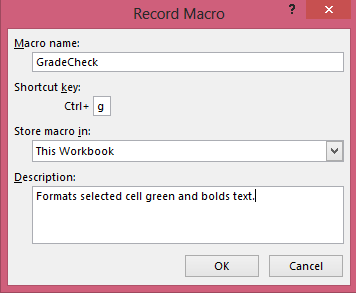
Excel 3

Macros and VBA

Introduction

Welcome to Excel 3: Macros & VBA! This course will build upon the skills you have learned in your previous experiences with Excel. After Excel 3, you will have learned the building blocks necessary to create macros which automate lengthy and tedious tasks in Excel.

Excel 3 is the most advanced Excel course offered by STS. It is extensively focused on the Office VBA programming environment, which provides the user with control over Office files and other processes that use VBA.

Required Skills

You should have a basic knowledge of the Windows environment and have firm understanding of all the basics of Excel. This understanding can be achieved through the completion of at least a few of the previous STS Excel courses or equivalent personal experience.

Macros

Anyone who has used a computer program regularly has most likely learned keyboard shortcuts for their favorite commands. These help us save time on fairly basic operations such as copy (Control+C), paste (Control+V), and save (Control+S). Excel (and most other Microsoft Office products) lets us create our own shortcuts if we wish. These custom shortcuts are called “Macros”. A macro is a recorded set of steps that allows users to automate lengthy, menial, or common tasks. They can even be assigned to a keyboard shortcut.

Exercise: Using a Macro

In this exercise, we will see how macros can save us time and improve consistency once they have been created.

Security Warning
  1. Open Macro-VBA Examples.xlsm from the class files folder.

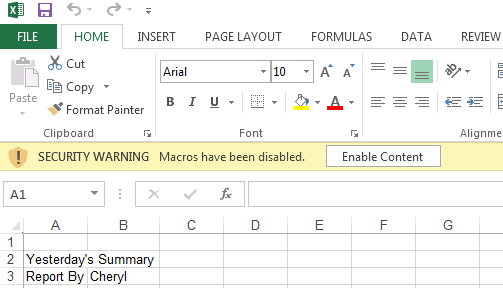
  2. A Security Warning will appear saying that macros have been disabled. Click "Enable Content" to make sure that our macros work.

    The purpose of this warning is to let you know that there is a macro coded within this file. Macros are actually computer code that runs in the background of Excel and, if used incorrectly, could cause problems. This warning is to make sure you expected there to be a macro in this file. If you expected a macro in this file, go ahead and click enable content. If you received this file from someone else and did not expect a macro to be in the file, you may not want to enable the content yet and instead check with the person you got the file from to figure out if the macro is necessary and safe to run.

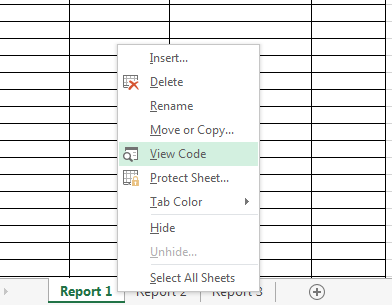
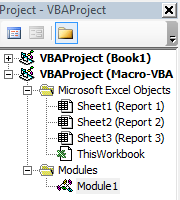
  3. Examine the three Worksheets in this Workbook by clicking on the three tabs on the bottom left side of the screen.

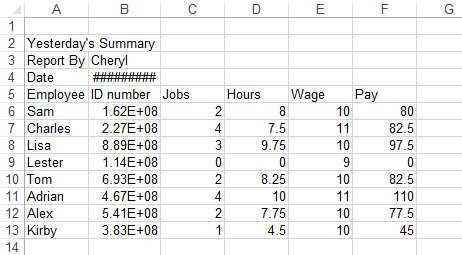
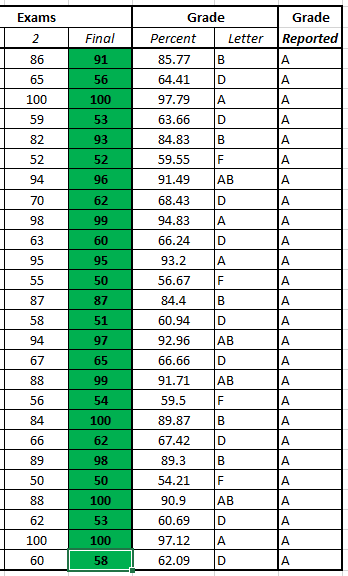
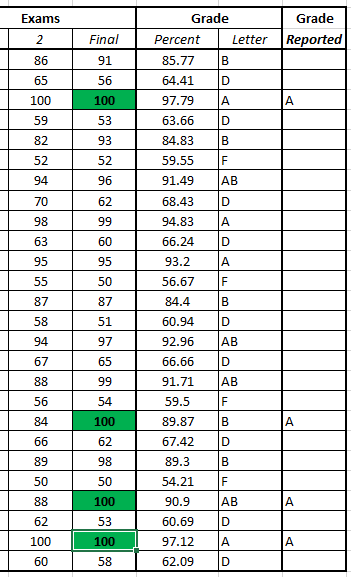
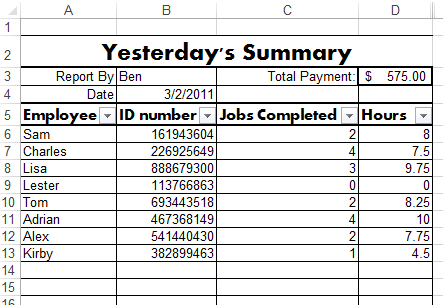
    In this example, you receive reports daily at your job with a summary of yesterday’s employee hours. They come in a poorly formatted sheet as the person who sends them doesn’t know Excel very well. It is your job to format these reports so they are presentable financial documents and to determine the total labor costs for that day.

  4. Report 1 worksheet
  5. Switch back to the Report 1 worksheet and spend some time using your Excel knowledge to format the report and calculate the total wages paid for the day.

    Doing this task once doesn't seem like a big deal, but having to do it every day would become very tedious in short time. This is where our macro comes in! This workbook has a macro written and saved that automatically formats the report and makes a few calculations. It has been set to the keyboard shortcut Ctrl+Y.

  6. Press Ctrl+Y to run the macro. The macro will run and the sheet will be updated with better formatting and calculation methods!

    Macro run
  7. Run this same macro on the second and third worksheet as well. We've made a tedious, painstaking task extremely simple with macros!

VBA and the Visual Basic Editor

The Microsoft Office Suite is written using a computer language known as Visual Basic. In most Office programs, there is a built-in program called the Visual Basic Editor which allows you to code your own customizations to Office applications using the Visual Basic for Applications (VBA) programming language.

The vast majority of Excel users do not use macros, so some of the options concerning macros and VBA are hidden by default. Let's open up our advanced macro options!

Exercise: Enabling the Developer Tab

  1. Click on the File Tab, then click on Options at the bottom of the File menu. The Excel Options dialog box will appear.

  2. Select the Customize Ribbon button from the menu on the left.

  3. Check the box for the Developer Tab in the box on the right side under Main Tabs.

  4. Check option for developer
  5. Click on OK to save your changes. A Developer tab will appear on the Ribbon!

Now that we have all the tools we need, let's look at the VBA code for this workbook. We should expect to find code for the macro that we just used to format the three work summaries.

Exercise: Viewing a Macro in the Visual Basic Editor

  1. There are a few different ways to open the VBA Editor.

    1. Right-click on the name of one of the worksheets and click View Code.

    2. View code by right clicking
    3. Alternatively, open the Developer tab and click on the Visual Basic button.

    4. View code in developer tab
  2. The Visual Basic Editor will open in a separate window.

    Visual Basic Editor

    The editor has five main parts: the Project Explorer, the Property Window, the Toolbar, the Menu Bar, the Workspace.

    Project Explorer All macros and code created for use in Excel must be associated with a project. This area provides a navigational interface to open code for different Excel objects(worksheets or workbooks), forms, and modules. To open a coding window, double-click on the object in the Project Explorer.
    Project explorer
    Property Window All objects in the Project Explorer have certain properties associated with it which can be viewed and changed here. This is also used to view and change the properties associated with UserForm controls.
    Property Window
    Tool and Menu Bars The tool bar contains quick shortcuts to many commonly used functions and commands. The menu bar contains all the commands that can be performed in the VB editor. These will be examined as needed.
    Tools and Menu Bars
    Workspace The workspace is the large gray area in the center. This is where we can open code windows to view and edit our macros. The code windows can be minimized, maximized, and closed with the common three buttons in the upper right corner of the code windows.
  3. In the Project Explorer, click the plus sign next to the Modules folder of "VBAProject (Macro-VBA Examples.xlsm" if it is not already expanded.

  4. Double-click on Module 1 to open it in the Workspace.

  5. Module1 location
  6. Scroll through the code and try to figure out what's going on. Let's look at lines 8 to 21, which can be grouped into three parts:

    1. These two lines define a selected range and active cell.

      Range("A2:F2").Select
      Range("F2").Activate
    2. These lines apply changes in formatting to the selected range.

      With Selection
      .HorizontalAlignment = xlCenter
      .VerticalAlignment = xlBottom
      .WrapText = False
      .Orientation = 0
      .AddIndent = False
      .IndentLevel = 0
      .ShrinkToFit = False
      .ReadingOrder = xlContext
      .MergeCells = False
      End With
    3. This last line merges the selection into a single cell.

    4. Selection.Merge
    This is Visual Basic for Applications, and we will be learning how to write it today!

  7. After you are done, close out of the VBA Editor to return to the normal Excel interface.

  8. Close VBA Editor

Today's Project

For the remainder of this course, imagine that you are a teacher who has made the following promises to their students:

Let's start by recording a macro that changes the formatting of a cell: we will use this formatting to signify changes that we make to our spreadsheet.

Recording Macros

After seeing the hundreds of lines of code and seemingly complex syntax associated with the report macro example, you may be feeling overwhelmed and think you will never be able to make something that complicated. Don’t fret, it is easier than it seems thanks to the "Record Macro" function! This allows you to record clicks and changes that you make and translates it into VBA for you.

Exercise: Recording a Simple Macro

  1. Open Gradebook.xlsm from the class files.

  2. In this gradebook, locate and select the first cell in the Final Exam row with a value of 100%. This will be cell L6.

  3. Find cell L6
  4. In the Developer tab, click on the Record Macro button.

  5. Record Macro button
  6. In the Record Macro box that appears, enter the following information:

    1. Enter "GradeCheck" in the "Macro name:" box. Descriptive macro names keep our macros organized.

    2. Set the shortcut key to Ctrl + g. For this step, you just have to make sure you're not overriding a commonly used shortcut such as Ctrl + c (copy).

    3. Make sure "This Workbook" is selected for the "Store macro in:" box.

    4. A description tells a workbook user what the macro will do. Set the Description to something like "Formats the selected cell green and bolds text."

    Record Marco window
  7. Click OK and DO NOT click anything else! Excel has now begun recording everything we do within the program, so keeping our actions to a minimum will keep our macro free of clutter. Note that if you mess up while recording a macro you can always stop and try again!

    You can see Excel is recording by looking in the bottom left corner of the Excel window. There is a square that represents a "stop" button (like on a remote control). By hovering over this, the following text will appear: "A macro is currently recording. Click to stop recording." We will click this once we have done everything we want to have our macro do. (The image below shows the difference between what this section of the Excel interface looks like recording versus not recording.)

  8. During and After recording
  9. Complete the following three tasks with as few clicks as possible:

    1. Go to the Home tab.

    2. Bold and Paint bucket tool
    3. Click the Bold button on the Font palette.

    4. Click the Paint Bucket drop-down arrow on the Font palette and select green from the Standard Colors section.

  10. Our macro is finished! Click the Stop button in the lower left corner next to "READY."

  11. Congratulations, you have just made a macro! Let's test it out.

  12. Click on another cell in the L column and try changing its formatting with Ctrl + G.

  13. The macro worked and made the selected cells green and bold! This was a simple example that demonstrates the power of being able to record macros. You don’t have to know anything about VBA to make simple macros. Simply use the Record Macro function.

    Let’s reset our worksheet for the next exercise where we will continue this example. A macro has already been recorded in this class file to erase any formatting and grade updates. It has been assigned to Ctrl+R.

  14. Press Ctrl+R to run the Reset Formatting macro that we have made for you.

VBA: The Basics

Programming Concepts

As Excel VBA is a programming language (more specifically an object-based, scripting language), it is useful to review some basic programming concepts for those who are new to programming. We will start off by talking about what exactly programming is. Then we will discuss some basic programming concepts and terminology used in (object-based) programming.

What Is Programming?

A program is an organized, written solution to a problem or task that typically employs some kind of symbolic notation. Programming is thus the art (and sometimes science) of writing out programs. In computer applications, programming typically involves writing out some sequence of computer readable instructions. In this way, learning how to programming is a lot like learning a new language to speak to a friend who only speaks a language different from you. Some examples of programs that we come across in everyday life are:

Basic Programming Concepts

Since the development of computers, hundreds of programming languages have been developed to do a variety of tasks. Fortunate for us, though, almost all programming language share a basic logical structure of concepts and terms. The main concepts employed in programming languages are:

Concept Description Example
Conditional Logic Code will run only if a certain condition is met. Give a student an A only if they receive 100% on the final.
Looping Code will run repeatedly until it is stopped. Keep processing grades for each student until there are no students left.
Functions A prewritten rule or process that can be used at any time. Run the premade grading function for every student.
Variables A "box" to store information that a computer will remember and recognize. Store each student's grade as a variable so it can be accessed again later.
Objects Can store information like variables, but can also make actions (called methods) and have characteristics (called properties). Arrays, cells, and worksheets are all different Excel objects.

Now that you have an introduction to programming, let's start working with VBA!

Exercise: Cleaning Up Recorded Code

Since code automatically written by Excel can be a little bit inefficient and cluttered, our first task will be to streamline the macro that we have just recorded.

  1. Open the VBA Editor by clicking on the Visual Basic button in the Developer tab.

  2. In the Project Explorer under Modules, double-click Module1.

  3. The code for our recorded macro will appear. Yours may be slightly different depending on the order and number of your clicks, but that is OK for now.

    
    Sub GradeCheck()
    ‘
    ‘ GradeCheck Macro
    ‘ Formats selected cell green and bolds text.
    ‘
    ‘ Keyboard Shortcut: Ctrl+g
    ‘
    Selection.Font.Bold = True
    With Selection.Interior
    .Pattern = x1Solid
    .PatternColorIndex = x1Automatic
    .Color = 5287936
    .TintAndShade = 0
    .PatternTintAndShade = 0
    End With
    End Sub
    

    The first line Sub GradeCheck() initializes the macro and the last line End Sub ends the macro. All the relevant code of the macro comes between these two lines are indented for organization. This is an example how many lines in VBA come in pairs and act as containers to hold other code. Both lines are necessary for any macro and are rarely changed.

  4. Examine the code in the macro.

  5. The statement that changes the font to bold is Selection.Font.Bold = True. In this case, the Selection object has a Font object stored within it, and we are setting that Font's "Bold" property to True.

    With: Our First VBA Statement

    The VBA code that changes the cell to green is within a With statement. With statements are space-saving devices that allow multiple changes to be made to a single object. All of the code inside a With statement (in between the With and End With keywords) is run with regard to the With object (in this case, Selection.Interior).

    Thus, the statement that changes the cell color to green starts with:
    With Selection.Interior
    and continues with:
    .Color=5287936
    and ends with:
    End With

    However, Excel has added some unnecessary lines of code that are doing nothing but adding clutter; let's clean our macro a bit!

  6. Delete the lines referencing the .Pattern, .PatternColorIndex, .TintAndShade, and .PatternTintAndShade properties of Selection.Interior. Excel has automatically added these lines even though we did not change these properties! Your code should now look like this:

  7. Sub GradeCheck()
    ‘
    ‘ GradeCheck Macro
    ‘ Formats selected cell green and bolds text.
    ‘
    ‘ Keyboard Shortcut: Ctrl+g
    ‘
    Selection.Font.Bold = True
    With Selection.Interior
        .Color = 5287936
    End With
    End Sub

    Since we've made changes to our code, we should make sure it still works.

  8. Go back to the regular Excel environment and try Ctrl+G on one of the 100% final scores. If nothing happens, make sure your macro code is the same as the code above!

  9. Use Ctrl + R to clear the worksheet's formatting.

  10. Let's make one more change to our code that will make better use of our With statement!

  11. Create a With statement that makes two changes to the Selection object: first, .Font.Bold=True, and second, .Interior.Color=5287936. Note that we can only do this becouse both Font and Interior are child objects of Selection.

  12. Your code should now look like this:

    Sub GradeCheck()
    ‘
    ‘ GradeCheck Macro
    ‘ Formats selected cell green and bolds text.
    ‘
    ‘ Keyboard Shortcut: Ctrl+g
    ‘
    With Selection
        .Interior.Color = 5287936
        .Font.Bold = True
    End With
    End Sub
  13. Go back to the regular Excel environment to test this edited macro!

VBA: Variables, Objects, and While

If we want our macro to do the formatting for us, we will need it to select cells on its own. To begin, we will make our macro apply a green/bold formatting to every student regardless of their grade, and we will put an A in the Reported Grade column for every student as well. Later, we will add conditional logic to make our macro only apply these changes for those that got a 100% on the final exam.

  1. Switch back to the code module for Module1.

  2. Add the following lines to the macro code (shown in blue):

  3. Sub GradeCheck()
    ‘
    ‘ GradeCheck Macro
    ‘ Formats selected cell green and bolds text.
    ‘
    ‘ Keyboard Shortcut: Ctrl+g
    ‘
    Dim RowNum As Integer
    RowNum = 4
    With Selection
        .Interior.Color = 5287936
        .Font.Bold = True
    End With
    End Sub

    You have just created a Variable! Variables in VBA are called Dimensions (abbreviated "Dim"). We will use and edit this variable throughout our code by referring to its name, "RowNum", in place of a number. For now, the value of RowNum is 4.

    Let's use this RowNum variable to add two Object references to our code! First, we will change the value of cell O4 to "A". Next, we will use the Select method to temporarily define cell L4 as the Selection object that our With statement formats.

  4. Remembering that RowNum = 4, add the two blue lines below to your macro.

  5. Sub GradeCheck()
    ‘
    ‘ GradeCheck Macro
    ‘ Formats selected cell green and bolds text.
    ‘
    ‘ Keyboard Shortcut: Ctrl+g
    ‘
    Dim RowNum As Integer
    RowNum = 4
    Cells(RowNum, "O") = "A"
    Cells(RowNum, "L").Select
    With Selection
        .Interior.Color = 5287936
        .Font.Bold = True
    End With
    End Sub

    The reason we are using 4 for the RowNum value is because there is no Gradebook data in rows 1, 2, or 3. Row 4 is the first row of our data.

    Instead of only changing row 4, though, we want to run our code for every row in our gradebook! This is why we have stored the value of 4 in a variable: once we are done formatting row 4, we can add one to the value of RowNum and rerun the entire codeblock for row 5, then row 6, and so on. This is called incrementing and we will need a Loop to make it effective.

    We will use the While statement for our loop. A While statement runs code over and over again as long as a certain condition is true.

  6. Add three new lines to your macro to build this loop and set up an incrementing process!

  7. Sub GradeCheck()
    ‘
    ‘ GradeCheck Macro
    ‘ Formats selected cell green and bolds text.
    ‘
    ‘ Keyboard Shortcut: Ctrl+g
    ‘
    Dim RowNum As Integer
    RowNum = 4
    While (Cells(RowNum, "B") <> "")
    
        Cells(RowNum, "O") = "A"
        Cells(RowNum, "L").Select
        With Selection
            .Interior.Color = 5287936
            .Font.Bold = True
        End With
        RowNum = RowNum + 1
    Wend
    End Sub

    Pay attention to what code is being repeated. We want the changes to our Cells objects to run for every row in our Gradebook, and we want the incrementing line to move RowNum to the next row every time the loop runs. However, we do not want RowNum = 4 to run every time because we would never leave the first row of our Gradebook.

    Also take note of the While condition:

    While ( Cells(RowNum, "B") <> "" )

    This expression is essentially stating that the macro should repeat the following code as long as it is not empty, or:

    as long as the cell in the current row's B column is not equal to nothing.

    In plainer terms, the macro will stop once it reaches an empty row. We can therefore run this macro on any amount of grade data and it will automatically stop whenever it has finished the whole set!

    The macro isn't finished yet, but we can test it out to see if it works! Because we do not have any criteria that determine when cells are changed, the macro will just change every final score in the O column to "A" and make every exam score in the L column green.

  8. Navigate back to the Excel document and run the query with Ctrl+G. Make sure the document responds as you expect it to!

  9. Formatted spreadsheet
  10. Use the reformatting macro (Ctrl+R) to undo these changes.

VBA: If

As seen with the While statement, true-or-false questions (boolean variables) can be powerful tools in programming. The If statement allows us to run a section of code a single time only if a boolean expression is true. If the expression is false, the program will skip the section of code and continue after the End If line. We will use the If statement to check if the student got a 100% on the final and only apply the formatting and grade change if this is true.

  1. Switch back to the code window for Module1.

  2. Add the two lines in blue:

  3. Sub GradeCheck()
    ‘
    ‘ GradeCheck Macro
    ‘ Formats selected cell green and bolds text.
    ‘
    ‘ Keyboard Shortcut: Ctrl+g
    ‘
    Dim RowNum As Integer
    RowNum = 4
    While (Cells(RowNum, "B") <> "")
        If (Cells(RowNum, "L") = 100)   Then
            Cells(RowNum, "O") = "A"
            Cells(RowNum, "L").Select
            With Selection
                .Interior.Color = 5287936
                .Font.Bold = True
            End With
        End If
        RowNum = RowNum + 1
    Wend
    End Sub
  4. The If statement has three parts: the Boolean expression, the code that will run, and the End If. The Boolean expression evaluates as explained previously. Here it checks to see if the Cell in column L, the final grade, is equal to 100. Then, if that expression evaluates to true, the code between the If and End If will run. In this case, the code that runs gives the student an “A” and formats their final exam grade.

  5. Examine the code you entered to make sure it makes sense. Go over the explanations if you are not sure of what is going on.

  6. Switch back to Excel and test the macro by pressing Ctrl+G.

  7. Tested output

    The program runs and highlights only the final exam grades that equal 100% and puts an "A" in the grade reported column. We have now completed the first portion of our macro to check our first grade criteria (if they get a 100% on the final, they get an "A"). To accomplish this, first, we recorded an macro to get the code necessary for formatting. Next, we added a While statement that looped through every student. And finally, we added the logic to check if the student got a 100% by using the If statement. These few basic steps combined to make a macro that could make it much easier to check final exam grades if there are hundreds of students in a class.

  8. Clean the spreadsheet with Ctrl+R.

VBA: For

Now we need to find out if the other students deserve to get their final grade bumped up one letter. For this part, we will look at each of the students' homework grades to check and see if they got higher than a 95% on a homework assignment.

  1. Switch back to the Code window.

  2. Type the following lines of code into the macro to create the For loop and necessary variables:

    Option Explicit
    Sub GradeCheck()
    ‘
    ‘ GradeCheck Macro
    ‘ Formats selected cell green and bolds text.
    ‘
    ‘ Keyboard Shortcut: Ctrl+g
    ‘
    Dim RowNum As Integer
    Dim ColNum As Integer
    Dim GreaterThan95 As Boolean
    RowNum = 4
    While (Cells(RowNum, "B") <> "")
        If (Cells(RowNum, "L") = 100) Then
            Cells(RowNum, "O") = "A"
            Cells(RowNum, "L").Select
            With Selection
                .Interior.Color = 5287936
                .Font.Bold = True
            End With
        End If
        GreaterThan95 = False
        For ColNum = 4 To 9
            If (Cells(RowNum, ColNum) > 95) Then
                GreaterThan95 = True
                Exit For
            End If
        Next ColNum
        RowNum = RowNum + 1
    Wend
    End Sub

    Two variables are declared to be used in this section. The ColNum variable is needed to keep track of which homework assignment the For loop is looking at and thus is an integer data type. It will be explained more in a moment. The GreaterThan95 variable is a boolean type which means it can have a value of True or False This value starts each search as False and is switched to True if we find that a student has a homework grade higher than 95%. Let's take a closer look at our For loop:

    The For statement has three parts:

    • the counter expression
    • the code that will run
    • the Next statement

    For ColNum = 4 To 9
          If (Cells(RowNum, ColNum) > 95) Then
            GreaterThan95 = True
            Exit For
          End If
        Next ColNum

    • The first portion is the counter expression which determines how many times the loop will run. It contains the controlling variable, which is ColNum for our example. Here the loop is specified to run five times, from four to eight (4,5,6,7,8). This makes sense because there are five homework assignments.
    • The code that will run fills in the next section and will run the number of times specified by the counter expression. This code contains an If statement to check and see if the homework assignment specified is greater than 95%. If this is True, it will change the GreaterThan95 variable to True and force an early exit from the For loop.
    • The final part is the Next statement. This is the closing line of the For statement and increments the loops controlling variable for the next iteration.
  3. Examine the code you entered to make sure it makes sense.

  4. Switch back to Excel and Test the macro by pressing Control+G.

  5. The program should run exactly the same way as last time: this is okay, because we haven't entered any code that will directly change the gradebook. All that we've done is create a way for Excel to find out which students do or do not deserve the grade increase for having received good grades on their homework. This difference is denoted as a true or false value for the GreaterThan95 boolean variable in each row. The students who got a 95 or higher have a True value for this variable, and the rest of the students have a False value for the variable.

VBA: If/Else

Now we will use the information obtained from the For loop. We will format the student’s reported grade (column O) orange if they have earned a grade adjustment. If they did not earn an adjustment, we will assign the same calculated grade (column N) to their final grade reported (column O). We can put both of these conditions in one statement rather than creating a separate If statement for both.

  1. Switch back to the code window for Module1

  2. Type the following lines of code into the macro to create the If-Else statement:

  3. Option Explicit
    Sub GradeCheck()
    ‘
    ‘ GradeCheck Macro
    ‘ Formats selected cell green and bolds text.
    ‘
    ‘ Keyboard Shortcut: Ctrl+g
    ‘
    Dim RowNum As Integer
    Dim ColNum As Integer
    Dim GreaterThan95 As Boolean
    RowNum = 4
    While (Cells(RowNum, "B") <> "")
        If Cells(RowNum, "L") = 100) Then
            Cells(RowNum, "O") = "A"
            Cells(RowNum, "L").Select
            With Selection
                .Interior.Color = 5287936
                .Font.Bold = True
            End With
        End If
        GreaterThan95 = False
        For ColNum = 4 To 9
            If (Cells(RowNum, ColNum) > 95) Then
                GreaterThan95 = True
                Exit For
            End If
        Next ColNum
        If (GreaterThan95) Then
            Cells(RowNum, "O").Select
            With Selection
                .Interior.Color = 49407 ‘ Orange
                .Font.Bold = True
            End With
        Else
            Cells(RowNum, "O") = Cells(RowNum, "N")
        End If
        RowNum = RowNum + 1
    Wend
    End Sub

    The If-Else statement is very similar to the If statement we used earlier. The first part is identical to the If statement. It checks to see if a Boolean expression is true, and, it true, runs the first block of code. If the Boolean expression evaluates to false, it runs the block of code after the Else portion. The structure is completed with the End If line.

    In this example, we check to see if GreaterThan95 is True, which means they have had a homework grade higher than 95% and have earned a grade adjustment. If this is True we select their reported final grade and format it orange. If it is False, we set their final reported grade to be the same as their calculated grade. The If-Else statement is then ended with the End If line of code.

  4. Test the macro in the regular Excel environment. The first function of our macro (formatting cells green and placing "A" values in the final grade column) should be unchanged. We should also see that if a student got a 95% homework grade, their final score is formatted orange; and if a student did not get a 95% homework grade, their reported grade is the same as their value in the M column.

  5. Macro test for grade
  6. Use Ctrl+R to clean the worksheet and return to the Code View.

VBA: Select-Case

We have one more thing to do before the objectives for our macro will have been completed: for each student who has a 95% on one of their homework grades, we will increase their final letter grade by one. However, VBA isn't able to understand the letter grade system that we use (A, AB, B, etc.). Thus, we will use a more complicated programming structure called the Select-Case statement. This will allow us to assign different values to a variable according to many discrete conditions.

  1. In the code window, type the following lines of code into the macro to create the Select-Case statement:

  2. Option Explicit
    Sub GradeCheck()
    ‘
    ‘ GradeCheck Macro
    ‘ Formats selected cell green and bolds text.
    ‘
    ‘ Keyboard Shortcut: Ctrl+g
    ‘
    Dim RowNum As Integer
    Dim ColNum As Integer
    Dim GreaterThan95 As Boolean
    RowNum = 4
    While (Cells(RowNum, "B") <> "")
        If Cells(RowNum, "L") = 100) Then
            Cells(RowNum, "O") = "A"
            Cells(RowNum, "L").Select
            With Selection
                .Interior.Color = 5287936
                .Font.Bold = True
            End With
        End If
        GreaterThan95 = False
        For ColNum = 4 To 9
            If (Cells(RowNum, ColNum) > 95) Then
                GreaterThan95 = True
                Exit For
            End If
        Next ColNum
        If (GreaterThan95) Then
            Select Case (Cells(RowNum, "N").Value)
                Case "F"
                    Cells(RowNum, "O") = "D"
                Case "D"
                    Cells(RowNum, "O") = "C"
                Case "C"
                    Cells(RowNum, "O") = "BC"
                Case "BC"
                    Cells(RowNum, "O") = "B"
                Case "B"
                    Cells(RowNum, "O") = "AB"
                Case "AB"
                    Cells(RowNum, "O") = "A"
            End Select
            Cells(RowNum, "O").Select
            With Selection
                .Interior.Color = 49407 ‘ Orange
                .Font.Bold = True
            End With
        Else
            Cells(RowNum, "O") = Cells(RowNum, "N")
        End If
        RowNum = RowNum + 1
    Wend
    End Sub

    Here, the Select-Case statement allows us to respond differently depending on what a student’s current calculated grade is. The first line selects the specific student’s calculated grade. The statement then goes through each case until it findsa case where the letter equals the student’s calculated letter grade. It then runs the corresponding line of code for that case, which assigns a letter that we have defined as one level higher than the student’s calculated grade. The statement ends with the line End Select.

    This Select-Case statement can be used for as many discrete Case conditions as necessary. We have purposely left out a Case "A" statement as a student cannot receive a grade higher than “A.”

  3. Test the macro to see how it performs!

  4. Macro using select case

    If you look closely, you will notice there are some errors here. For example, if someone was already given an "A" because they got a 100% on the final exam, their grade still may have been highlighted for an increase adjustment. Also, if they didn’t earn the adjustment, their final grade of an "A" may have been overridden by their calculated grade as in the fourth row from the bottom (Row 26).

VBA: Debugging Our Macro

We’re almost there. We only need to add a bit more logic to the program to make it function perfectly. To do this, we will add an If-Else statement that will only run the homework check portion if a student has not already received an "A" in the course.

  1. Add the finishing lines in blue.

  2. Option Explicit
    Sub GradeCheck()
    ‘
    ‘ GradeCheck Macro
    ‘ Formats selected cell green and bolds text.
    ‘
    ‘ Keyboard Shortcut: Ctrl+g
    ‘
    Dim RowNum As Integer
    Dim ColNum As Integer
    Dim GreaterThan95 As Boolean
    RowNum = 4
    While (Cells(RowNum, "B") <> "")
        If Cells(RowNum, "L") = 100) Then
            Cells(RowNum, "O") = "A"
            Cells(RowNum, "L").Select
            With Selection
                .Interior.Color = 5287936
                .Font.Bold = True
            End With
        End If
        GreaterThan95 = False
        For ColNum = 4 To 9
            If (Cells(RowNum, ColNum) > 95) Then
                GreaterThan95 = True
                Exit For
            End If
        Next ColNum
        If (Cells(RowNum, "N") <> "A" And Cells(RowNum, "O") <> "A") Then
            If (GreaterThan95) Then
                Select Case (Cells(RowNum, "N").Value)
                    Case "F"
                        Cells(RowNum, "O") = "D"
                    Case "D"
                        Cells(RowNum, "O") = "C"
                    Case "C"
                        Cells(RowNum, "O") = "BC"
                    Case "BC"
                        Cells(RowNum, "O") = "B"
                    Case "B"
                        Cells(RowNum, "O") = "AB"
                    Case "AB"
                        Cells(RowNum, "O") = "A"
                End Select
                Cells(RowNum, "O").Select
                With Selection
                    .Interior.Color = 49407 ‘ Orange
                    .Font.Bold = True
                End With
            Else
                Cells(RowNum, "O") = Cells(RowNum, "N")
            End If
        Else
            Cells(RowNum, "O") = "A"
        End If
        RowNum = RowNum + 1
    Wend
    End Sub

    In the If statement, we first check to see if the student did not earn an "A" (remember that <> means "not equal to") in the class in their original calculated grade (column N). We also check to make sure they did not get a grade increase due to receiving a 100% on the final by looking at the grade reported (column O) to make sure the program did not already assign an "A" there. If both these statements are true, it means the student has not yet earned a grade of an "A" based on the criteria tested so far. This means they are eligible to be checked for a grade increase due to a homework grade of greater than a 95%. If the boolean expression in the If statement evaluates to False, this means the student has already earned an "A" in the course. The program then goes down to the Else statement and runs the code to give the student a final grade of "A."

  3. Run the macro.

Macro with if-else statement

The macro runs successfully! Go through each student’s grade and check to make sure the grade was found correctly. Here is a review of what the program does to help you check the solution:

Congratulations! With the use of some basic programming structures and knowledge of Excel’s "Record Macro" function, you were able to code a fairly complex program to check a gradebook. Now that this program is created, it could be used every time this class is offered to save the instructor time and avoid errors in grade calculations.