Illustrator 1: Creating Graphics with Illustrator




About Illustrator
Adobe Illustrator, part of the Adobe Creative Suite package, is an application used to create and edit vector graphics. This extremely popular application is considered an industry standard, and is used widely by graphic designers to create logos, illustrations, and artwork for signs, posters, packaging and many other printed products. Adobe Illustrator can also be used to create illustrative web graphics.
This manual provides a basic introduction to the Illustrator interface and explores commonly used features by guiding students through various exercises and applying those skills and tools in creating an e-card.
- During this class, students will:
- Become familiar with the interface, workspace, and basic workflow
- Create and edit basic shapes using common Illustrator tools
- Modify shapes using anchor points and paths
- Add and style text for simple layouts
The Illustrator Interface
Interface Overview
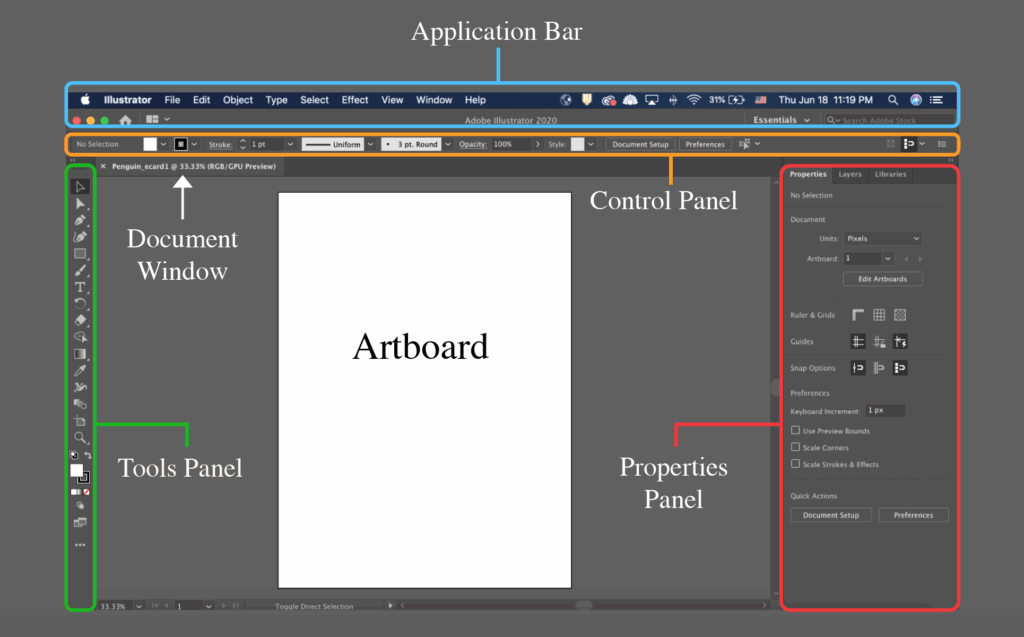
The portion of the Illustrator interface that is used to view and edit documents is known as the Workspace. A wide variety of windows, tools and menus (known as Panels) can be displayed within the Workspace in order to provide quick access to the features needed for a given task.
Creating a New Document
Open the Illustrator application.
Click Create New.
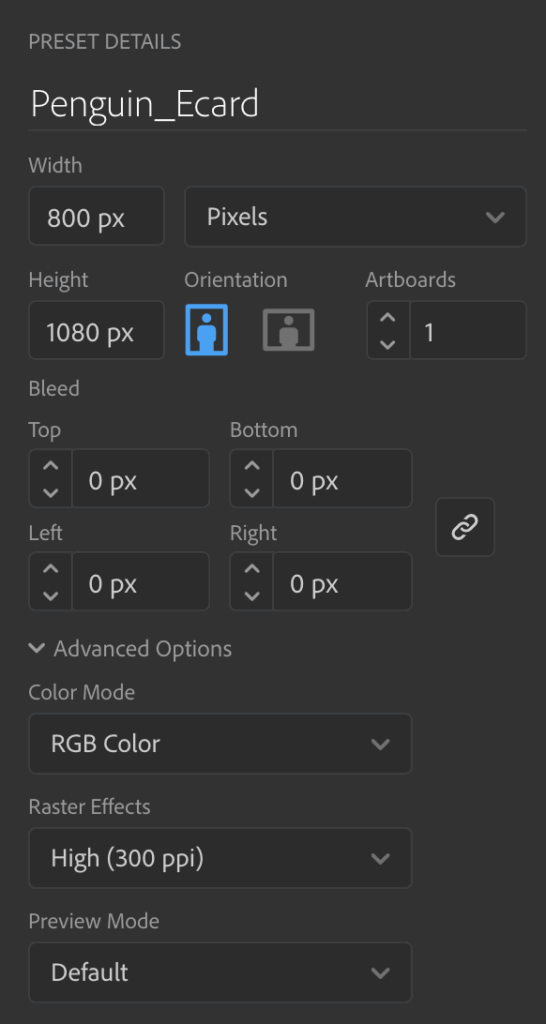
In the New Document window, adjust the settings to those shown below and click Create.
Interface Components
Application Bar
The Application Bar contains the Workspace Switcher menu and a shortcut to Adobe Bridge and Adobe Stock. The Application Bar also contains the File, Edit, View, and more.
The Workspace Switcher menu can be used to arrange multiple windows. Depending on your project, there are a variety of window layout options that will suit your needs. Use the drop-down menu to choose one of the many available window layout options. For the rest of this tutorial, we will be using the Essentials workspace.
Document Window
The Document Window displays the file that you are currently working on. If you have multiple files open, each file appears as a tab in the Document Window, as shown above. The white rectangle inside the Document Window, which displays the printable area of the Workspace, is called the Artboard.
Tools Panel
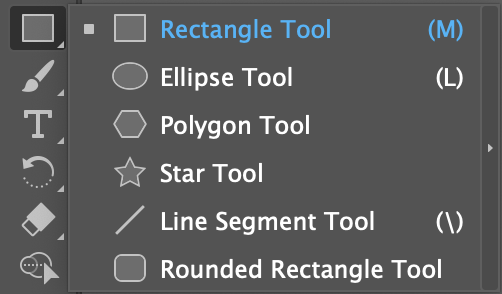
The Tools Panel contains tools used to create and manipulate artwork (like a toolbox). To select a tool, simply click it. Tools with a triangle in the lower-right corner have additional tools hidden beneath them. To display hidden tools, click and hold a tool icon; a drop-down menu showing the hidden tools will appear.
Control Panel
Recent versions of Illustrator default to the Essentials workspace, where the Control Panel is not visible. While the Control Panel can be helpful for accessing options related to the currently selected tool, it is not required to complete this workshop. The options shown in the Control Panel are just a small subset of those available in other panels and menus.
Properties Panel
The Properties Panel offers options to further monitor and modify your artwork, and some of these settings can also be found in the Control Panel. There are also two other panels: the Layers Panel and the Libraries Panel. We will delve more into the Layers Panel later in the workshop; however, you will not be using the Libraries Panel.
- Each panel is displayed on a separate tab. To bring a Panel to the front, click its tab.
Illustrator Practice Files
For the first half of the workshop, we will learn about the different tools available in Illustrator by working through different exercises.
We will start by going to Files > Open and then selecting Illustrator-Practice-2020
Layers Panel
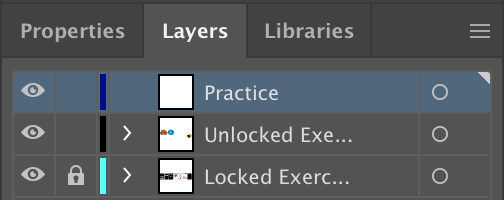
In many of the Adobe Create Suite applications, documents are often organized and separated into different components called layers. You can edit and modify objects in each layer without affecting items in other layers. The Illustrator practice file has multiple layers, and throughout this exercise, we want to work within the ‘Practice’ layer in order to utilize the tools.
Go to the Layers Panel and select the ‘Practice‘ layer.
Smart Guides
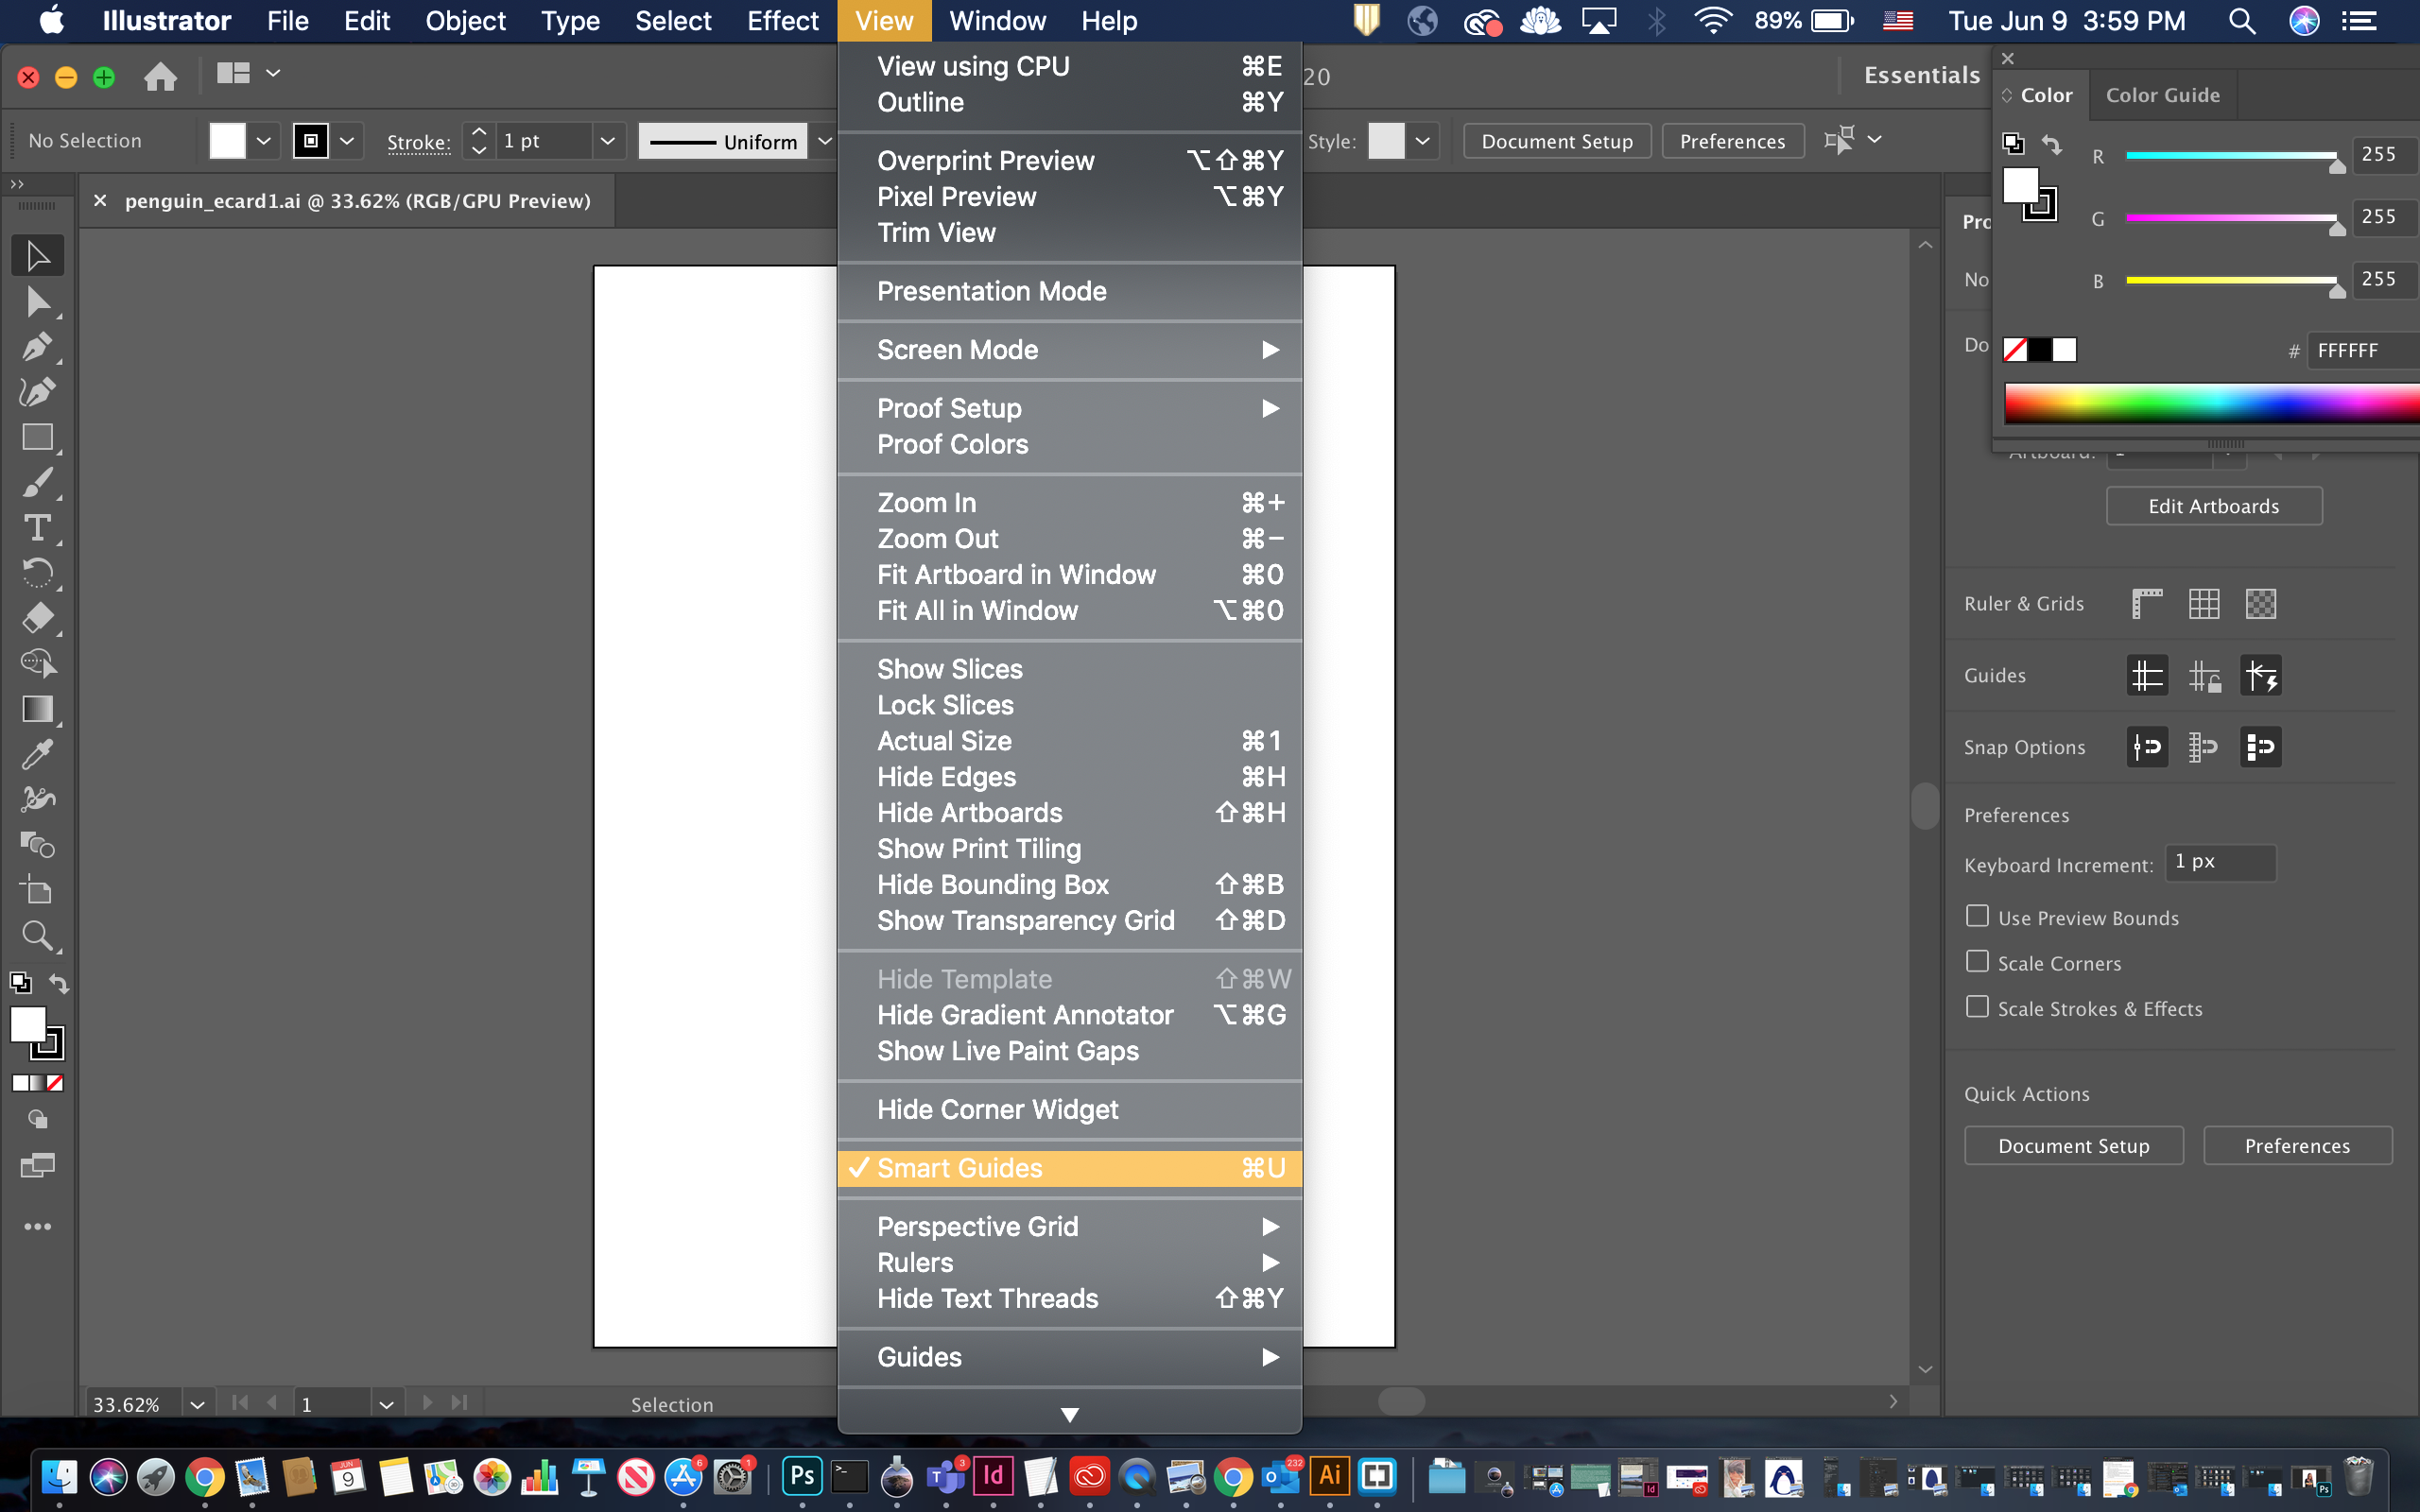
Before you begin, let’s turn on Smart Guides. Smart Guides allow you to align objects on your artboard easily, and it will greatly aid you on your projects.
To enable this feature, go to the Application Bar and select View > Smart Guides.
Navigating the Workspace
Working in Illustrator often involves moving around the workspace in order to focus on different portions of your project. In this section, we discuss a few methods of navigating the workspace.
Zoom Tool

Lets you zoom in or zoom out to increase or decrease the document display size.
Shortcut: Quickly zoom with any tool by holding Alt/Option and scrolling with the mouse/trackpad or by hitting Ctrl/Command and +/-
Hand Tool

Used to move around the Artboard when the document is zoomed in beyond the workspace.
Shortcut: Hold Spacebar while dragging with the mouse.
- Zoom in on Artboard so it extends beyond the Workspace
- In the Tools Panel, Click the Hand Tool.
- To pan around the Artboard, Click and Drag in the Document Window.
Fit Artboard in Window
Used to quickly fit the artboard within the current window.
In the Application Bar, go to View > Fit Artboard in Window
Shortcut: Ctrl/Command + 0
Creating and Altering Basic Shapes
In this section, we will create basic shapes with the Shape Tools and alter its form with the Selection Tool. We will also learn how to change the appearance of a shape by modifying its Fill Color, Stroke Color, and Stroke Weight.
Creating a Square
Rectangle Tool

Hold the Shift key to draw a perfect Square.
Use the Rectangle Tool to draw rectangles and squares.
Hold the Alt/Option key to draw the shape from the center out (rather than from one corner to the other)
Shortcut: M
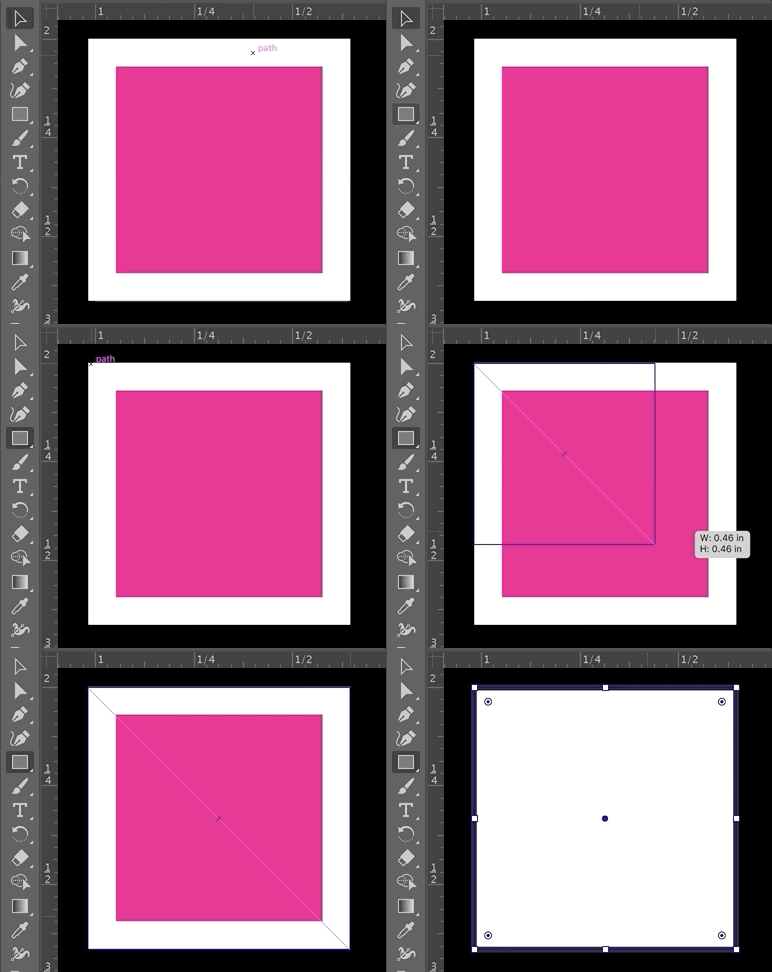
1. In the Tools Panel, Click the Rectangle Tool to select it.
2. Create a square by holding the Shift Key while dragging out.
Selection Tool

Use this tool to select, move, resize, rotate, etc. entire objects or groups of objects.
Select multiple objects by holding Shift and clicking each additional object, or by clicking and dragging a box around the objects you’d like to select.
Shortcut: V
- In the Tools Panel, Click the Selection Tool
- Click on any object in the Artboard, a box with control points appear to designate an onbject is selected.
- Hold down Shift and Click to select multiple objects
3. In order to create a copy, first select the square with the Selection Tool. Next, hold down the Alt/Option key while dragging out.
4. With the Selection Tool, move the copy over to the neighboring template. We want to resize the shape while maintaining the same proportions, so hold the Shift Key while dragging out a corners until it matches the template.
5. In the Tools Panel, double-click the white swatch in order to change the Fill, which is the color of the shape.

6. To change the color of the outline, go to the Tools Panel and click on Stroke. In a similar fashion, double-click the stroke swatch to change the stroke Color.


Creating a Circle
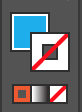
1. In this case, we do not want an outline for our circle. In the Tools Panel, click the stroke swatch then select the small white box with a red slash through it, which means none.
Ellipse Tool

Use the Ellipse tool to easily draw ellipse and circles.
Hold the Shift key to draw a perfect circle.
Hold the Alt/Option key to draw the shape from the center out (rather than from one corner to the other)
Shortcut: L
2. In the Tools Panel, hold down on the Rectangle Tool to display the hidden tools, and select the Ellipse Tool
3. In order to draw a circle, we would hold the Shift Key, but before we do that, we want to make a minor change. By default, we start by creating shapes from the corner, but we can also draw shapes from the center out by holding the Alt/Option key while dragging out. Combine both of these steps and hold the Shift Key and Alt/Option key while drawing a circle.
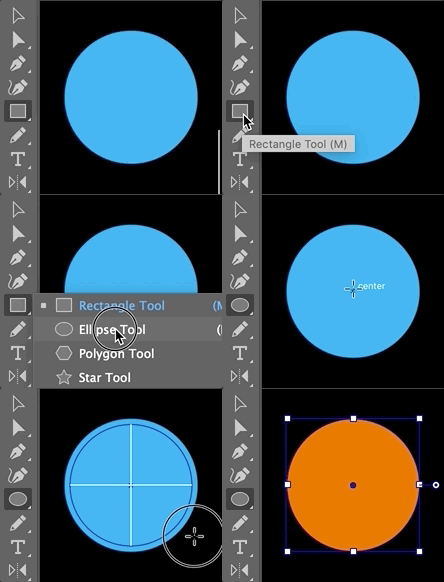
4. Make a copy then move the shape to the right. Hold Shift and resize the shape.
Creating a Triangle
1. In the Tools panel, select Fill and set it to none.

2. Change the Stroke to any color that you like.
3. Hold down on the Ellipse Tool and select the Polygon Tool from the hidden panel.
4. If you draw a shape with the Polygon Tool it is likely that it is not a triangle, but we can change the number of sides of the polygon. Drag out a shape (don’t let go of your click) and tap the down arrow key from your keyboard to change the number of sides until you get a triangle. Before you let go, hold down the Shift Key to align the base then let go of the click.

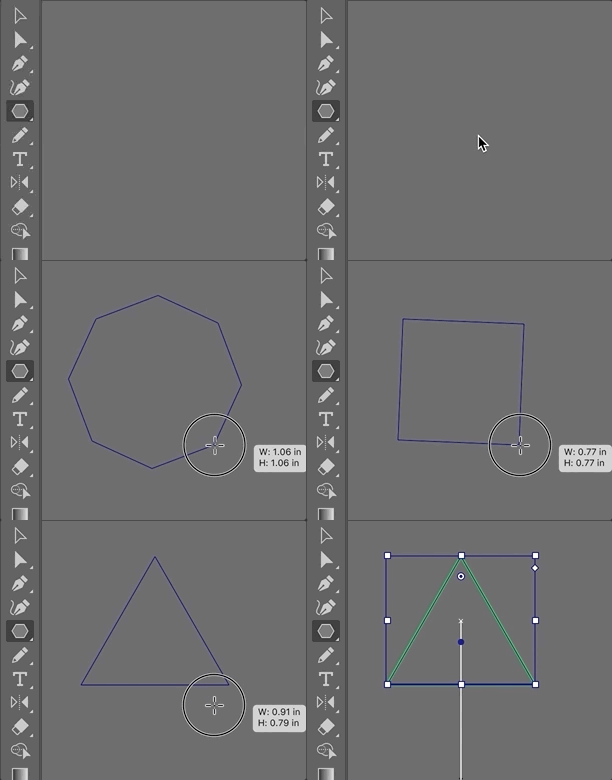
5. While moving the triangle, make sure to click directly on the stroke to move it because the shape does not have a Fill Color.
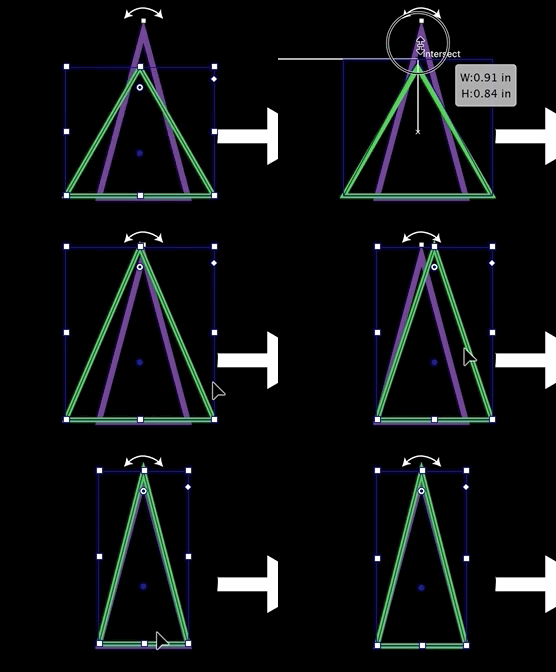
6. With the Selection Tool, stretch the top of the triangle upwards and move the sides inward, matching as closely as possible to the template. Make a copy.
7. The second triangle is rotated 90 degrees clockwise, and instead of trying to rotate the triangle to exactly 90 degrees, let’s set the rotation to 45 degree increments. Select the copy of the triangle with the Selection Tool and hover over the corner until the cursor becomes a double-sided arrow. Next, hold down the Shift Key and rotate the triangle 90 degrees.
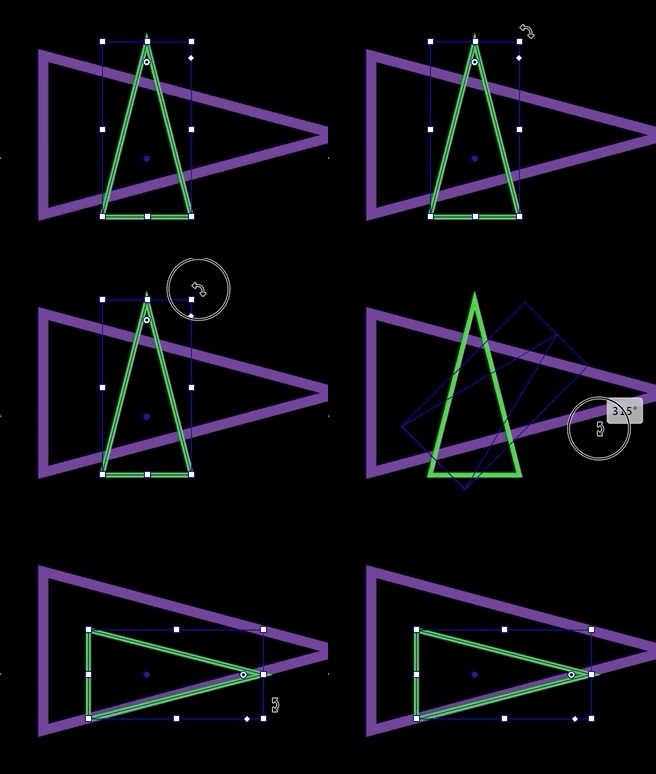
8. Resize the triangle and you are done!
Transforming Shapes with Anchor Points
In Illustrator, every shape is composed of points connected by paths; we can change a shape by manipulating individual points with the Direct Selection Tool. In this section, we will focus on utilizing the Direct Selection Tool to create unique shapes.
1. Make a copy of the rectangle.
2. Draw a rectangle and reposition if necessary.
Transforming a Rectangle
Draw a rectangle and reposition if necessary.
Direct Selection Tool

Use this tool to select individual anchor points within a shape.
Select individual anchor points or path segments by clicking on them, or select an entire path or group by selecting any other spot on the item.
Select multiple anchor points by holding Shift and clicking each additional point, or by dragging a box around all points you would like to select.
Shortcut: A
3. From the Tools Panel, choose the Direct Selection Tool. Click once on the top-right anchor point to select it and then click and drag the anchor point inwards.
Creating an Organic Shape
1. Draw a circle and reposition if necessary.
2. Make a copy and use the Direct Selection Tool to select the bottom anchor point. Click and drag the point downwards.
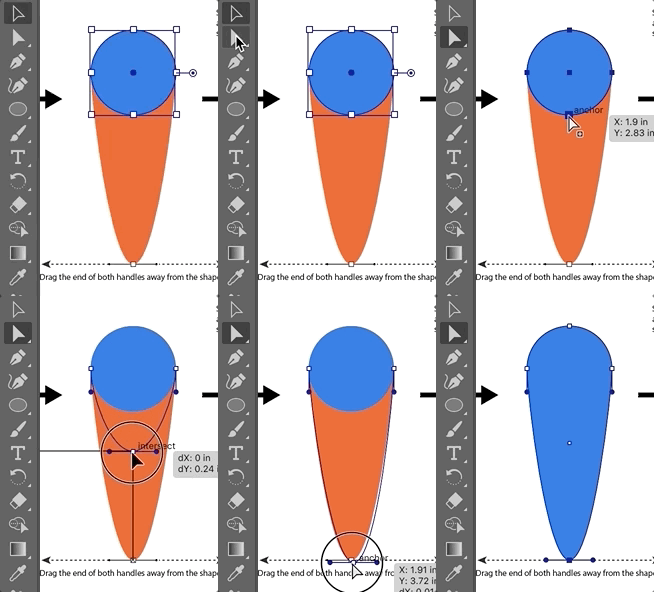
3. We can adjust the curvature of the shape with handles. Depending on the angle and length of the handles, it changes the direction and size of the curve. Select the bottom anchor point with the Direct Selection Tool then drag the handles away from the shape until curvature of the shape matches the template.
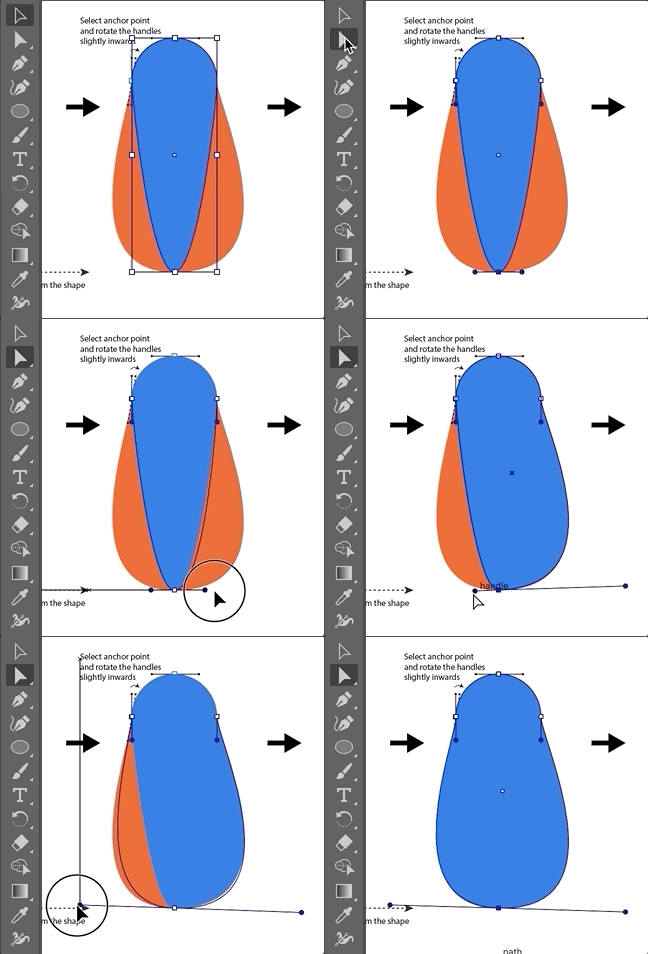
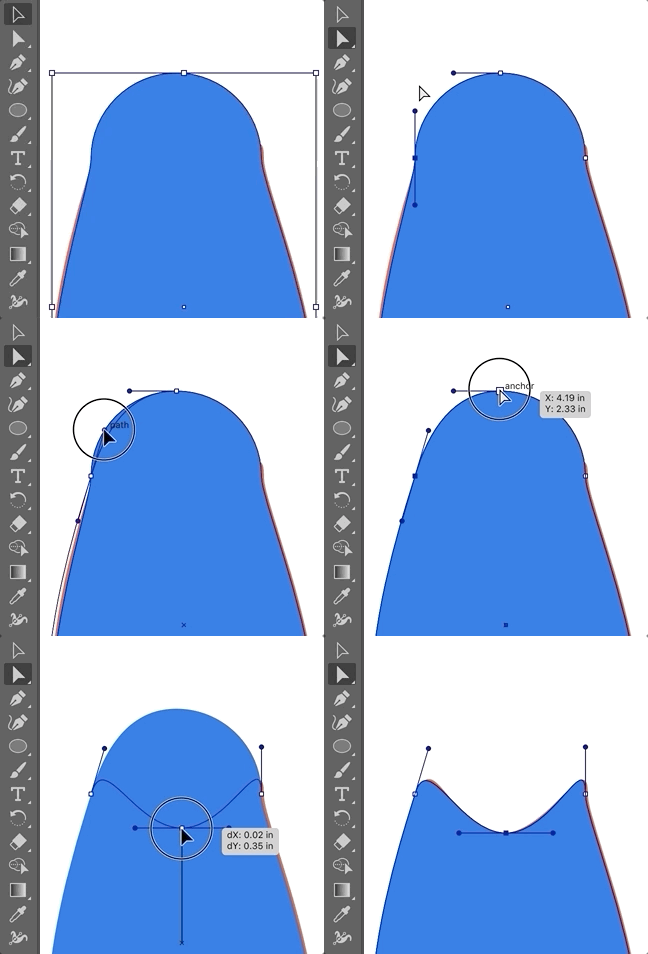
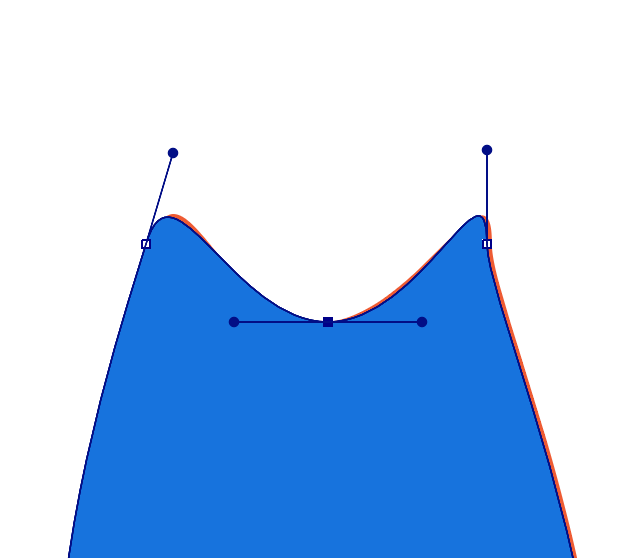
4. Make a copy then click on the left anchor point with the Direct Selection Tool. Rotate the handles slightly inwards by dragging the top handle to to the right. Afterwards, select the top anchor point and drag it downwards.
Creating a Rounded Square
1. Draw a square and choose a Fill Color
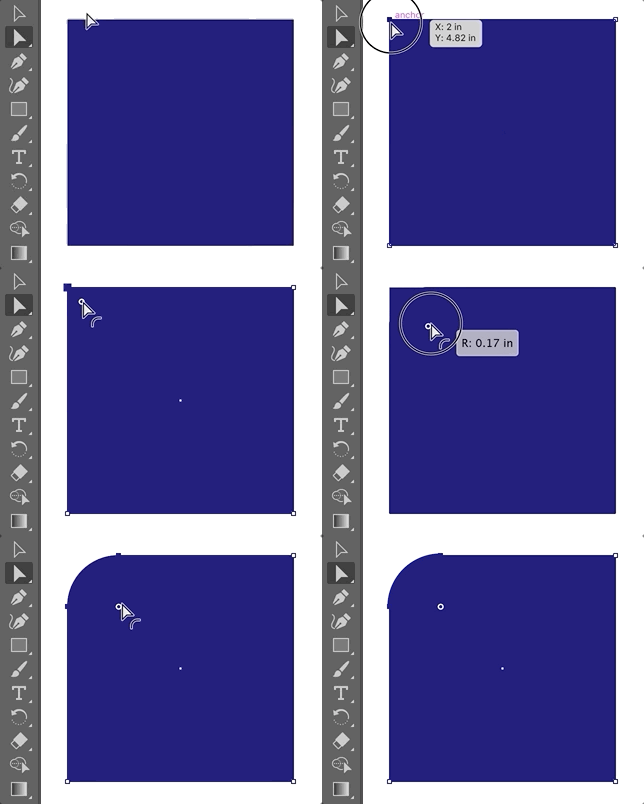
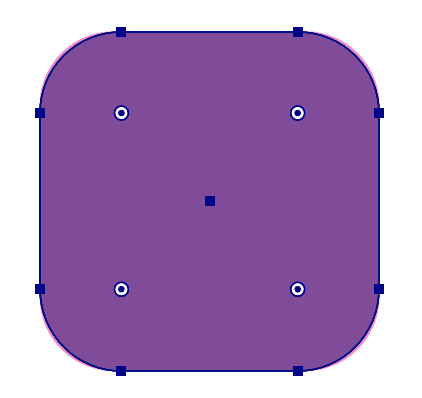
2. Inside the shape, there are four white circles near each corner, and these allow us to round the corners of the square. Click on a white circle and drag it inwards.
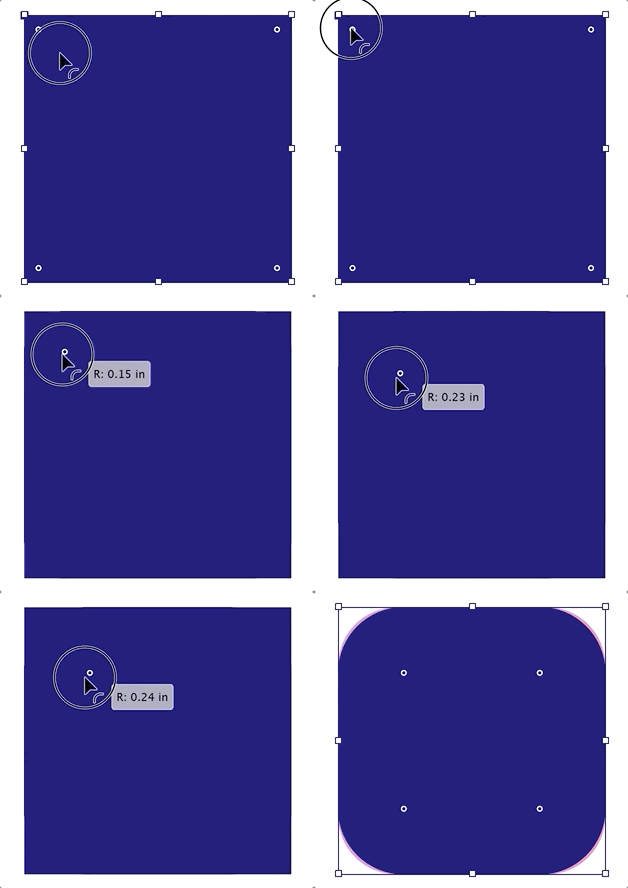
3. The previous step rounded all the corners at once, but we can also round out a specific corner. Click on the anchor point with the Direct Selection Tool to active it and drag the the white circle inwards.
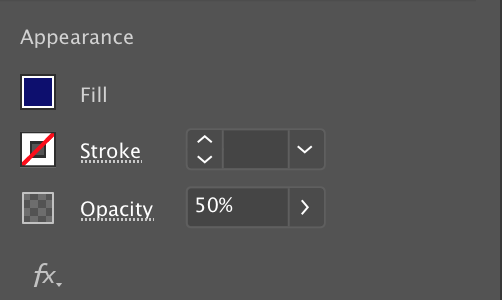
4. Let’s adjust the transparency of the shape by lowering its Opacity. Go to the Properties Panel and change the opacity to 50%.
Pen Tool
In Illustrator, the Pen Tool is used to draw custom shapes from scratch by laying out a series of curve and corner points connected by paths. We’ll complete a few practice exercises.
Exercise 1: Straight Lines
1. Before you start drawing, make sure that the Stroke Color is set to a color that you can see easily and that the Fill Color is set to none

2. In the Tools Panel, select the Pen Tool.
Pen Tool

The Pen tool is used to create anchor points and adjust the angles of the curves connecting them.
Click once to create an anchor point. A line appears from the last anchor point you’ve placed, connected to wherever your mouse cursor is on screen. Click again to create additional points.
Click and drag to set the angle for the control handle, which affect the angle of lines (also known as paths) that connect the anchor points.
Click the first point you created to close your shape and stop adding new points.
To stop creating new points without closing your shape, hit the Esc key or select another tool.
3. Click once in the center of point 1 to place your first anchor point. The Pen Tool creates paths between multiple points, so we won’t see a line appear until we place the next point.
4. Click once on point 2 to place another anchor point. This time, a line should appear between points 1 and 2.
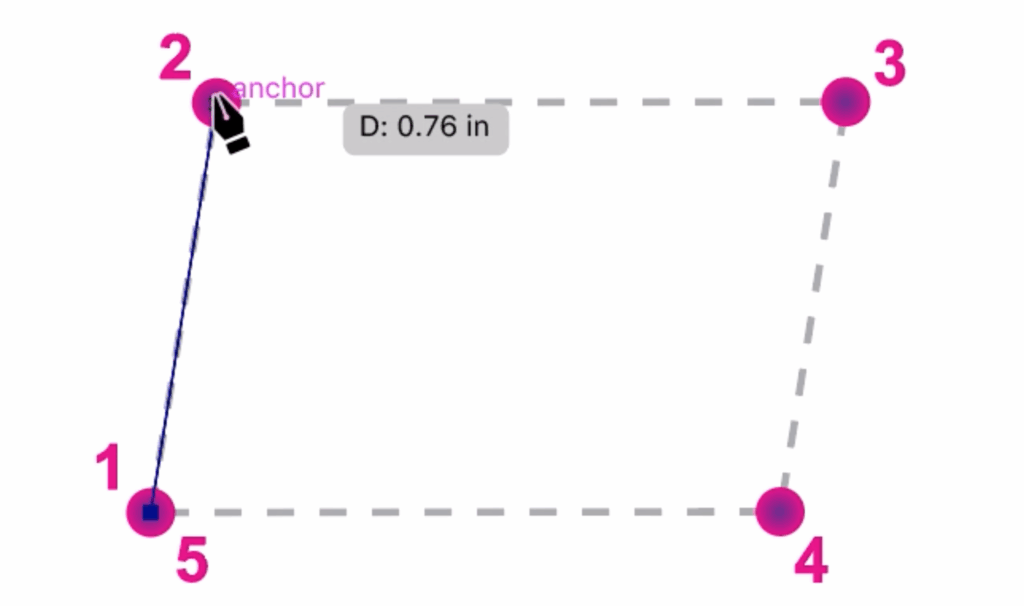
5. Click on points 3 and 4 to continue drawing the shape.
6. To close the shape, hover over point 5 until you see a small circle appear next to your cursor. This indicates that Illustrator will now close the path. Click on point 5 to close the path.
Modifying Shape
Use the Direct Selection tool to move individual points at any time.
Here is a clip of the whole process:
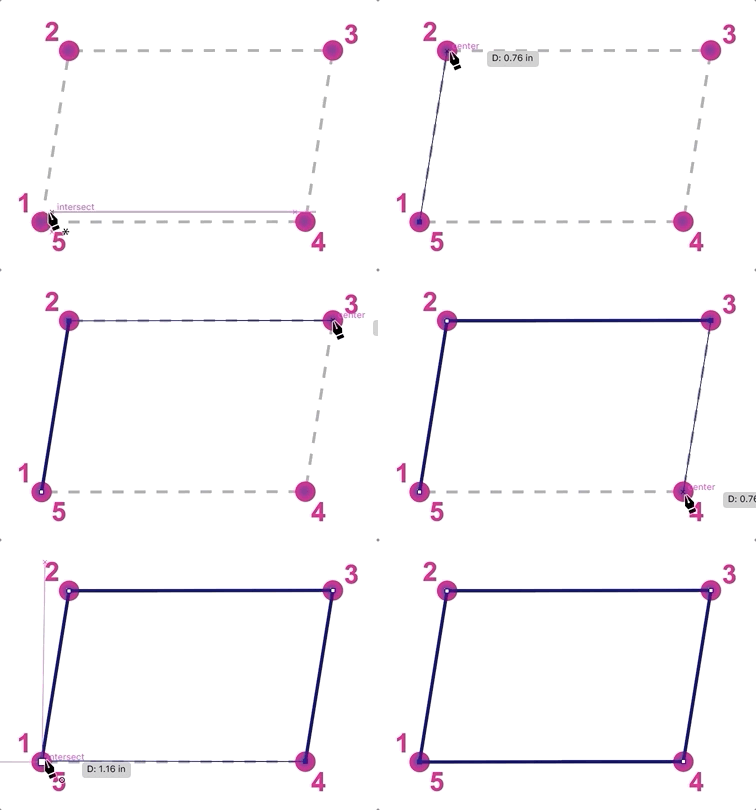
Exercise 2: Curved Lines
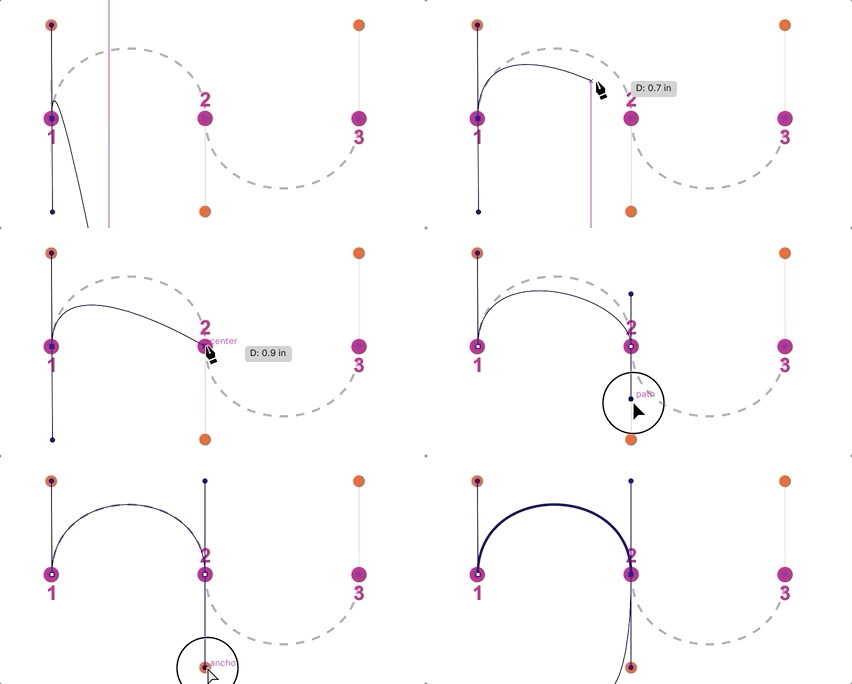
1. For this exercise, we will be creating a curved line with handles. With the Pen Tool still selected, click on point 1 and drag upwards toward the red circle and release the mouse. Though we won’t see a line appear until we create the next point, adding these handles to our first point sets the stage for a curved line.

2. Click in the center of point 2 and drag downwards toward the red circle. A curved path is created between points 1 and 2. Note that if we dragged upwards at point 2, the curve would have formed an S shape instead of a U shape.
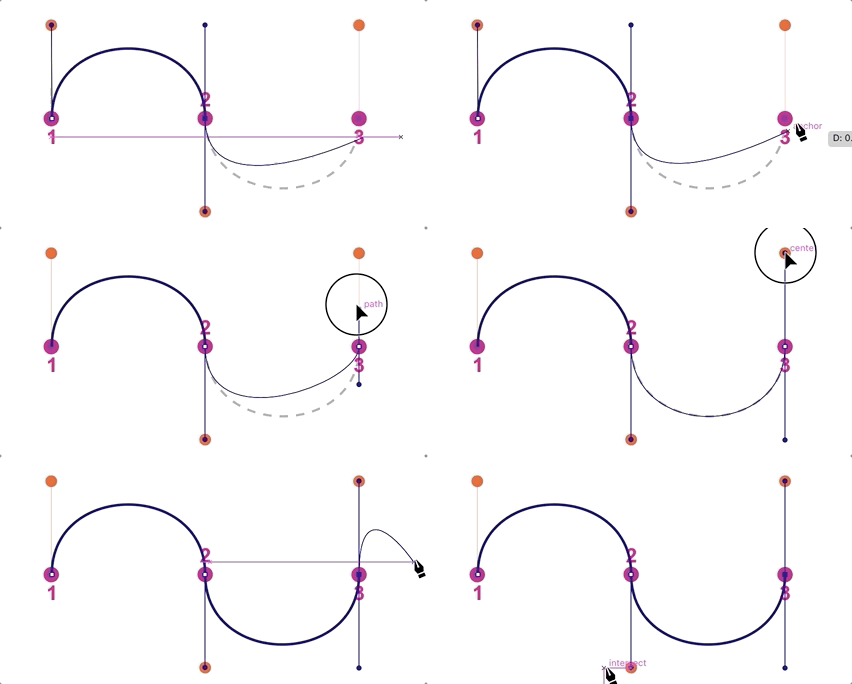
3. Finish the curved line by Clicking once in the center of point 3 and drag upwards toward the red circle.
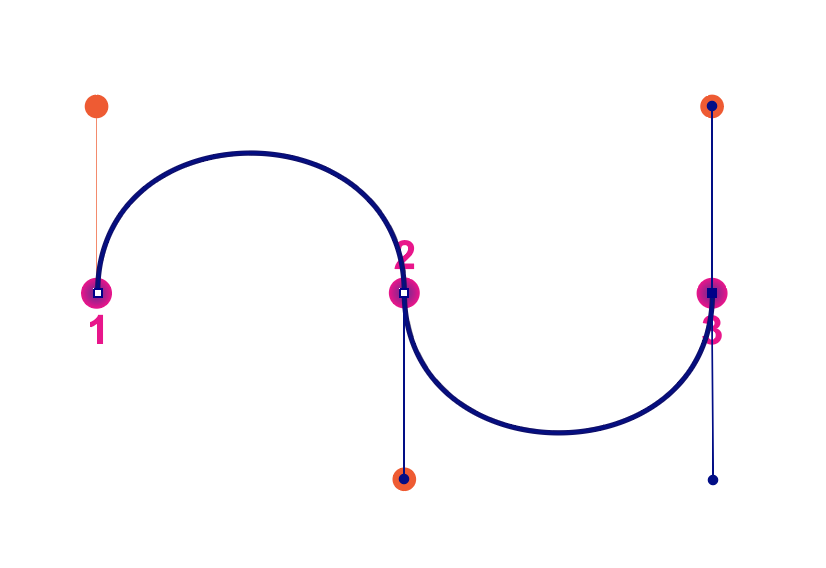
4. Since this is not a closed shape, we will need to press the Enter key in order to move on to another task. Using the Direct Selection Tool, we can move the handles to adjust the curves.
Exercise 3: Heart
The first two exercises covered the bare essentials of the Pen Tool; now, we will apply what we learned by drawing a heart! We will use this heart in the e-card later. Make sure that you are not still editing your curve from Exercise 2. Either press the Enter key or switch to the Selection tool, then back to the Pen tool.
Before moving onto the next section, try to do this exercise without help.
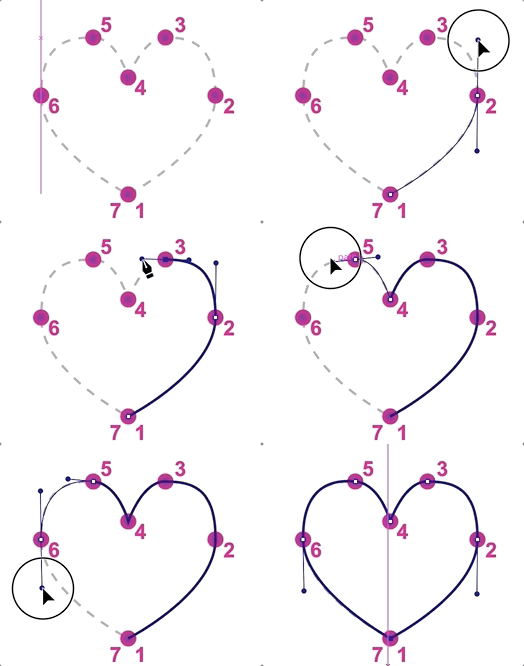
1. Click on point 1 to start the shape.
2. Click point 2 and drag upwards to create a set of handles. It will help to hold Shift while dragging handles — this will restrain their angle to 45 degree increments.

3. Click on point 3 and drag slightly to the left.
4. Click point 4, but do not drag! We want this to be a corner.
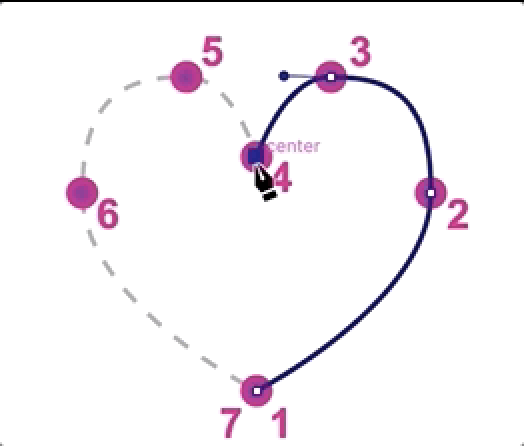
5. Click point 5 and drag your cursor to the left.
6. Click point 6 and drag your cursor downward.
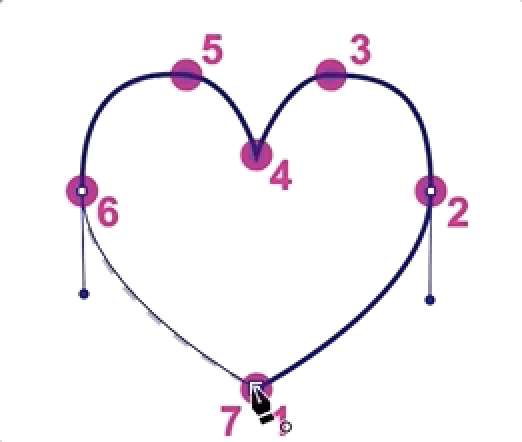
7. Hover over point 7 until you see a small circle appear next to your cursor. This indicates that Illustrator will now close the path. When you see the circle appear, click point 7.
Here is a clip of the whole process:
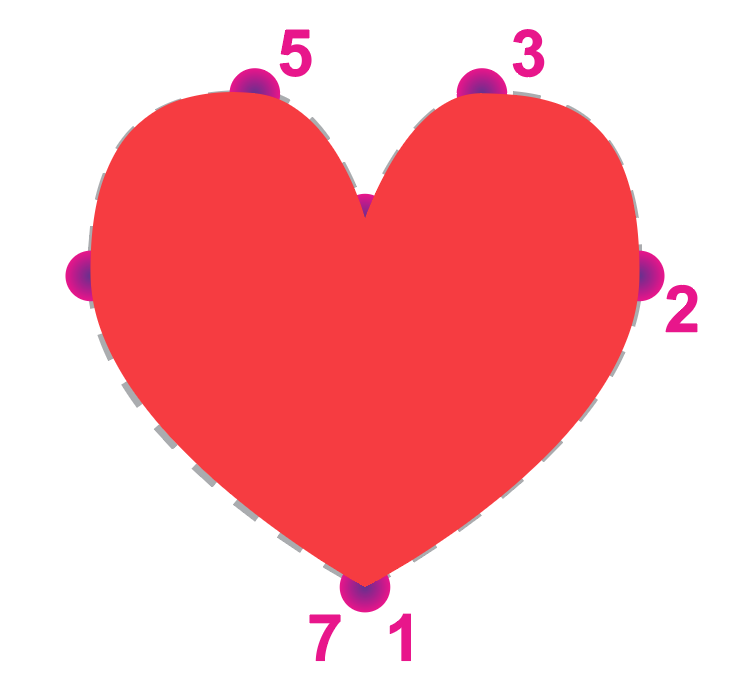
8. If needed, adjust the shape of the heart by using the Direct Selection Tool and playing with the handles and anchor points to match the dotted outline as closely as possible.
9. Change the Fill Color to a light red and set the Stroke to none.

10. If you have time, practice making your own shapes with the Pen Tool! The kind of curve that the Pen Tool makes is called a bezier, and it is used in an extremely wide variety of software including programs for design, sound production, and animation.
For even more practice, here’s a fun game to help you master the pen tool: http://bezier.method.ac/
Shape Builder Tool
The Shape Builder Tool allows us to combine and delete shapes. We will explore these two features in the Cloud and Moon exercise.
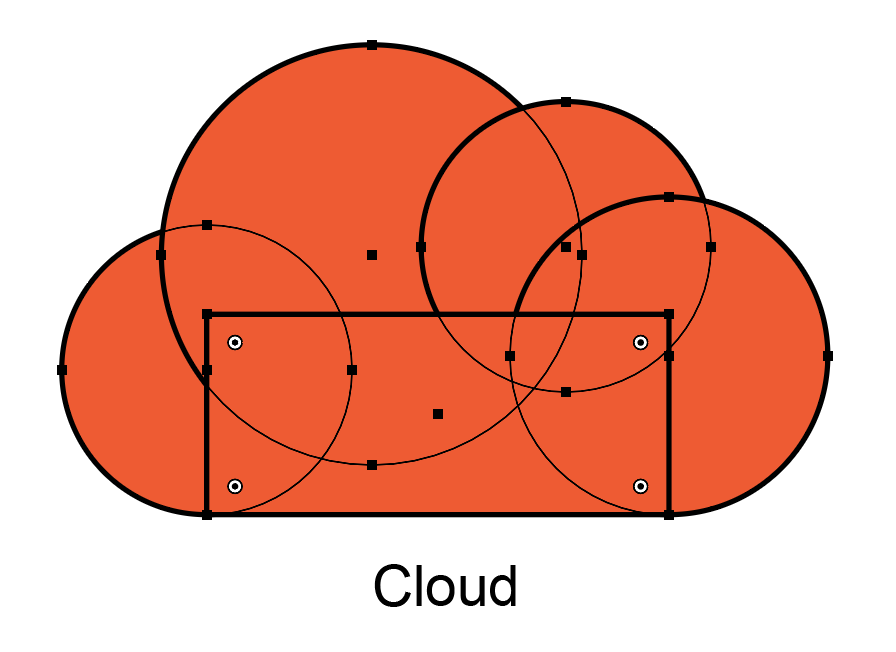
Cloud
First we will use the rubberband method to select all of the shapes. Use the Selection Tool and drag over the area to select the shapes.
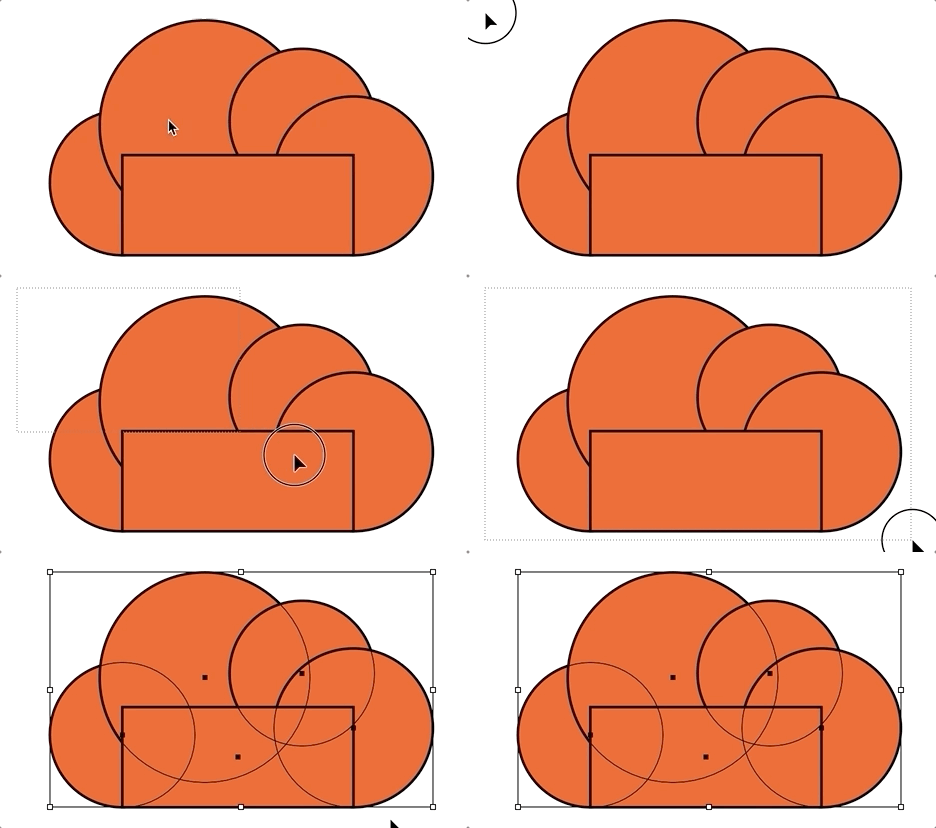
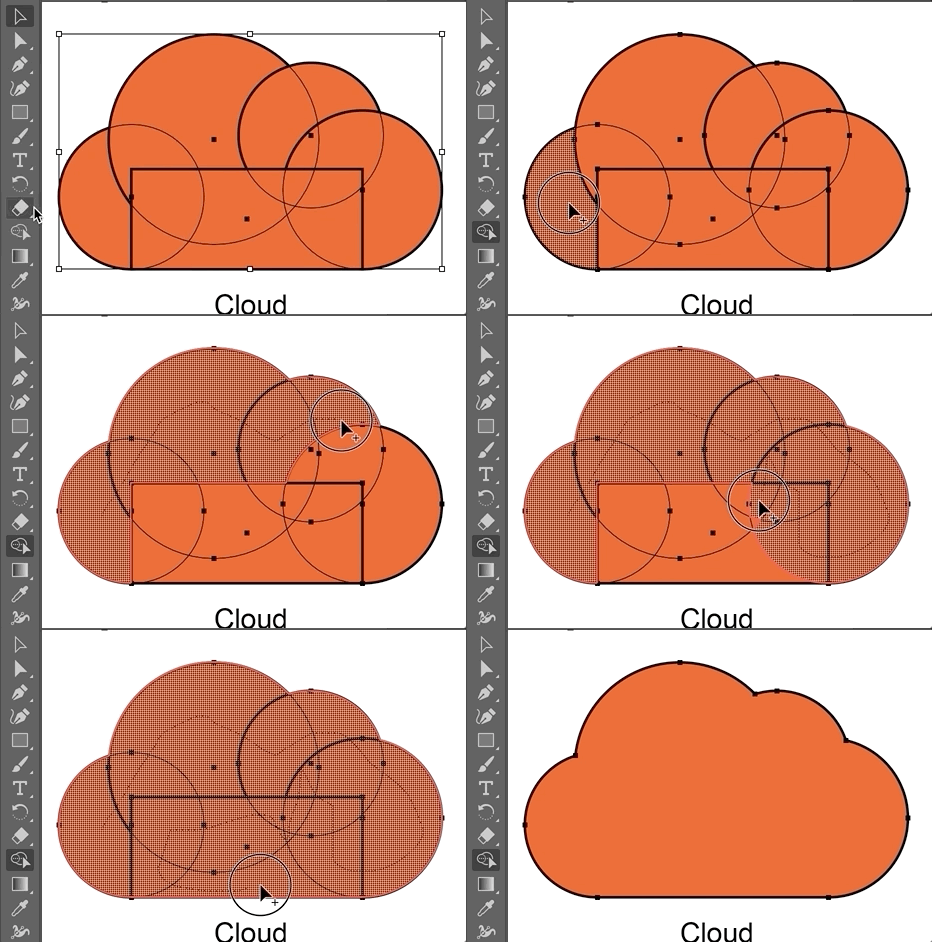
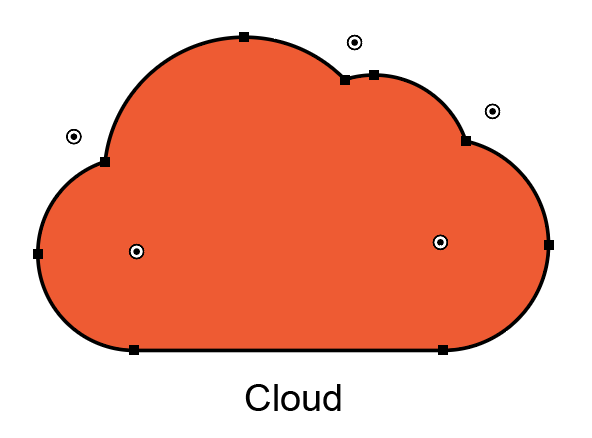
From the Tools Panel, click on the Shape Builder Tool. Drag over all the shapes to create a line connecting all the pieces. Let go of the click and the shapes should be combined into a large cloud.
Moon
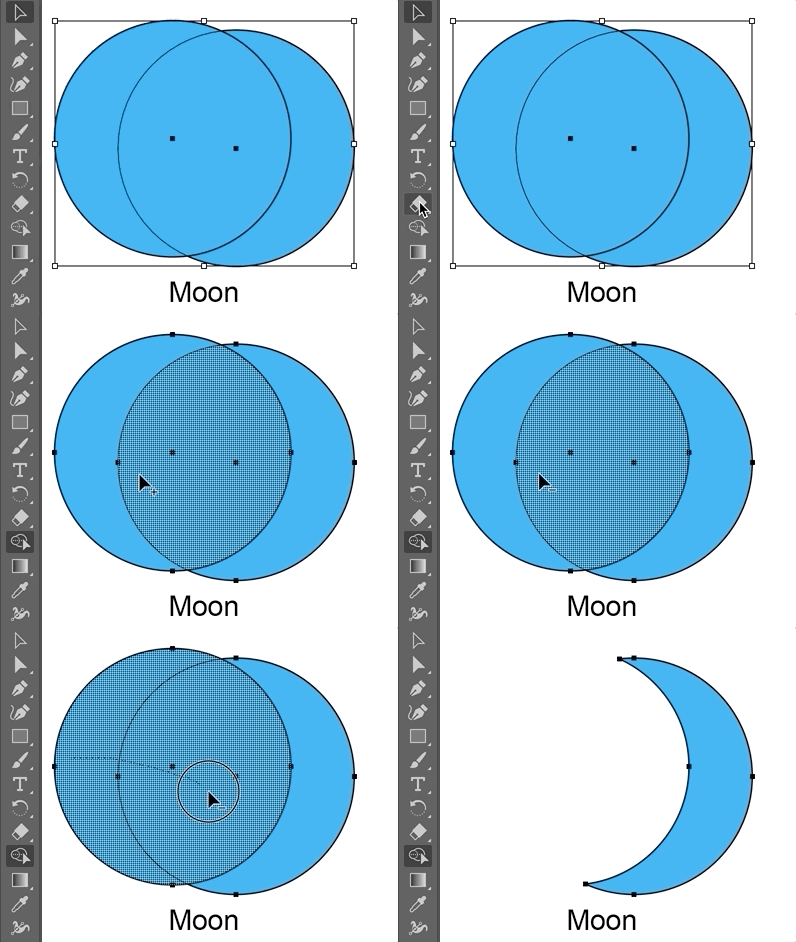
Using a similar process, select both circles with the rubberband method.
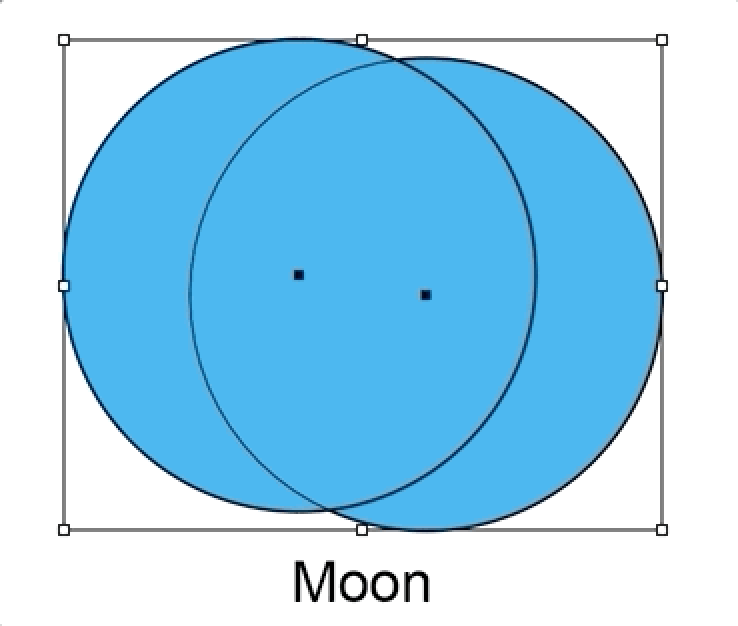
While on the Shape Builder Tool, hold the Alt/Option Key while dragging a line though the left circle to delete that part of the overlapping shape.
Pathfinder
Like the Shape Builder Tool, Pathfinder also allows us to combine and delete shapes. The only difference is the fact that we can choose from a list of preset options in Pathfinder to create our unique shape. Let’s look at how Pathfinder works by applying it to the two previous exercises.
Pathfinder
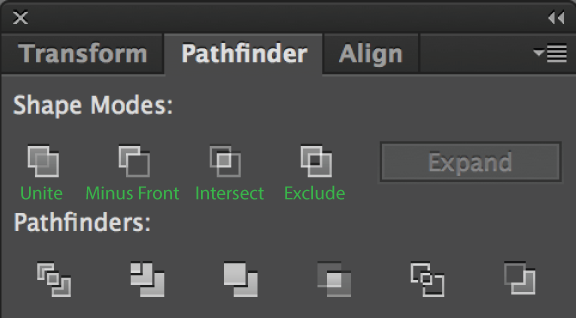
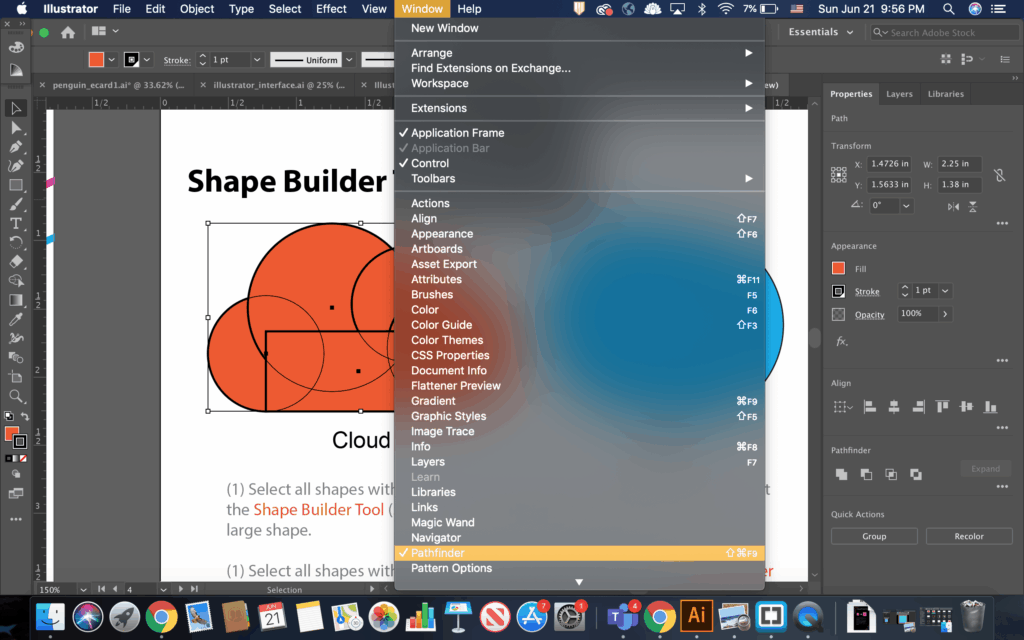
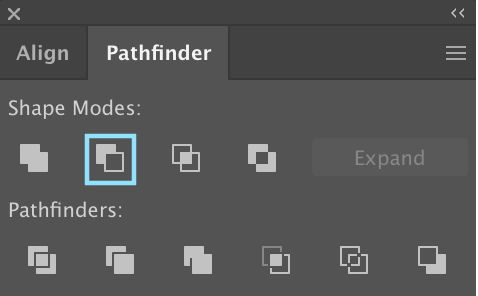
The Pathfinder Panel allows you to create more complex shapes by combining or subtracting two or more overlapping shapes. Access Pathfinder via Window > Pathfinder
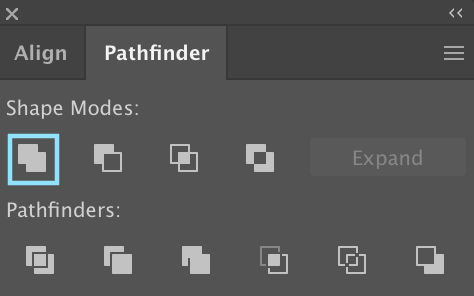
Select two or more overlapping shapes and use the Shape Modes buttons in the Panel to combine them.
The four modes are:
- Unite: Combine two or more shapes into one, eliminating internal paths that overlap.
- Minus Front: Subtract the shape in front from the shape behind.
- Intersect: Keep only the areas where both shapes overlap.
- Exclude: Remove the areas where both shapes overlap.
Pathfinder options
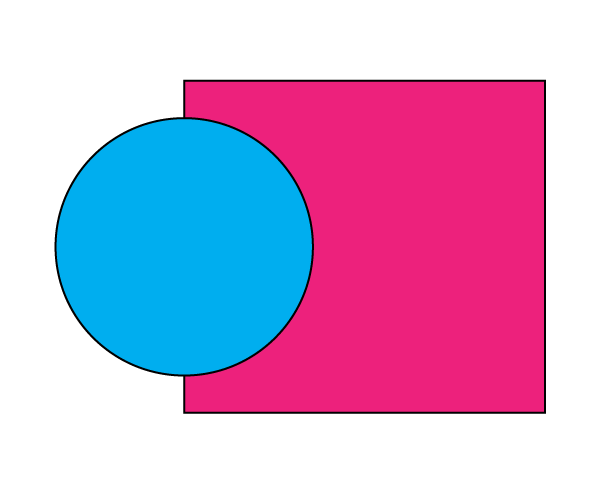
Original

Unite

Minus Front

Intersect

Exclude
Cloud
1. Undo the changes with Ctrl/Command+z until you revert both the Cloud and Moon examples to its orginal state.
2. Use the rubberband method to select all of the shapes.
3. In the Application Bar, go to Windows > Pathfinder.
4. Select Unite from the list of Shape Modes.
Moon
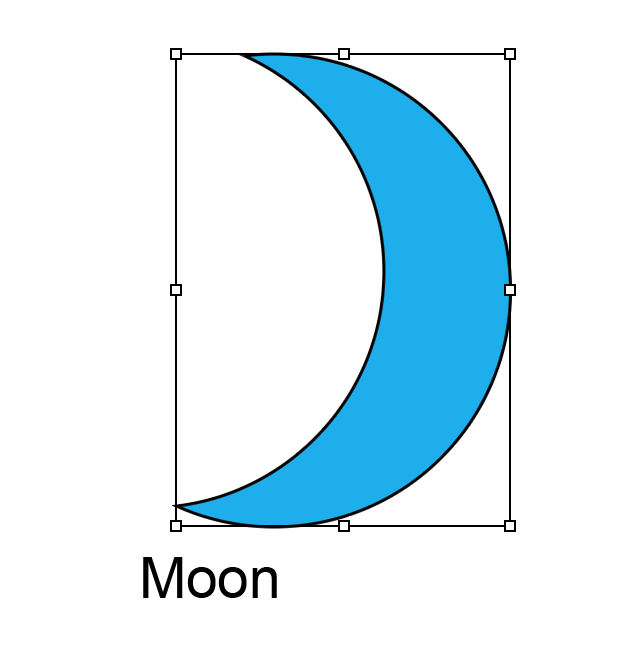
1. Select both shapes with the rubberband method.
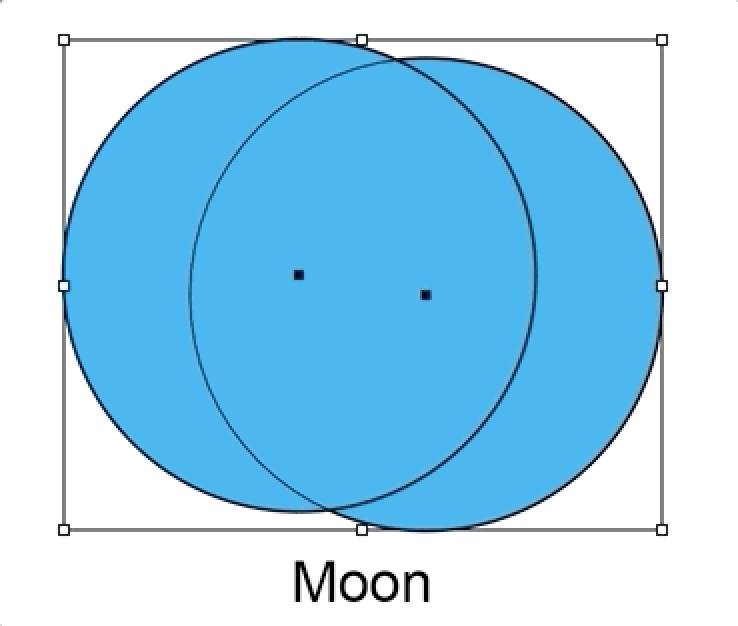
2. From Shape Modes, select Minus Front.
As you can see, Pathfinder and the Shape Builder Tool accomplishes the same task, and it all comes down to personal preference.
Type Tool
The Type Tool is very similar to other programs that utilize text. We will look at how we can change the properties of the text with the following exercise.
1. From the Tools Panel, select the Type Tool.

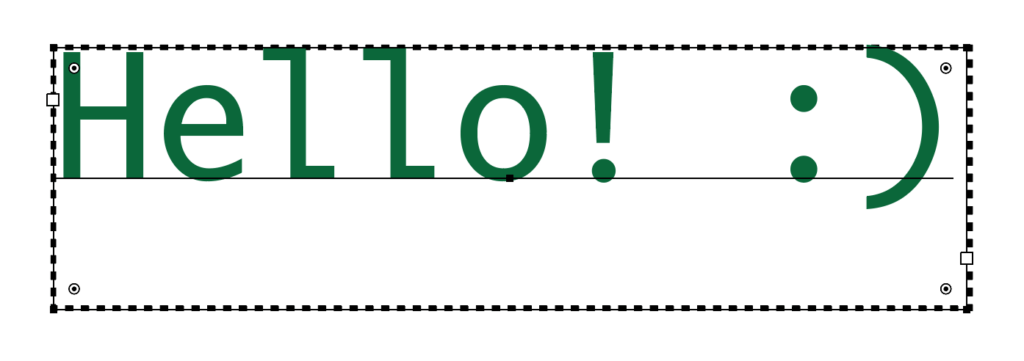
2. Drag a text box that matches the dotted template and write a message of your choice.
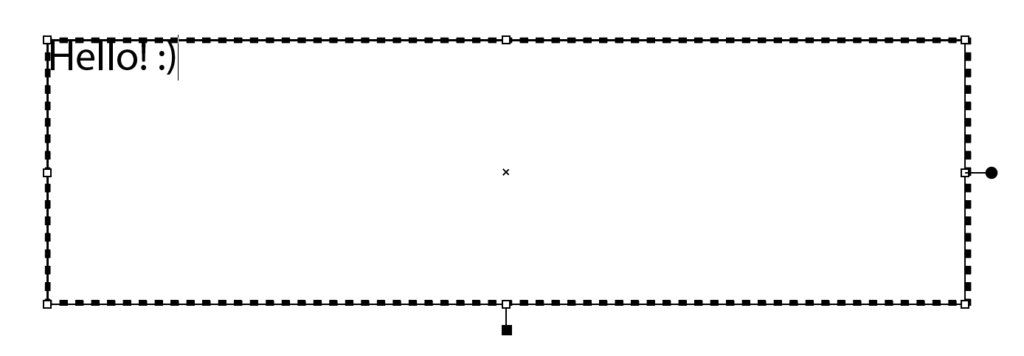
3. Highlight the entire message to select it.
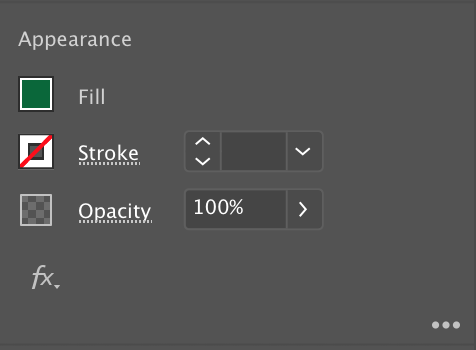
4. Go to the Properties Panel and change the Fill and/or Stroke Color.
5. Use the dropdown to explore the variety of Fonts and choose one to your liking.
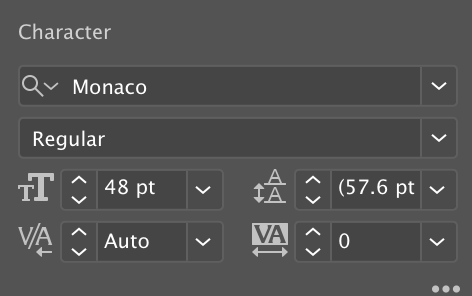
6. Change the Font Size, and if part of your text is missing it means your text is too large for the size of the text box. To fix this, you need to decrease the size of your font or increase the size of your text box.
Grouping Shapes
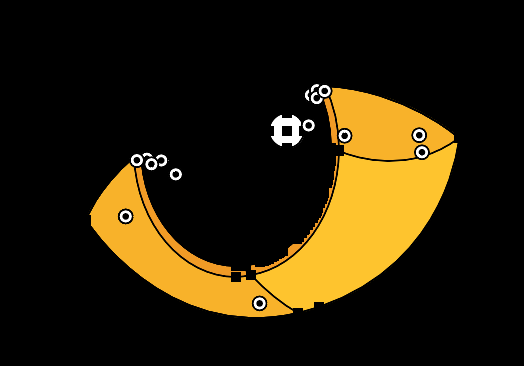
Grouping shapes is a useful feature in Illustrator because we can move all the shapes at once without having to select all of them each time. We will group the shapes of the eye to help us create the second eye.
1. Select all the shapes with the rubberband method then right-click and select Group.
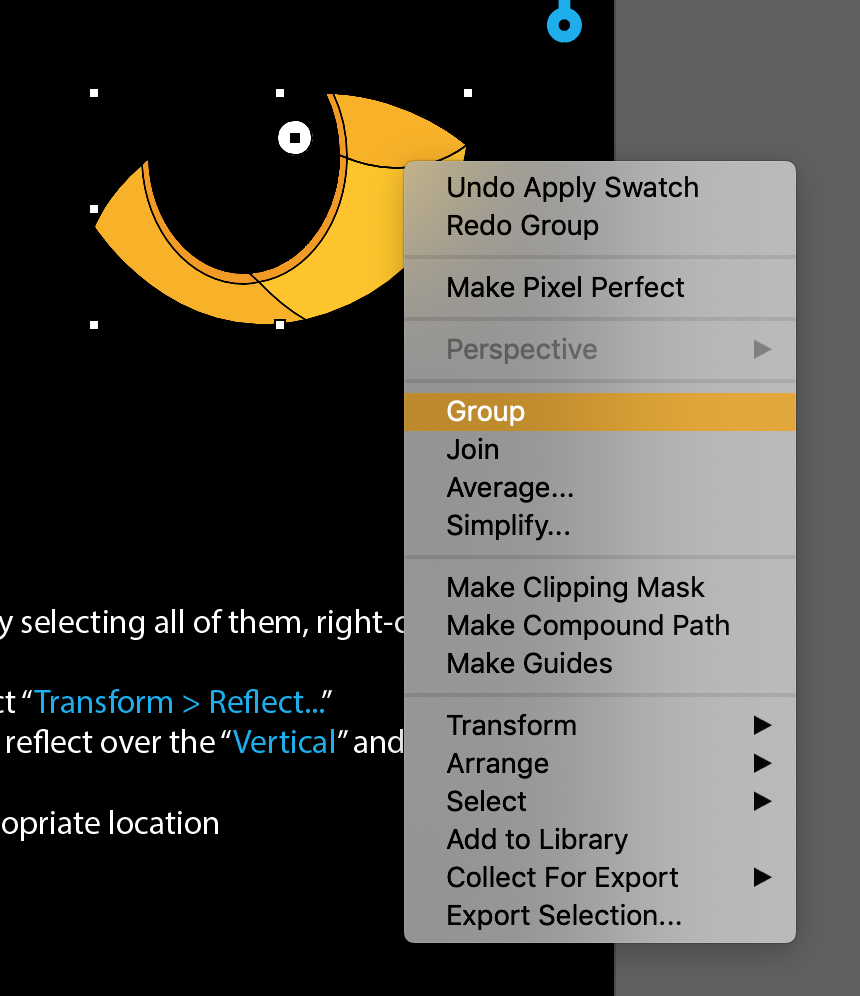
2. In order to create the other eye, right-click and select Transform > Reflect...
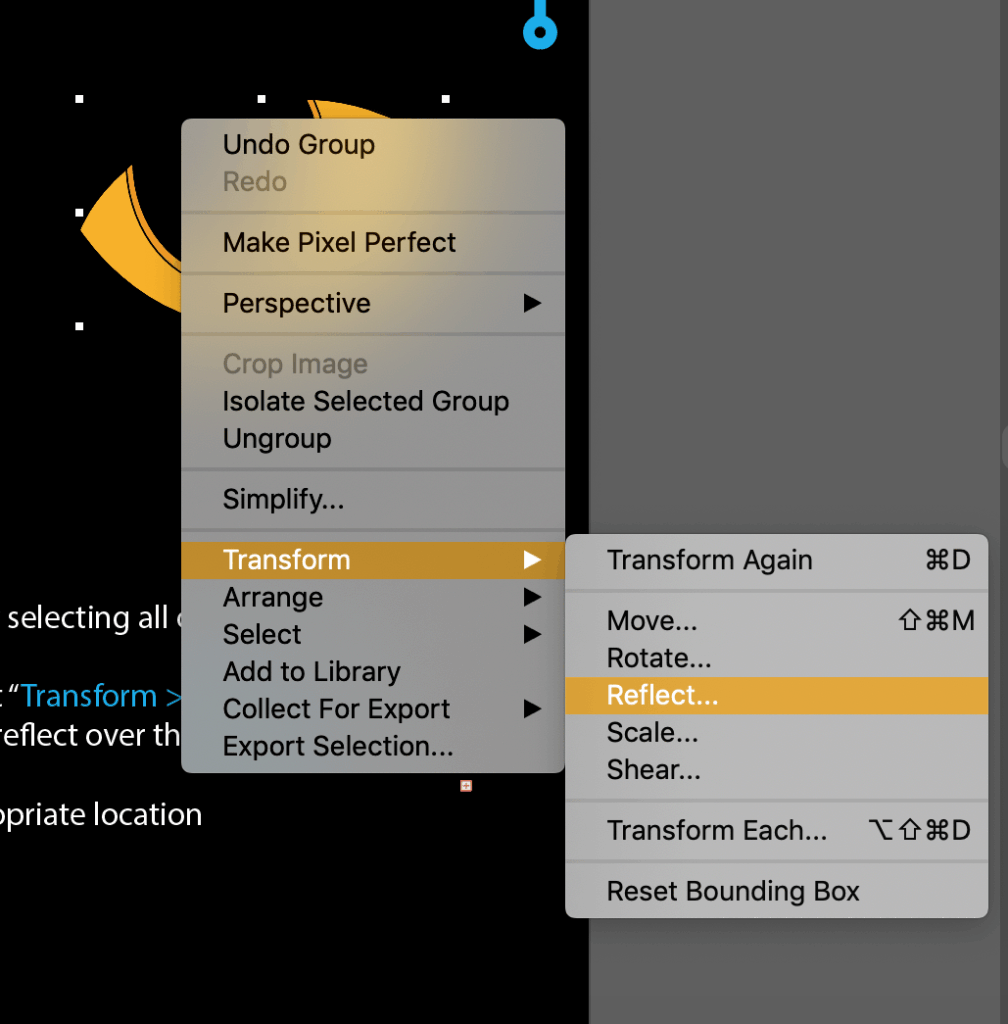
3. From the menu, choose to reflect over the Vertical axis and click Copy.
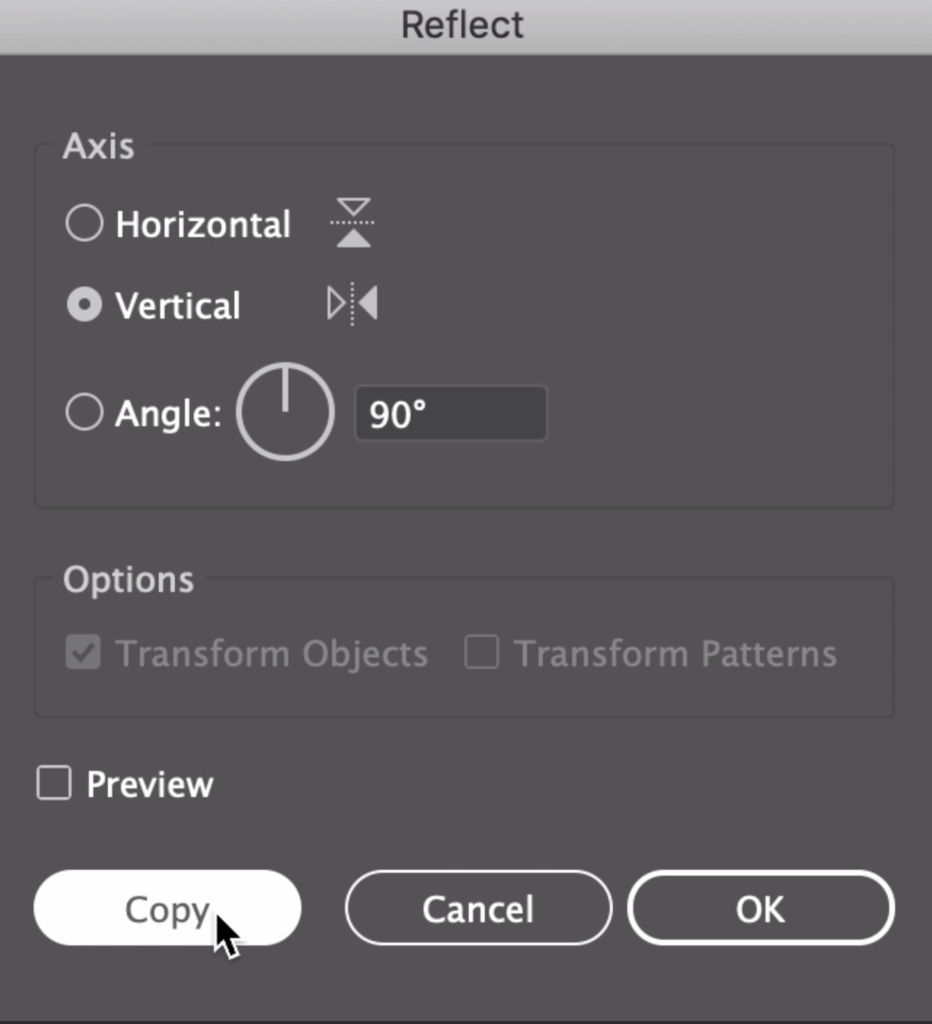
4. Move the copy and align it to the other eye.

With the exercises completed, we will apply these skills in our next project! Don’t close this tab because we will use the heart we created from this file in the e-card later. The steps to create the e-card can be found under our “Hands-On Activity” section. Happy designing!