Premiere Pro: Basic Video Editing with Adobe Premiere



About Premiere
Adobe Premiere, part of the Adobe Creative Cloud package, is a powerful timeline-based video editing software application. This sophisticated editing platform is considered to be an industry standard, and is used worldwide by professionals to edit video footage.
Premiere is a good choice for video editing because it is user-friendly, it supports high resolution video and integrates easily with other creative suite applications like Audition and After Effects. Premiere is used to import, edit, and export video projects.
This manual provides a basic introduction to the Premiere interface and explores commonly used features needed to create a simple video. After reviewing this manual and activities, we encourage students to learn about more advanced features either through 1-on-1 support or through LinkedIn Learning (all UW-Madison students get free access).
Getting Started in Premiere
Creating a New Project
The Home window will show your most recent projects you have been working on. If this is your first time opening Adobe Premiere, you will not see any past projects appear.
Team Projects
Adobe Premiere now offers the option to create a “Team Project”, where different users can edit the same project across different computers. However, at this time, the process to use this feature is not as seamless as it sounds and requires quite a bit of set-up beforehand. If you are interested in this, you can view this YouTube video that explains the details of setting up your workspace for this purpose: What are Premiere Pro Team Projects? (2023 Update and Guide)
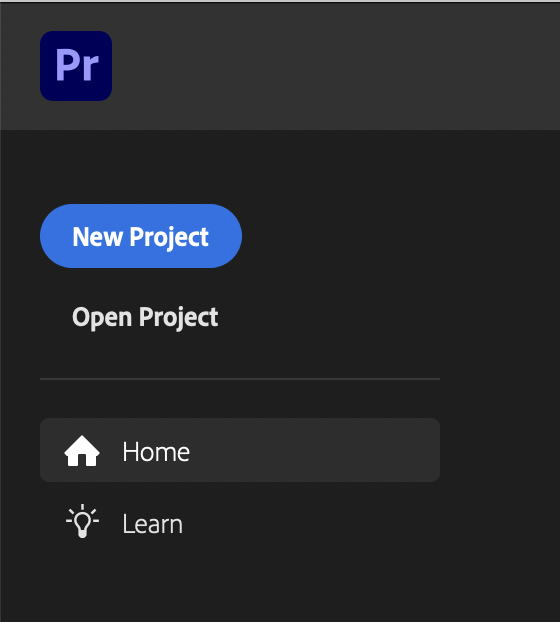
1. Open Adobe Premiere and click on the blue “New Project” button. You will be taken to the “Import” section.
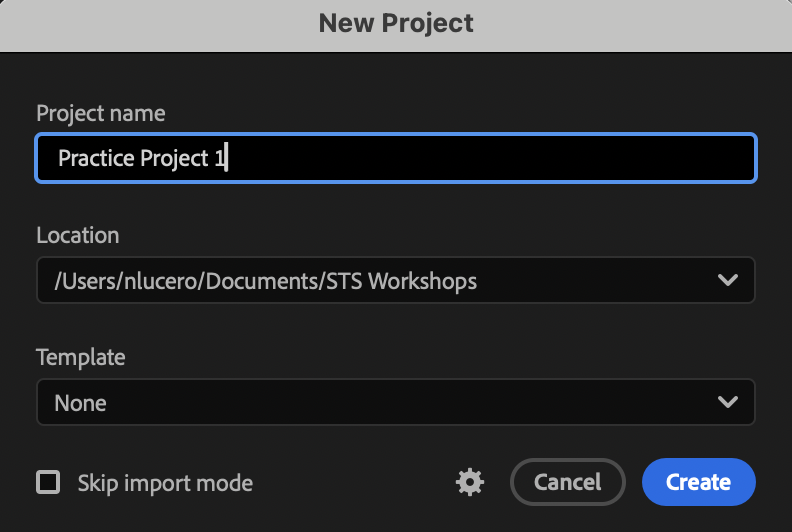
2. Update the “Project Name” and ” Location”. If your video is for a class project, follow any naming guides your instructor has provided. Change the location to a folder on your computer that you can easily find later if needed.
TIP: It is always good practice to create a new folder within your Documents Folder or Desktop for each video project you create in order to keep things organized.
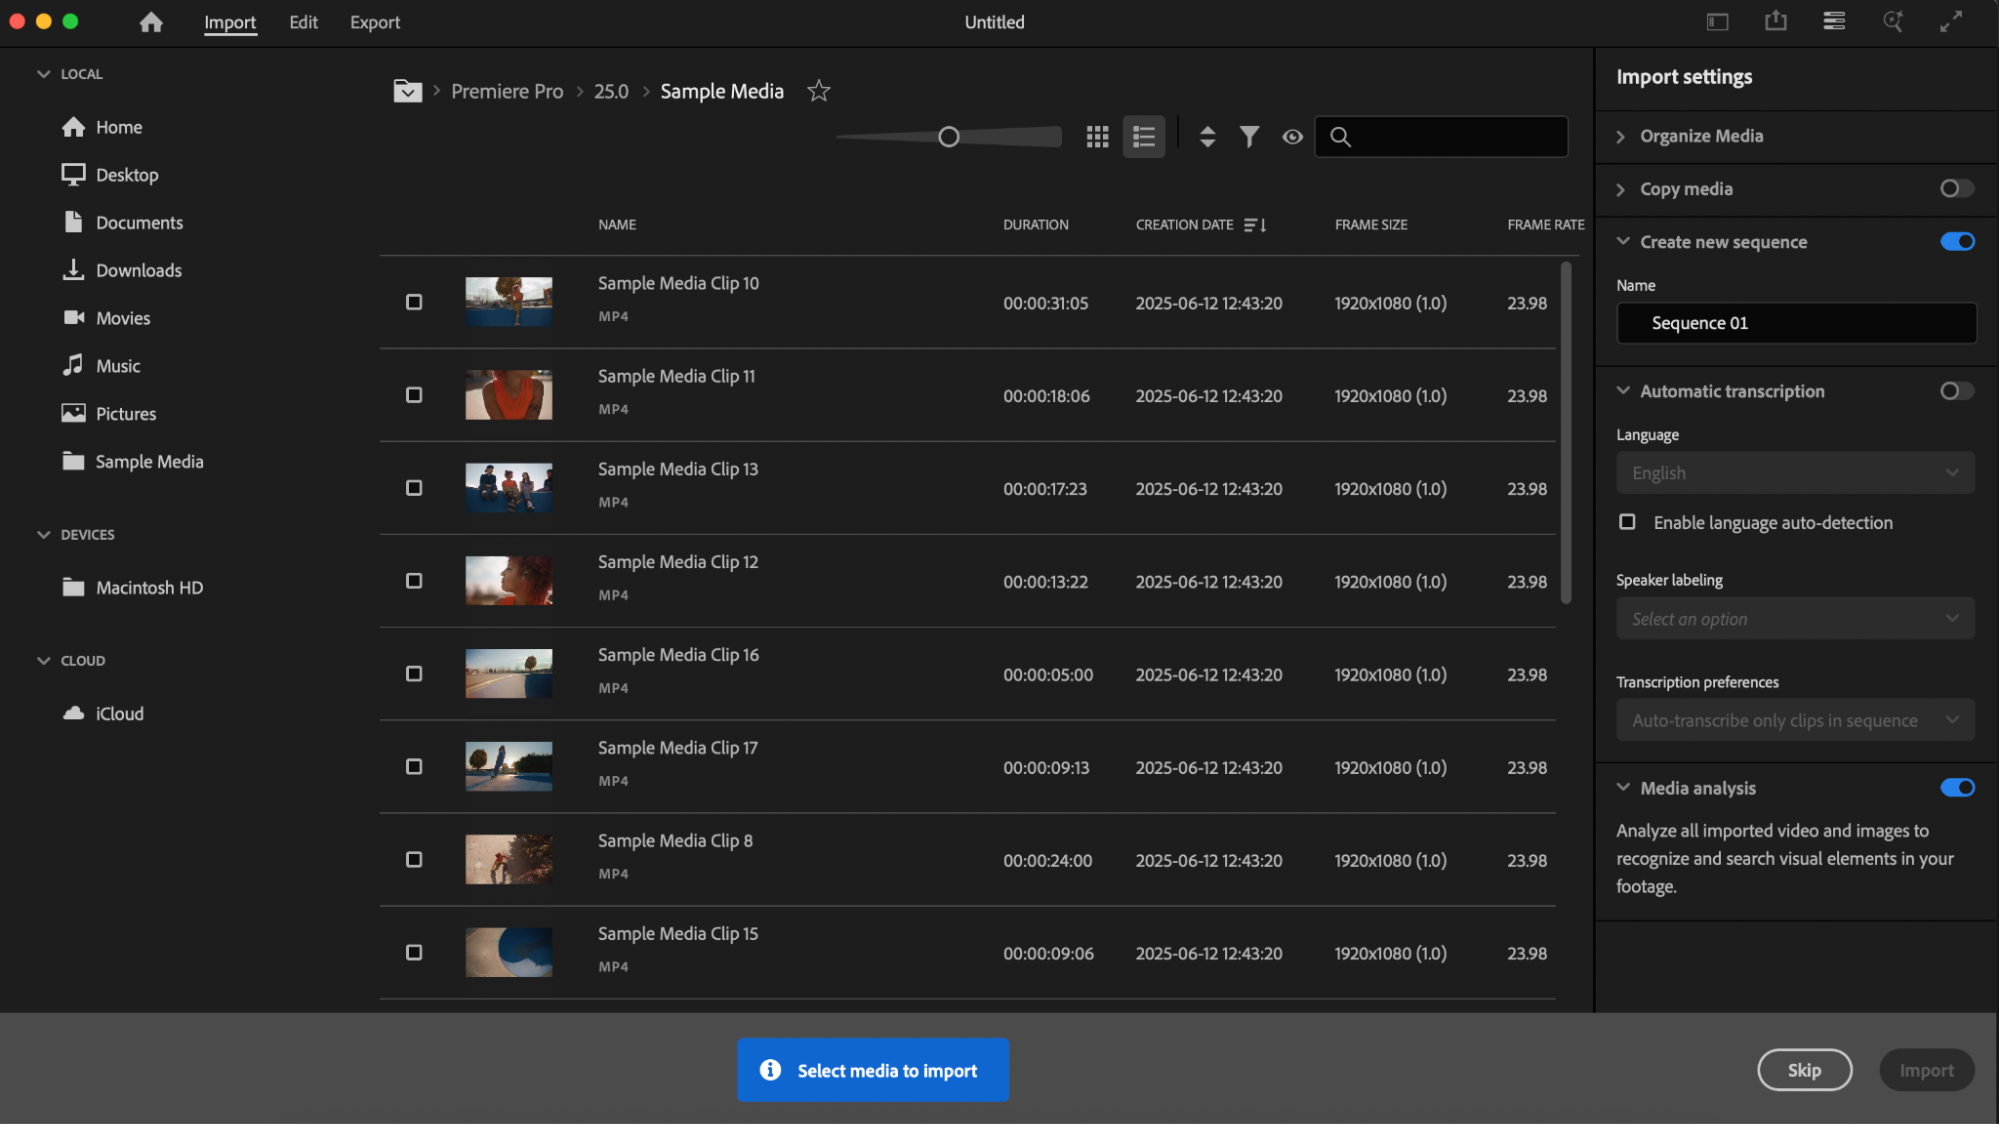
3. Import videos that you want to immediately include in your project by locating them within the folders on the side panel and select the folder(s) or file(s) you want. If locating your media via this section becomes difficult, you can opt to Skip this part and import media after initially creating a new project.
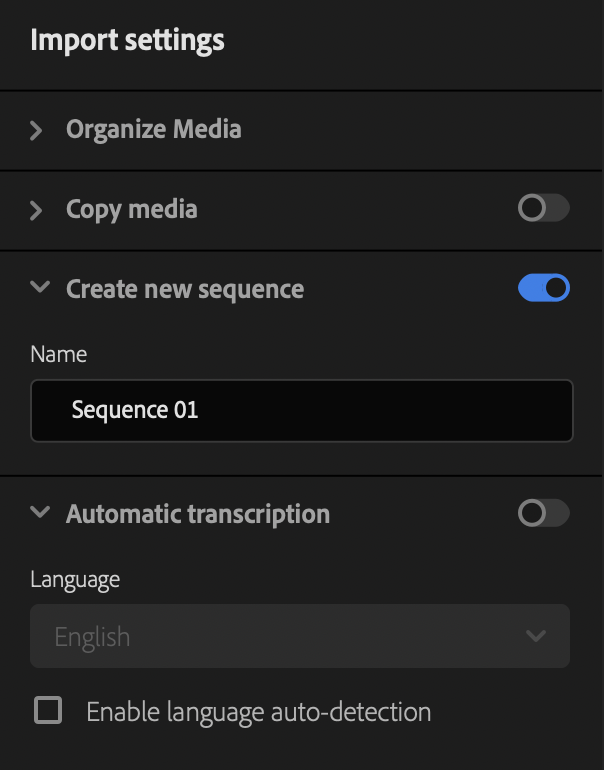
4. Import Settings can be left as the default unless you have specific guidance on how to change these settings.
5. Click the blue Import button if you are selecting media to enter Edit mode. If you prefer to import media later, you can click Skip.
Premiere Interface: Essential Windows and Panels
Premiere Workspaces

This manual focuses on the “Editing” workspace (this is different from the default “Learning” workspace when you first open Premiere). Different Workspaces prioritize different windows and menus most useful for the kind of work or effect you want to focus on.
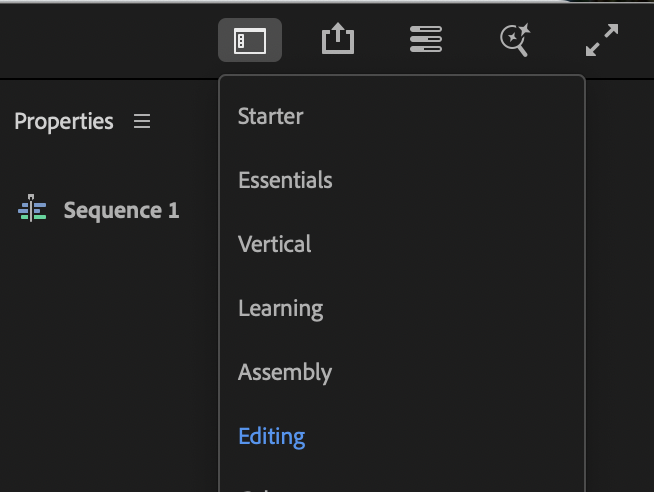
You can change to a different Workspace by clicking on the Workspaces icon (from the upper-right corner).
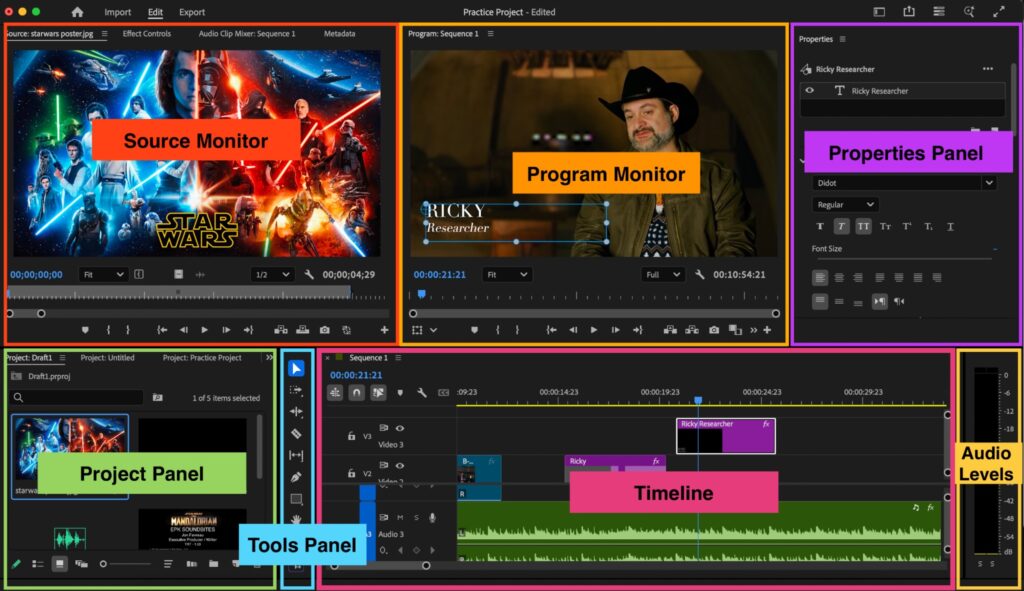
- Source Monitor: The Source Monitor is in the top left corner of the interface. This is where you can preview files from the Project Panel and/or trim clips before adding them to the Timeline.
- Program Monitor: The Program Monitor can be found in the top right corner of the interface. This areas gives you a preview of what your final project will look like as you are working on it. When you play your project from your Timeline, the video is displayed here.
- Properties Panel: The Properties Panel, much like in other Adobe programs, will provide additional quick editing tools depending on what you are selected on. For instance, this is where you can easily change the frame size of a video clip, reposition a video, edit your title text font and color, and adjust the volume of a clip.
- Project Panel: The Project Panel can be found on the bottom left of the interface, directly below the Source Panel and next to the Timeline. This is where all your media files are stored after they have been imported, along with copies of your sequences.
- Timeline: The Timeline can be found on the bottom the interface, between the Tools Panel and Audio Meter. This is where a “Sequence” is opened and all of the editing takes place! The Timeline is composed of two sections: Video Tracks and Audio Tracks. These Tracks allow us to “layer” videos, titles, graphics, and/or audio clips to create a more dynamic project. Your Timeline Marker (blue line) will indicate what appears in the Program Monitor.
- Tools Panel: The Tools Panel is directly to the left of your Timeline. This is where you can access all of the different tools in Premiere. The most commonly used tools are the Selection Tool, Razor Tool, and Type Tool.
- Audio Meter: The Audio Meter is directly to the right of your Timeline. When a clip is played on the Timeline, the levels in the audio meters will move to show your decibel levels (dB). It is good practice to keep your audio levels between -6 and -12 decibels (db).
Resetting the Workspace
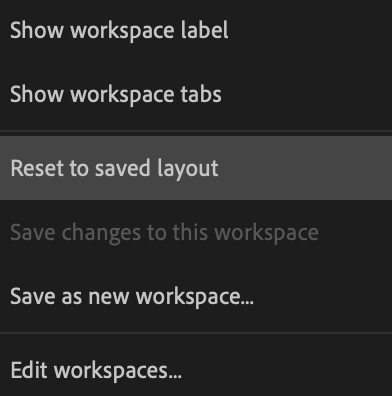
Did you accidently move a window panel? Don’t worry! You can easily go back to the original settings from the “Workspaces” menu.
- Click on the “Workspaces” icon (the first icon from the upper-right corner)
- From the list, select “Reset to saved layout”
- Now all of your monitors will go back to the default sizes and positions.
Resizing Window Panels
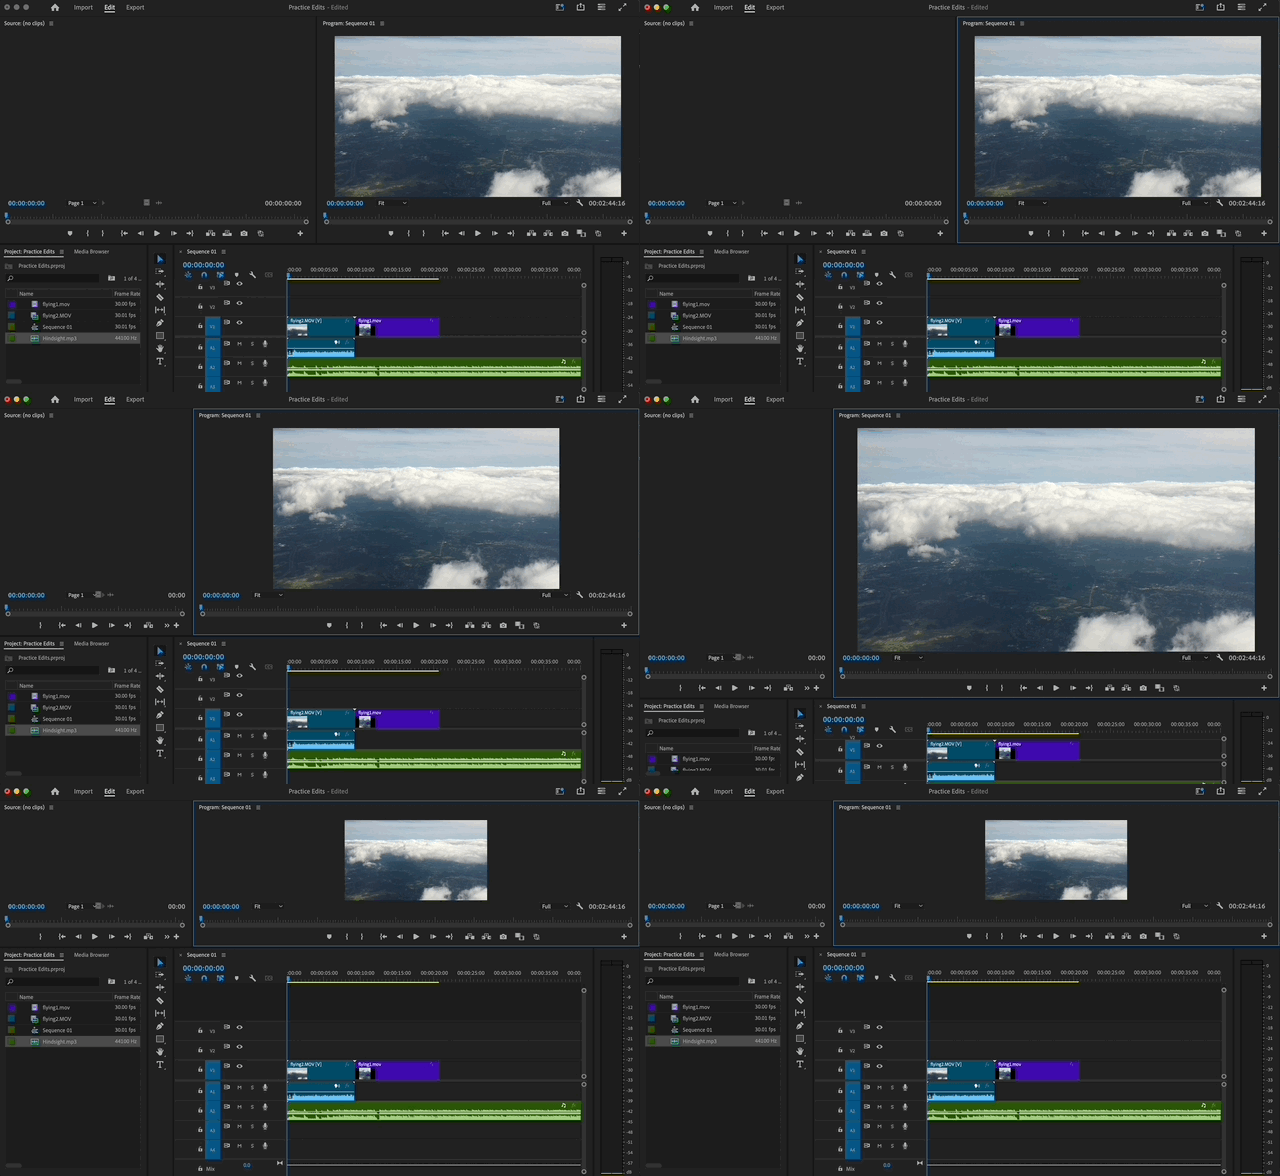
If a panel is too large or too small, you can resize it by dragging the edges.
Importing Media
Importing media into Premiere does not mean you are actually bringing the media into your project file, but rather you are pointing to where the media lives within your computer. Because of this, if you plan to use media stored in an SD card, always remember to copy the media to a folder on your computer first and import from that folder instead of importing directly from the SD Card. Otherwise, the moment you remove the SD card, your Premiere project will not be able to locate your original files.
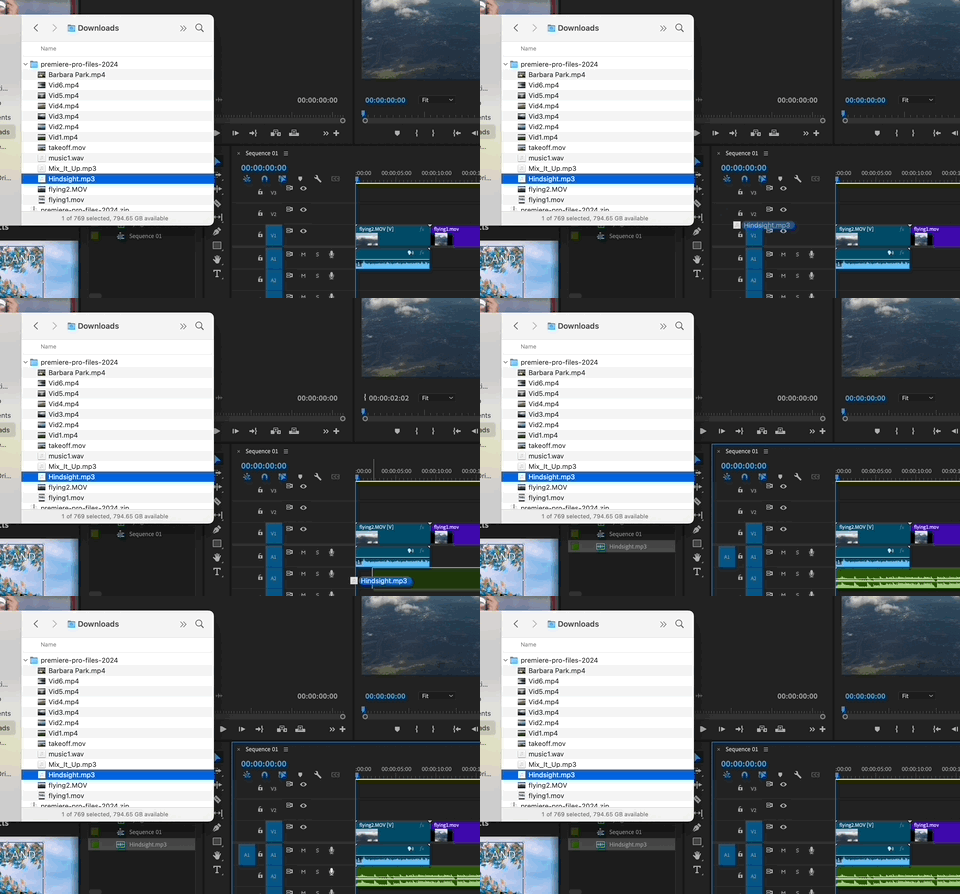
Import With Drag and Drop
Find your media within Finder or File Explorer and drag and drop files directly to the Timeline to edit immediately OR Project Panel to access later.
Import With the File Menu
If you are having issues with importing media files through the drag and drop method, follow these steps:
- Navigate to File > Import
- Navigate to the folder with your video and audio files.
- Select either the entire folder or individual media files you want to bring in to your project. To select multiple files, hold down Command or Control while selecting each file. To select all files within the folder, click Command + A on a Mac, or Control + A on Windows.
- Click Import. It will take a few seconds to load all of the media. You should see a dialog box showing you the progress of your import. Once the media is imported, you will see either the folders or individual media files in the Project Panel. Premiere will preserve your file structure after importing, so you will see organized folders that you can open.
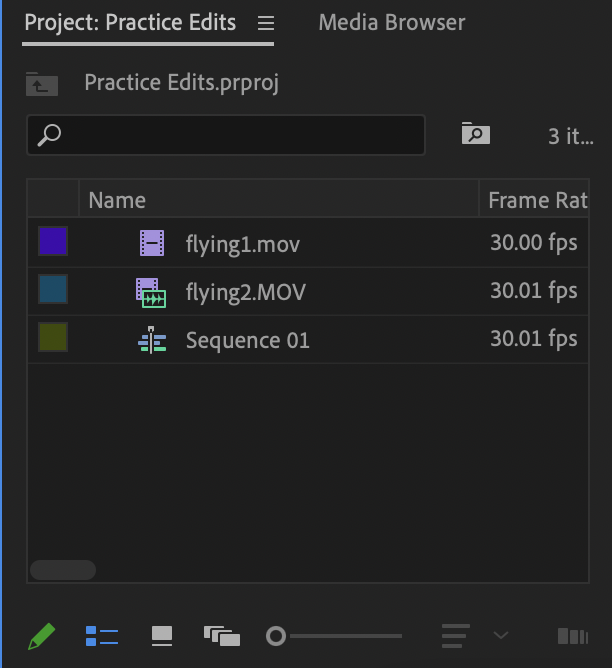
- To open a folder, double-click on the folder, and it will open in a different window.
Previewing Media
Previewing Media with the Icon View
By default, you will see your imported media files in list view within the Project Panel. Changing to icon view will let you have a small preview of video and image files without needing to use the Source Monitor.
To see your files as icons to see a preview of each, click on the third icon at the bottom of the Project Panel that looks like rectangle with line below it.

List View
Icon View
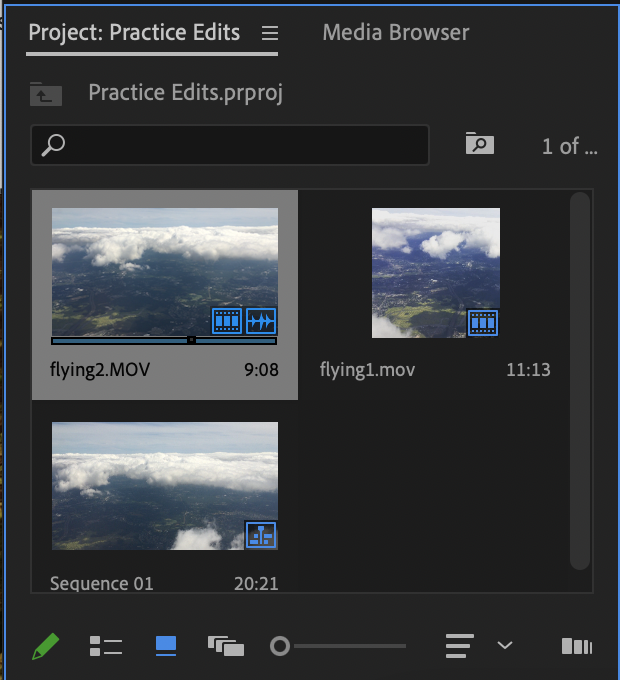
Within Icon View, each clip will have the title of the file in the bottom left corner and the duration of the clip in the bottom right corner.
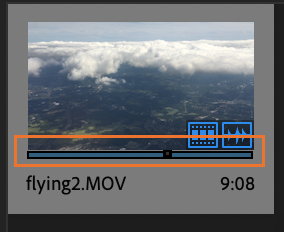
You can preview your clips by scrubbing over them with your cursor. When you click on a clip in the Project Panel to select it, you will notice a blue bar with a gray slider appear at the bottom of the clip image. Clicking on the gray slider and dragging it across the clip allows you to preview your clip and quickly see what footage your clip contains.
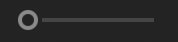
Right next to the list and icon boxes, you will notice a slider. This allows you to increase or decrease the size of your media display in the Project Pane. Clicking and dragging the slider will make your media files change in size in either the list or icon view.
Previewing Media with the Source Monitor
The Source Monitor will let you preview imported media files before adding them to your Timeline. If you are working with a lot of files, this can help save some time and rid you of confusion as you work through your project.
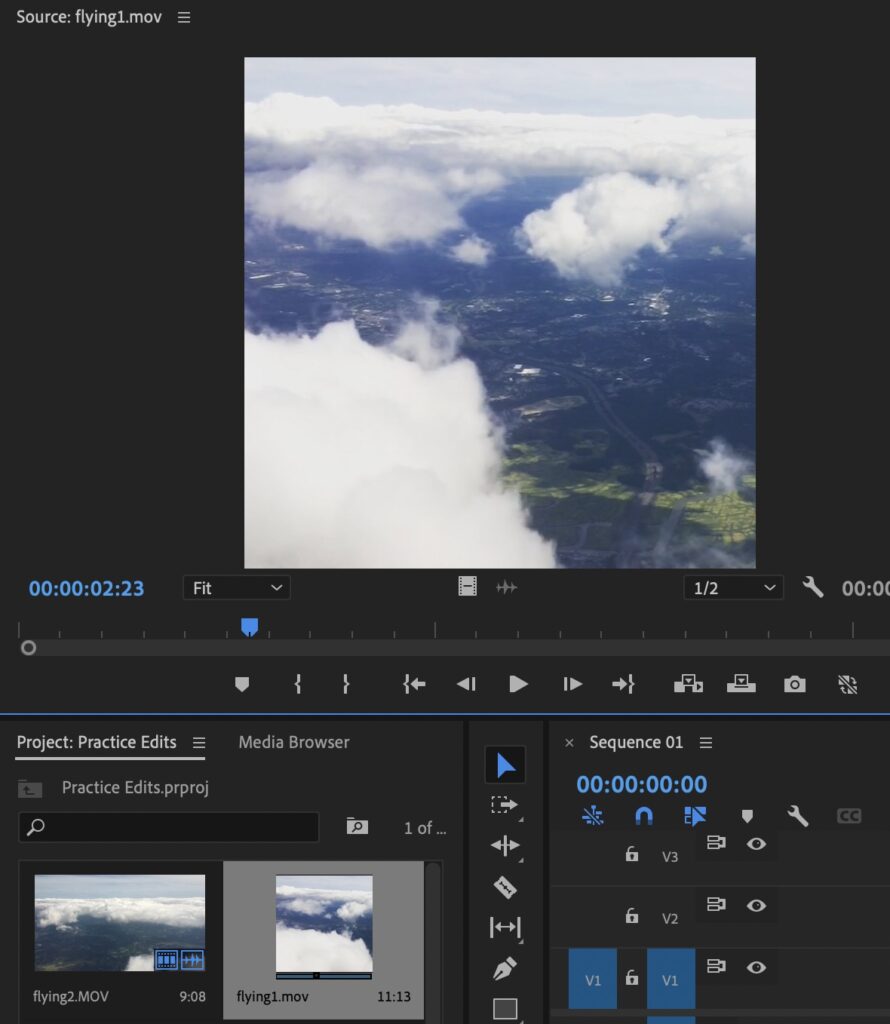
- From the Project Panel double-click on a media file to open it within the Source Monitor
- From the Source Monitor, click the play button or manually move the blue marker to preview the file.
- If you decide you want to use this media file within your project, just drag and drop the file to your Timeline either from the Project Panel or Source Monitor
Project Set-Up Essentials
Prior to making any basic video project edits (such as splitting clips), it will be helpful that you learn some important project organization and settings. This section will do that and also review how to navigate the Timeline more effectively so you can get started on editing your project.
Organizing Your Media
Organizing your media before starting any editing within the Timeline can be super helpful if you plan to work with a lot of media files for your project. This section will cover some basic organization steps that are optional to do for any video project.
Renaming Media Files
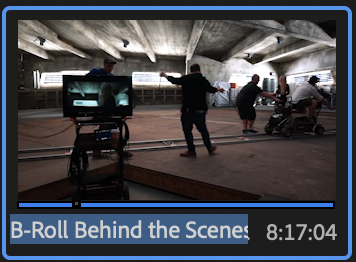
Your footage will automatically be imported with its original file name, which is often a generic number sequence. You can easily rename your footage in Premiere to facilitate the editing process.
- Click once on any media file to select it.
- Click once more, but this time over its current name.
- Rename the file and click Enter or Return on your keyboard to save changes.
Organizing Media Files with Bins
Bins are simply folders to organize your footage. If you didn’t already import media within folders, you can create new bins and drag files into them to better organize your files.
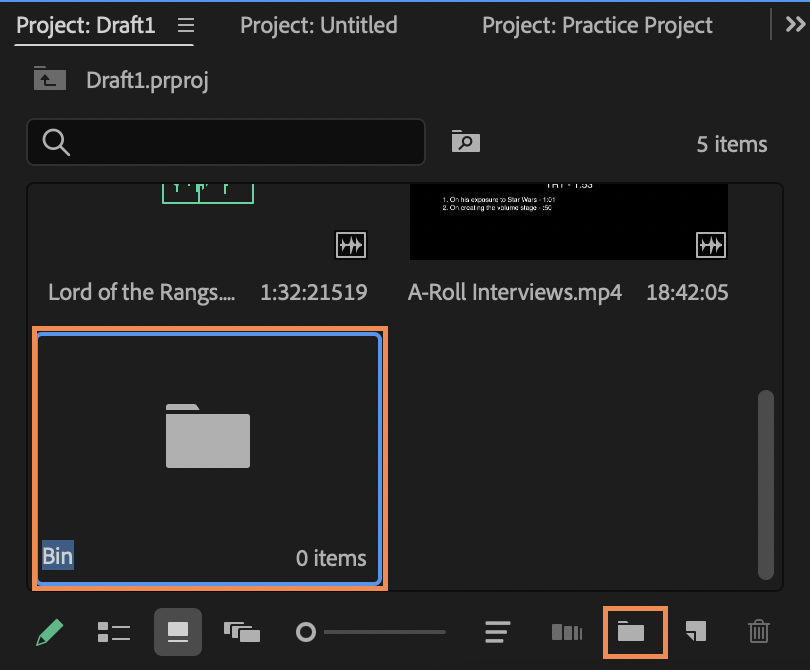
- To add a new Bin, click the folder icon in the bottom right corner of the Project Panel. If you do not see this icon, you may need to resize your Project Panel window by dragging the edges.
- A new Bin will appear in your Project Panel with the title “Bin” highlighted so you can rename it right away. Click on the title and Rename it anything that makes sense to you and your project.
Searching for Media Files
You will often have much more footage than you need imported and there will be a lot of files to sort through. Using the Search Bar to look for clips can be helpful to quickly find specific clips you need.
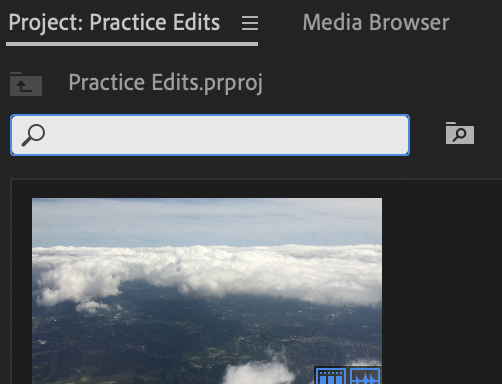
- Near the top of the Project Panel, click in the search bar next to the small Magnifying Glass.
- Type in a word or number that has been assigned to a clip as part of the name. If they are numbered, for example, search for the number of the clip you want to find, like “3”.
- As you type, Premiere will begin filtering through media files with that word or number.
Sequences: What Are They?
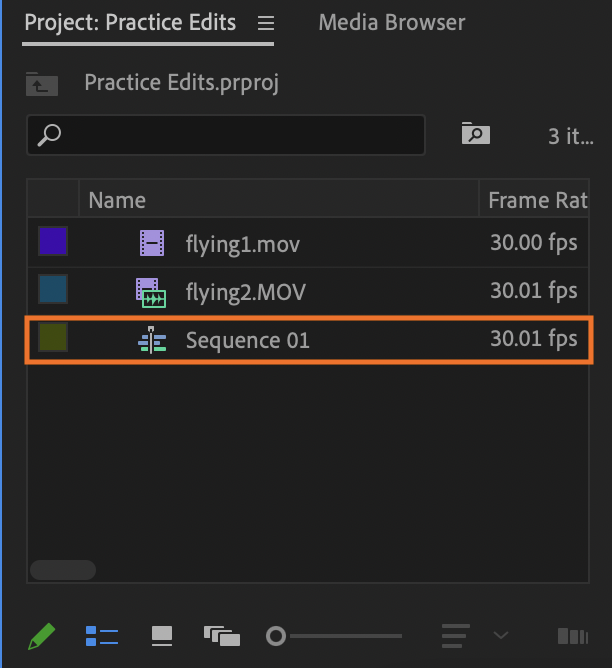
A Sequence is a file where you will add, edit, and assemble media clips within the Timeline. A Sequence is automatically created for you using the settings of your imported media when you create a new project. It can be found within the Project Panel and is often labeled either “Sequence 01” or after the name of the first clip that is dragged onto the Timeline. Within the Icon View, it’s common to confuse a Sequence File for a regular Media File because it’s icon preview will be the first imported file you put in the timeline.
List View:
Icon View:
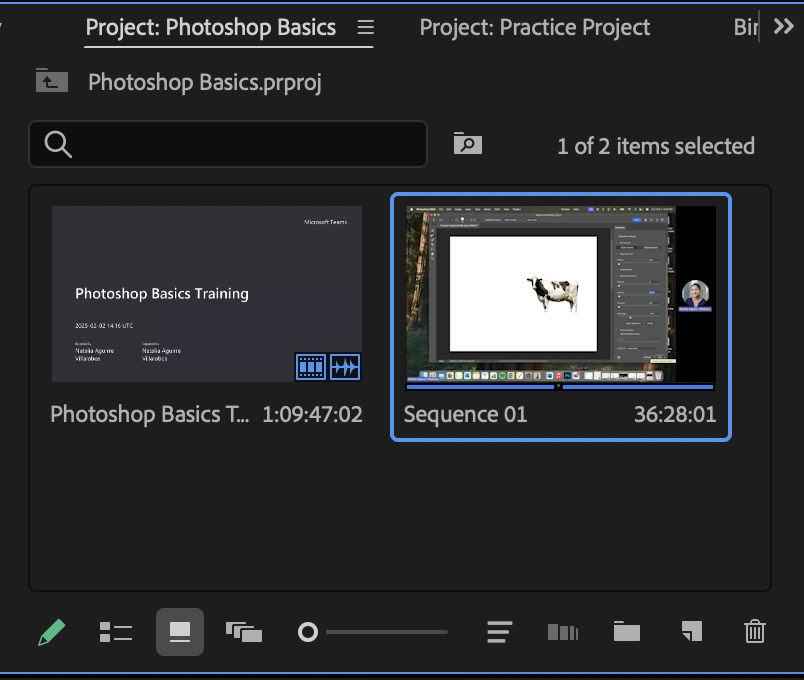
For basic and smaller projects, you typically do not need to create more than one Sequence, but you can by going to the top menu and going to File > New > Sequence…
If you ever “lose” your project within the Timeline, try double-clicking on a Sequence file from the Project Panel to open it back up in the Timeline.
Sequences: Viewing and Changing Settings
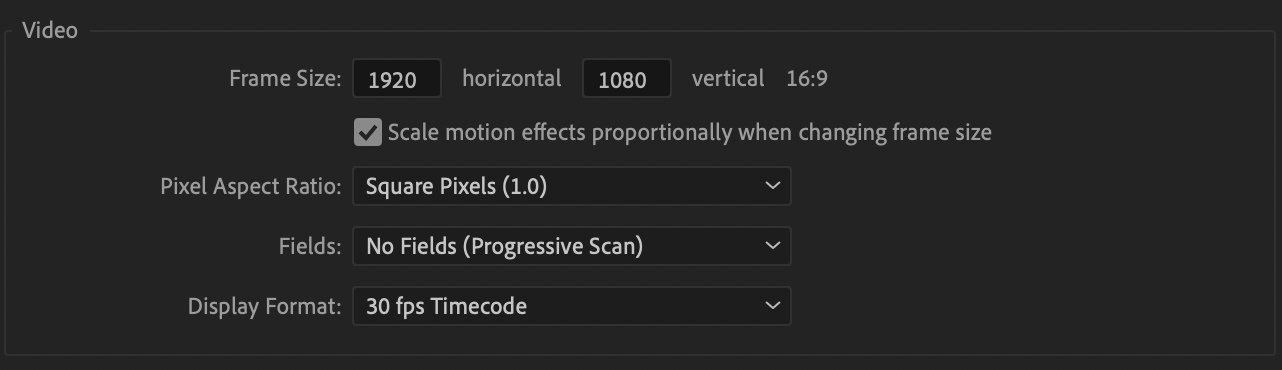
It’s recommended to keep a video at a 16:9 aspect ratio if it will be landscape, or 9:16 aspect ratio if it will be vertical. Dimensions that fit this ratio and are standard for landscape videos (i.e. for YouTube uploads) include 1280×720 and 1920×1080. Note that the larger the frame size, the higher the quality and file size of the exported video.
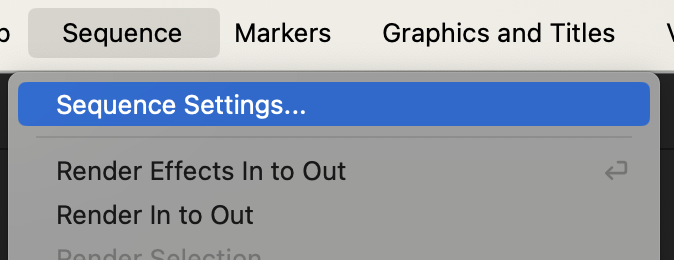
To check what your specific Sequence Settings are (such as the frame size of your project), go to Sequence > Sequence Settings…
From here, you can see what frame size your video has within the “Video” section, and you can adjust if necessary:
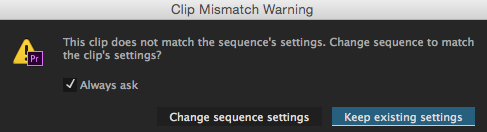
Clip Mismatch Warning
If for any reason your Sequence setting do not match your media clip settings, Premiere might ask to change the Sequence Settings. Click “Change sequence settings” if you’d like for Premiere to update your sequence settings so they match your media clip settings or choose “Keep existing settings” not make any sequence settings changes.
Social Media Video Size Considerations
Depending on where you want to upload your video (i.e. YouTube, Instagram, TikTok, etc.), you may need to update your video project’s frame size within the Sequence Settings. Ensure you are working with an appropriate frame size BEFORE you begin editing your project on the Timeline!
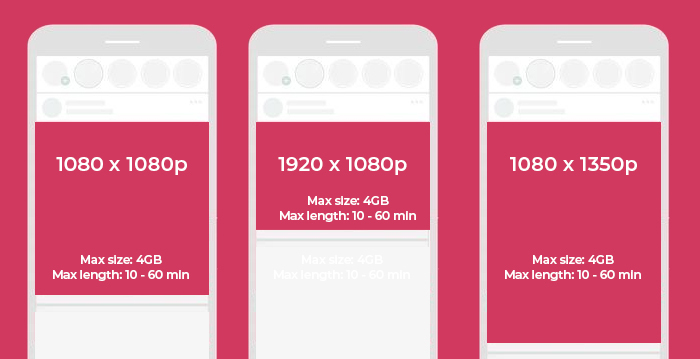
Here is a good guide to start you off for social media videos: The Complete Social Media Video Sizes Cheat Sheet
Navigating the Timeline
Reminder: to add media to the Timeline so you can begin editing, either drag and drop from your Finder or File Explorer directly to the Timeline, or import media files to your Project Panel and then drag from there to the Timeline.
The Blue Timeline Marker
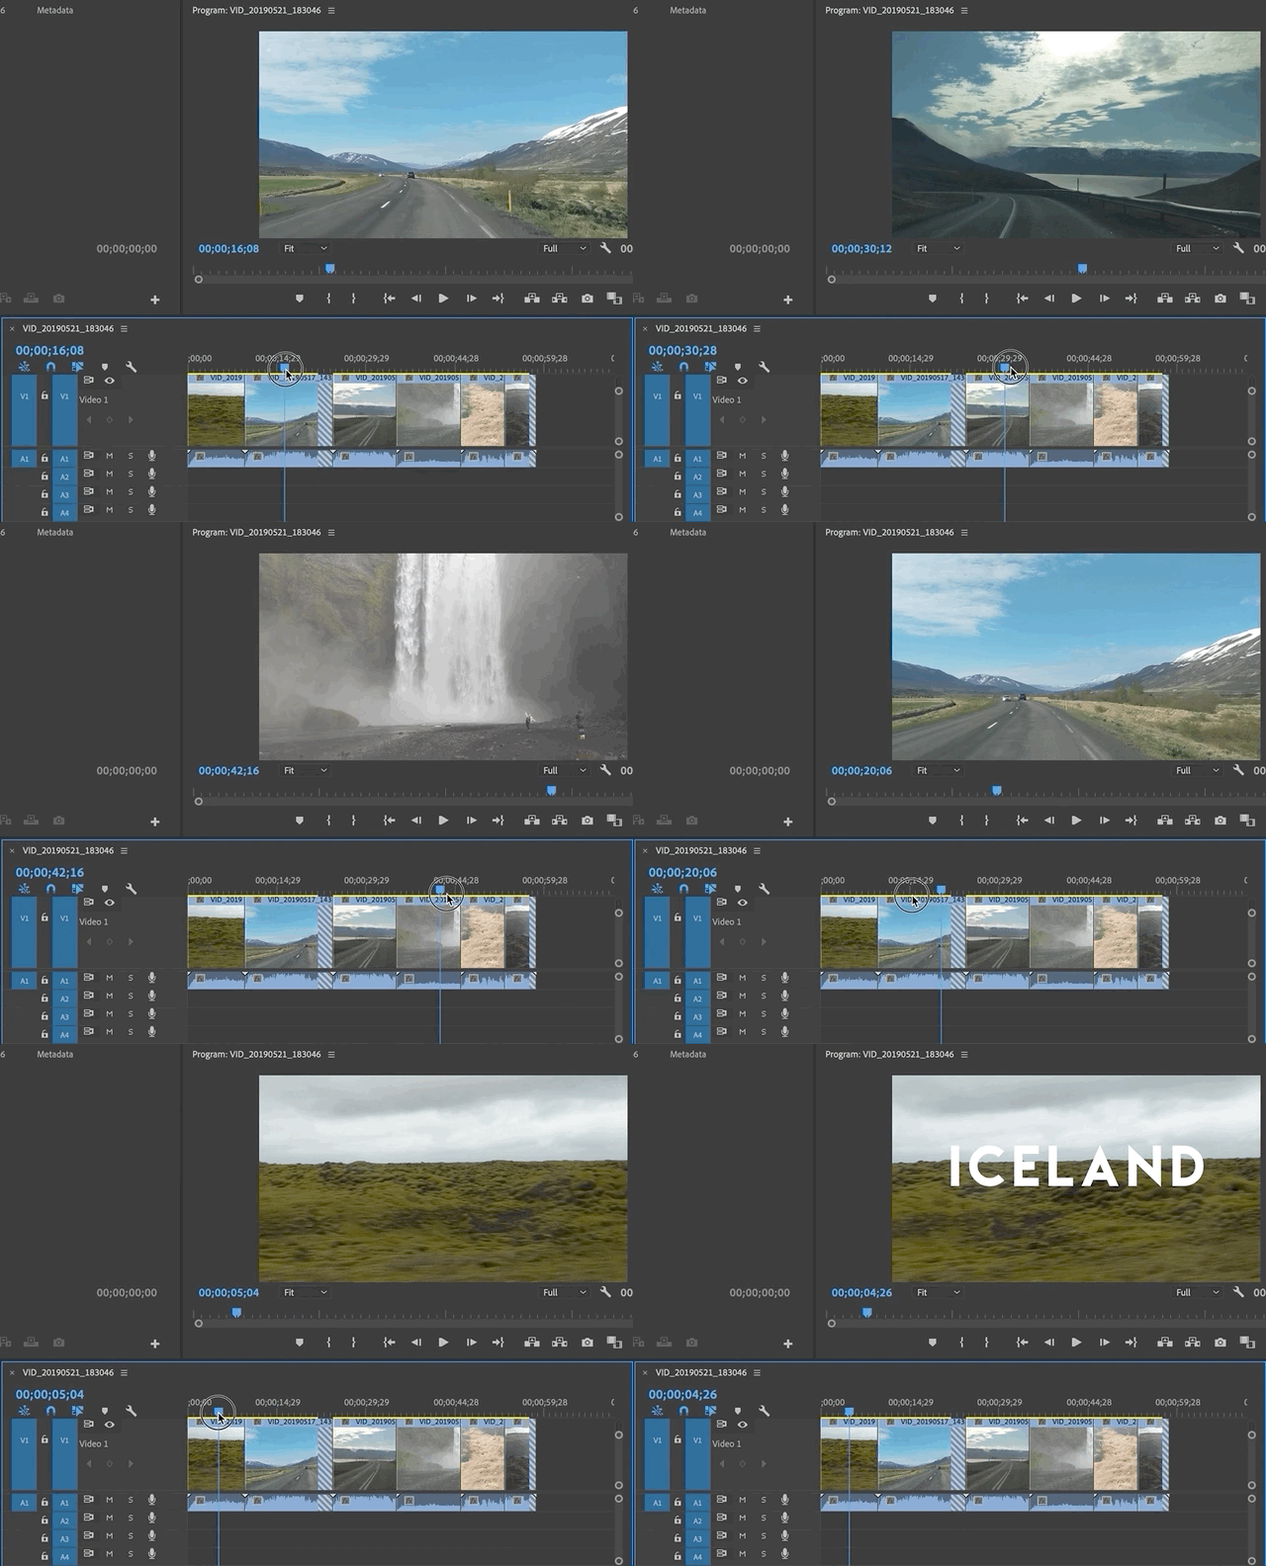
Playing/Pausing Clips
While you may use the buttons offered at the bottom of the Program Monitor, simply using the Spacebar to play or stop is most effective. Your project will begin playing from wherever the Blue Timeline Marker is located.
The Blue Timeline Marker indicates what part of your project (which exact frame) will be viewed on the Program Monitor. It can also serve as a great guide for cutting and zooming into specific areas of the project. You can manually move this marker wherever you want by clicking and dragging it over clips you want previewed in the Program Monitor.
Scrubbing Clips
You can scrub through the clip more precisely if you use the right and left arrow keys. You can also type in the beginning timecode of the clip on the left side of the timecode.
Zooming In and Out
Knowing how to zoom in and out of your media clips within the Timeline can be very helpful when making detailed edits, such as making cuts with the Razor Tool.
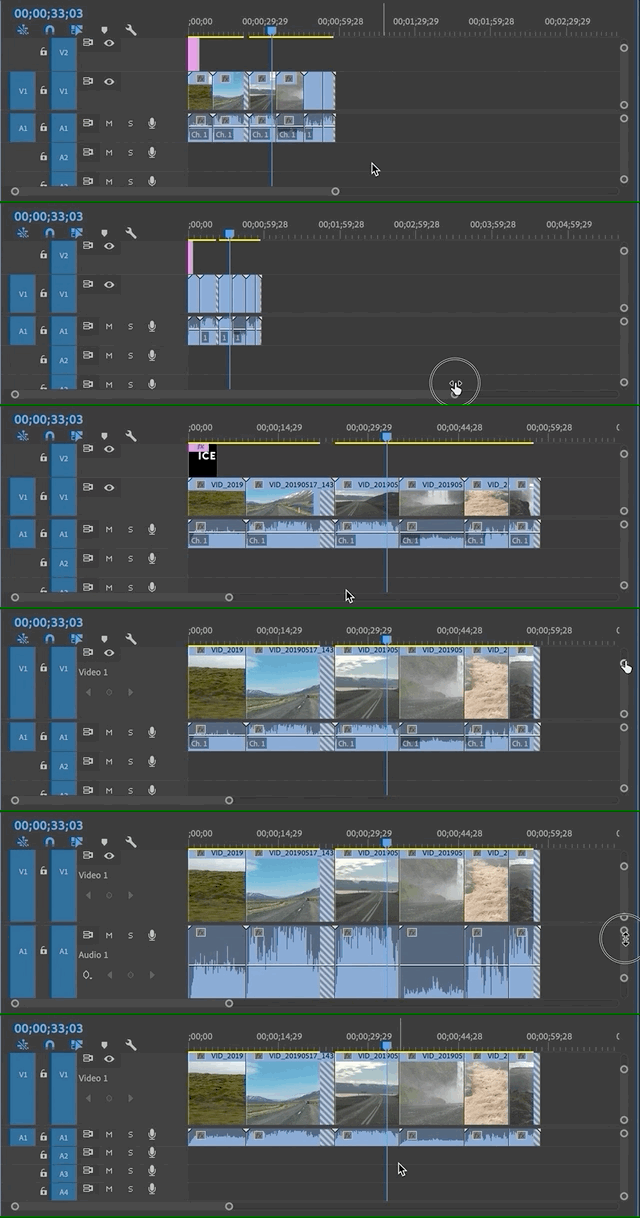
- To Zoom In and Out of clips on the Timeline length-wise, drag either end of the bottom grey scrollbar in or out. You can also click on the + and – keys on your keyboard.
- To Zoom In and Out of clips on the Timeline height-wise, drag either end of the side grey scrollbar up or down. You can also click on Command +/Command – keys on Mac or Control +/Control – on Windows. This is helpful when editing audio clips to see the audio levels throughout a single clip or between different clips.
Adding Additional Video and Audio Tracks
Sometimes Premiere’s three video and audio tracks are not enough for a project. To add more video tracks, right-click on the video track side of the Timeline and click “Add Track”. Similarly, to add audio tracks, right-click on the audio track side and click “Add Track”.
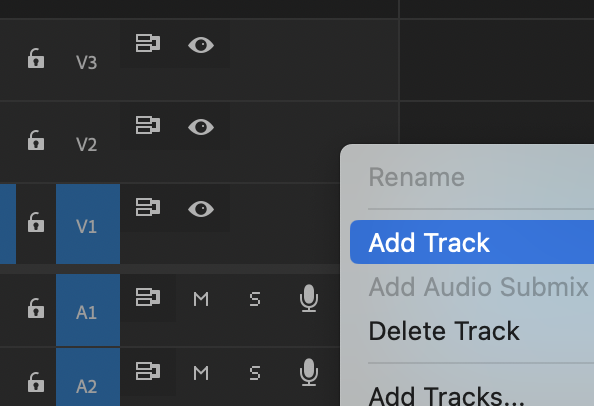
If you want to bring in more media, make sure to drag it to the correct Track. For example: If you try to bring in an audio file to a Video Track, it won’t allow you to until you hover over an Audio Track.
Source Monitor: What is it Good For?
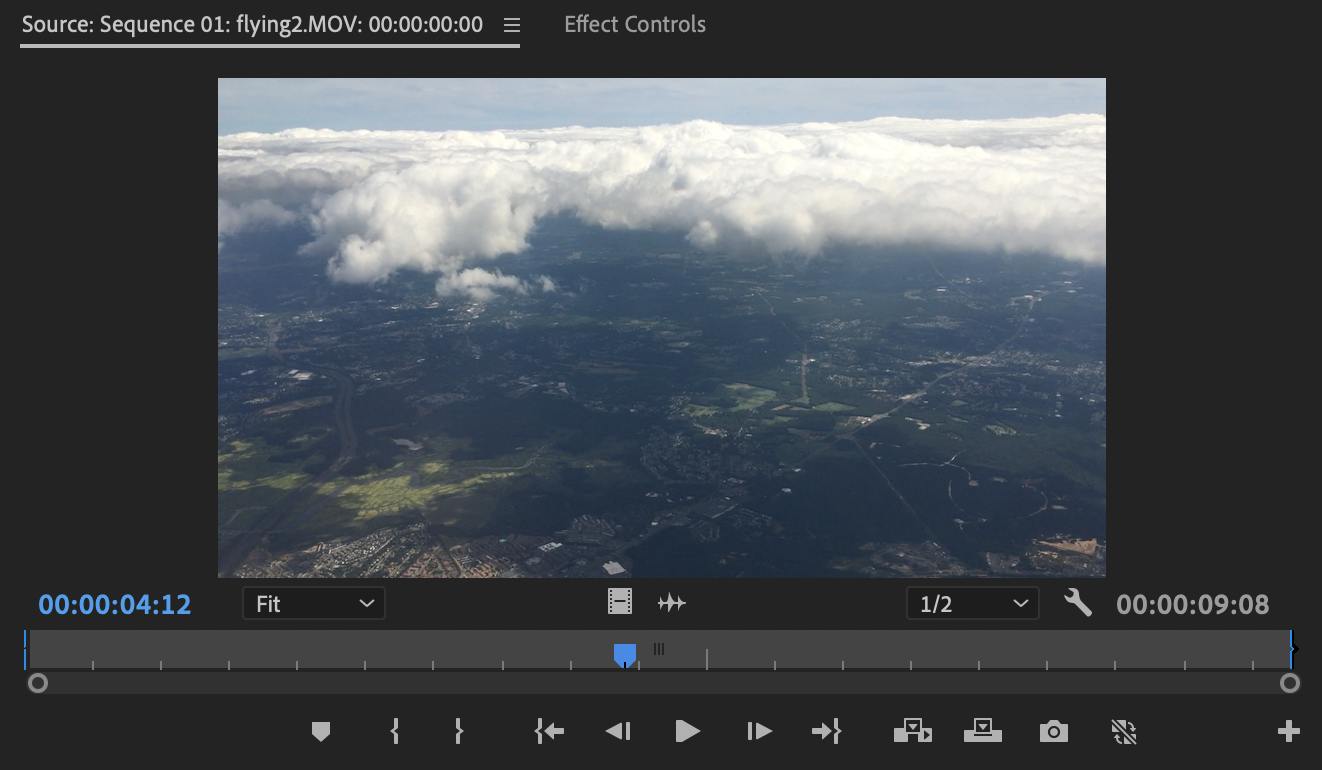
Trimming Media Clips Using the Source Monitor
The Source Monitor is great for previewing imported media before adding them to the Timeline. Additionally, the Source Monitor also lets you slice up their media clips within the Source Monitor first before using it in the Timeline (although you can also trim and cut clips directly within the Timeline).
- Double click on the media file you want to trim from the Project Panel so it shows up in the Source Monitor.
- Move the blue marker to where you’d like your clip selection to begin. At this timecode, mark an inpoint by pressing the “i” key on the keyboard or by pressing the inpoint button in the Source Monitor. If you mark the incorrect spot, you can redo this as many times as you need.
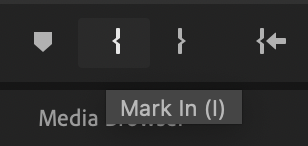
- Move the blue marker to where you’d like your clip selection to end. At this timecode, mark an outpoint by pressing the “o” key on the keyboard or by pressing the outpoint button in the Source Monitor.If you mark the incorrect spot, you can redo this as many times as you need.
- Click and drag the video from the Source Monitor into your Timeline.
Creating Subclips with the Source Monitor
Sometimes when you are working with a very long clip within the Source Monitor, it would be easier to use it in small sections. You can create subclips from an original media clip and have just that section saved within your Project Panel.
- Double click on the media file you want to trim from the Project Panel so it shows up in the Source Monitor.
- Mark an inpoint and outpoint as mentioned above.
- Navigate to Clip > Make Subclip
- In the title box, name the Subclip and click OK
- The Subclip should now appear in the Project Panels, ready for you to drag onto the Timeline to use!
Basic Editing Tools and Techniques
Undo
To quickly undo your previous action, you can press commandz on your keyboard. For Windows users, you can use controlz.
Now that you can import footage, navigate through the panels and create subclips, we will start looking at the more in-depth editing that can take place within the Timeline.
Rescaling Video Clip Frame Size
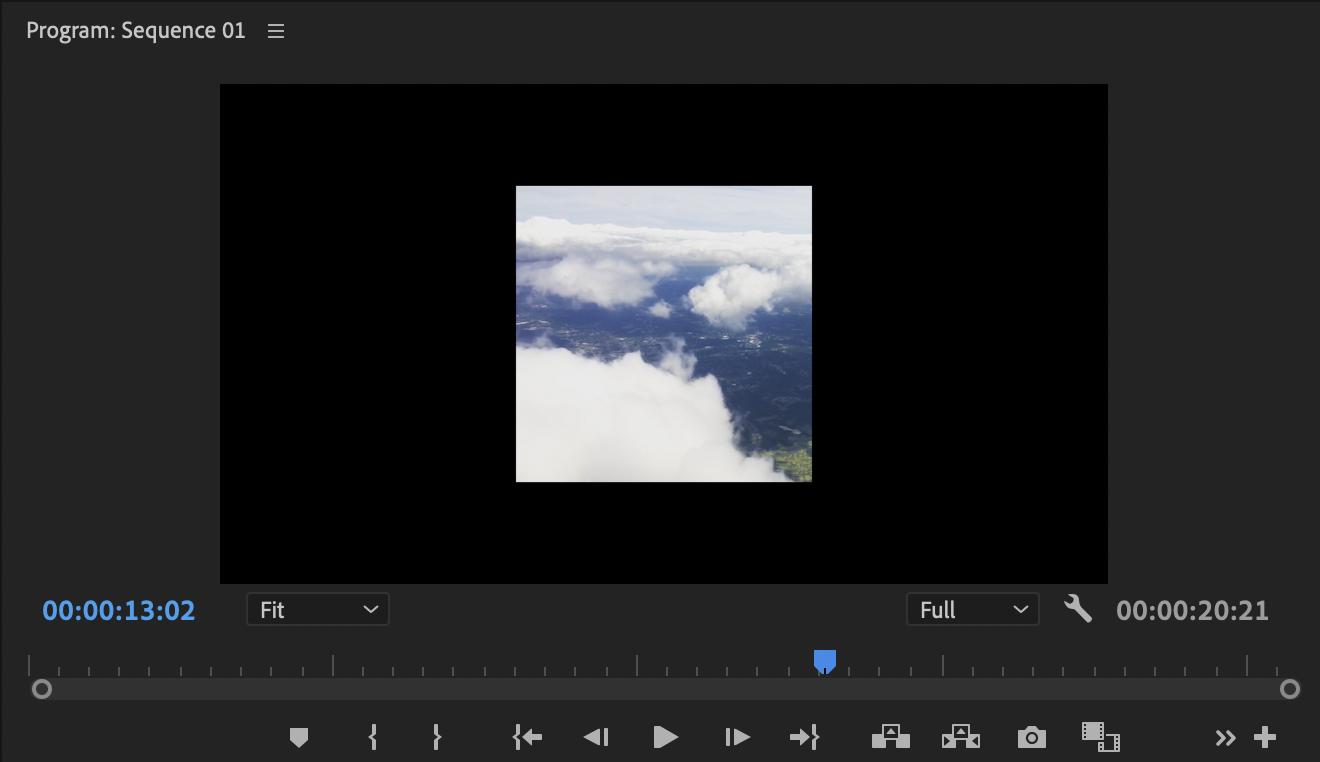
Does some of your media look too small or zoomed in when you view it on the Program Monitor? Sometimes we will import video files that are not the same frame size as our video project’s sequence settings. Keeping the size as it shows up might be fine, but it might also be distracting for our final video and will require us to resize the clip to fit our frame.
Quick Fix: Fill and Fit
This option offers a quick fix for video clips that may not be the same dimensions as the frame (shows up in the project monitor smaller than the frame).
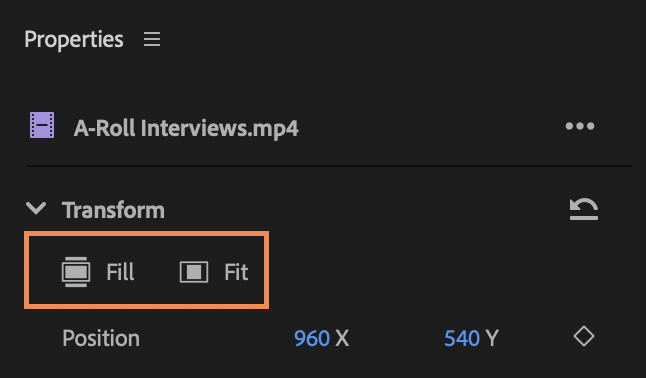
- Within the Timeline, move the Blue Marker so it is on the video clip you want to resize. This will let you preview the clip on the Program Monitor as you resize.
- Select the clip
- From the Properties Panel, click on either “Fill” or “Fit” from the Transform area
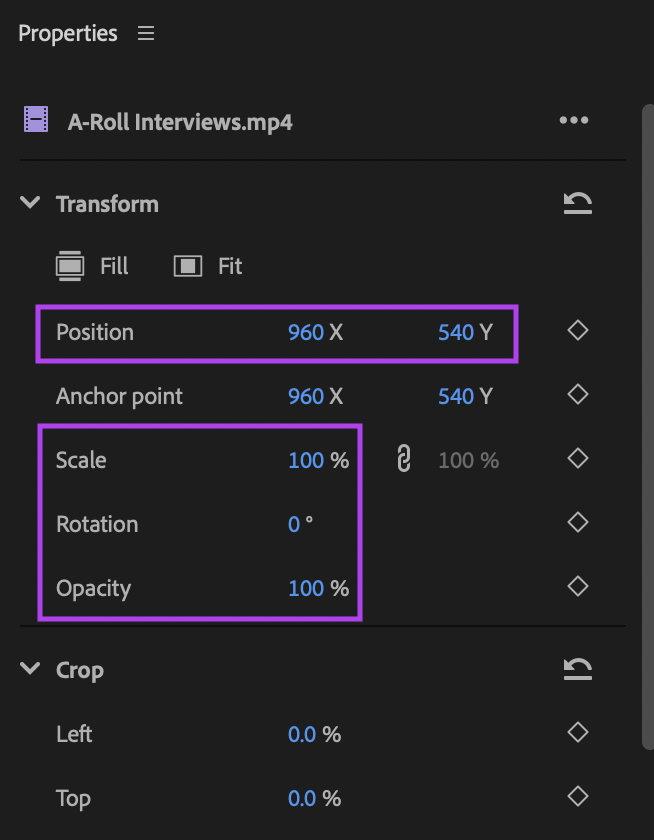
You can also manually rescale a video within the Properties Panel
- Within the Timeline, move the Blue Marker so it is on the video clip you want to resize. This will let you preview the clip on the Program Monitor as you rescale.
- Make sure the video clip is selected
- Go to the Properties Panel and alter any of its settings by hovering your curser over the blue button and using your trackpad or mouse scroll to scroll up or down to increase or decrease the number.
Selection Tool: Trimming, Moving, and Deleting Media Clips with the Selection Tool

The Selection Tool allows you to move around media clips within the Timeline. It also allows you to trim or expand video clips on either end as you need.
To use the Selection Tool, simply select it from the Tool Bar and click and drag on the appropriate clip.
Trimming/Expanding Media Clips
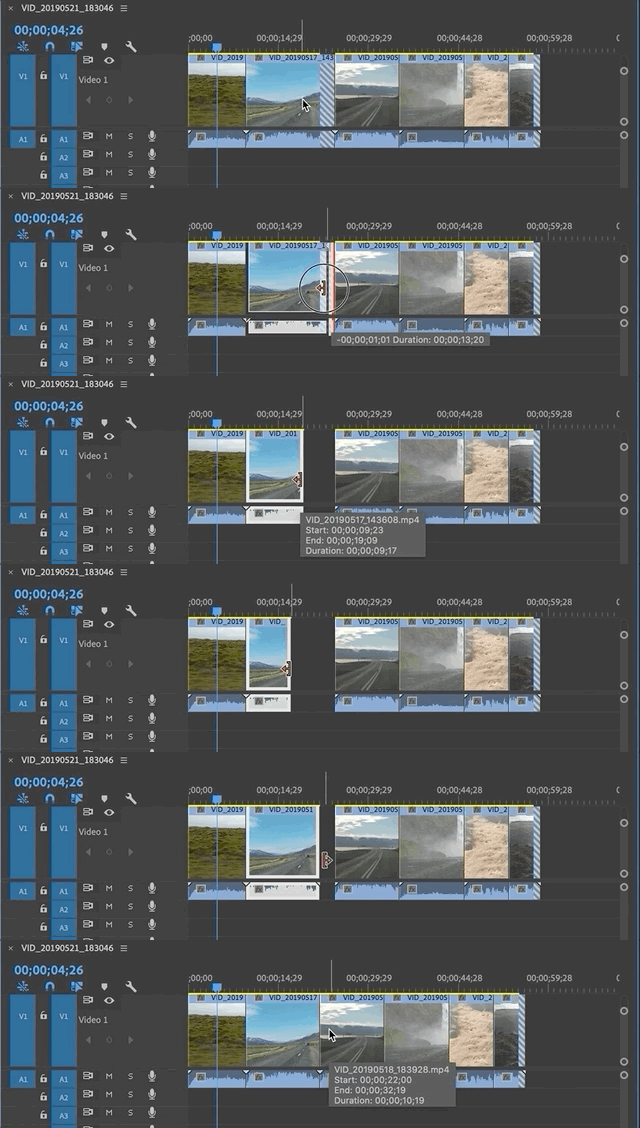
Sometimes during the editing process, you may decide that some clips that are already in the Timeline need to be longer or shorter.
- Click on a clip in the Timeline so it is highlighted.
- Hover over either edge of the clip. Notice how there is a red arrow bracket; that means the clip can be shortened or elongated.
- While the red arrow is visible, Click and drag the edge of the clip to the right or left.
Gaps and Overwriting
Trimming a clip may leave a gap in your Timeline, do not forget to move the other clips accordingly or click on the empty space and click Delete or Backspace to remove it.
Be careful when making a clip longer with this method, if you overlap other clips on the timeline you will overwrite them.
Deleting Media Clips
During the video process some clips need to be cut because of time constraints or because they just don’t make sense for the narrative any more.
There are two main ways to delete material: a cut delete and a ripple delete. Both have benefits, and it is up to the creator to decide which to use and when.
Cut Delete: This edit cuts and leaves a blank space.
- Click on a media clip.
- Click the Delete key on Mac or Backspace key on Windows.
Ripple Delete: This edit does not leave a blank space, but rather it puts the two closest clips together.
- Choose a clip in the middle of two other clips.
- Click Option + Delete on Mac or Alt + Backspace on Windows.
Razor Tool: Splitting Clips with the Razor Tool
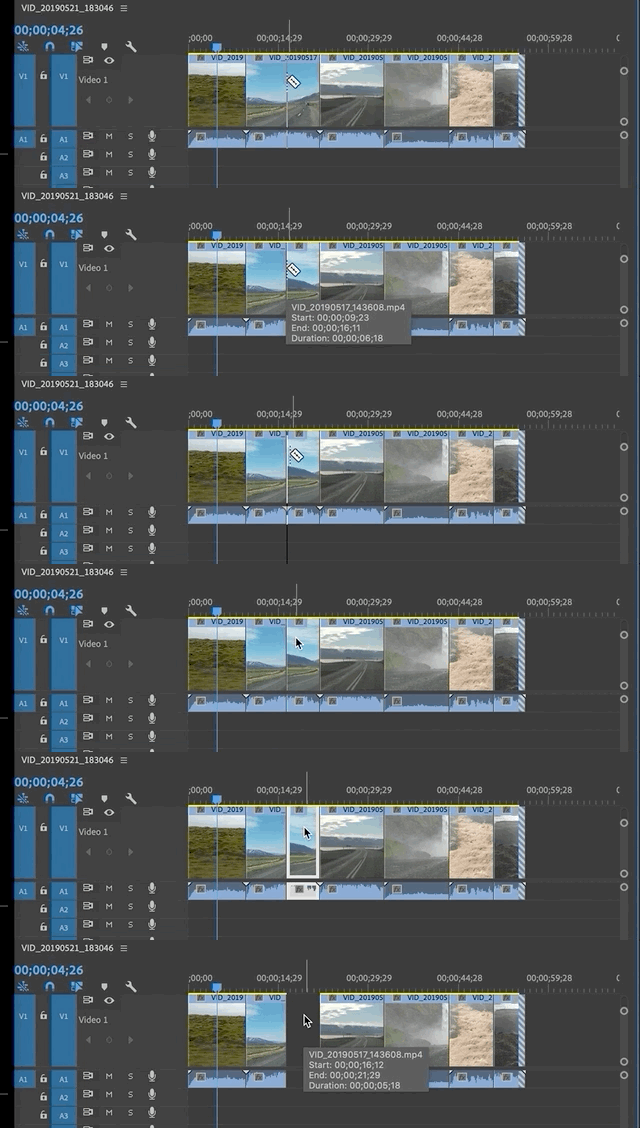
While creating videos, there may be times when you want to cut out a section of a clip within the Timeline. The Razor Tool will let you do just that!

You can use the Razor tool to cut up a clip, essentially making it two new clips. Once we do that, we can move the clips around in the Timeline to fit our needs. To use the Razor Tool:
- Select the Razor Tool from the Tools Bar
- Hover over a clip on your timeline (Optional: move your Blue Marker to where you want to split your clip prior to hovering)
- Once you have found the moment you want to split the clip at, click once. You just split your first clip!
Adjusting Media Clip Speed
In Premiere, you can speed up or slow down the motion of a clip.
- Select a clip in your Timeline.
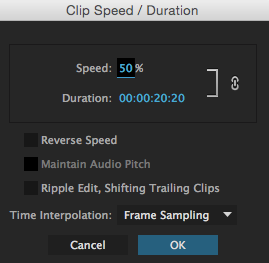
- Right-click on it and select the Speed/Duration option. A dialog box will appear for you to modify the speed settings of that particular clip.
- In the Speed section, change the speed to either a percentage or specific duration.
- Select “Maintain Audio Pitch” if you do not distort the sound of your clip.
- Select OK. Now you can play your clip in the timeline and see/hear the difference in speed.
Unlinking Audio and Video Tracks
By default, videos with audio are automatically linked when brought into the Timeline. This means that any trimming or cuts meant for one affects the other. Unlinking allows for audio or video to be deleted in order to replace it with other video or audio, such as background music.
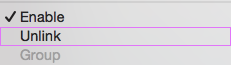
- Right click on a media clip and select Unlink from the menu that pops up (you may need to scroll down a bit).
- Delete or move either the video or audio clip as needed for your project.
- Feel free to bring in other video or audio to supplement the deleted or moved clips.
Adjusting Media Clip Volume
For the Entire Clip
Adjusting audio within the Timeline is the most straightforward approach. This allows us to change the overall volume of each clip.
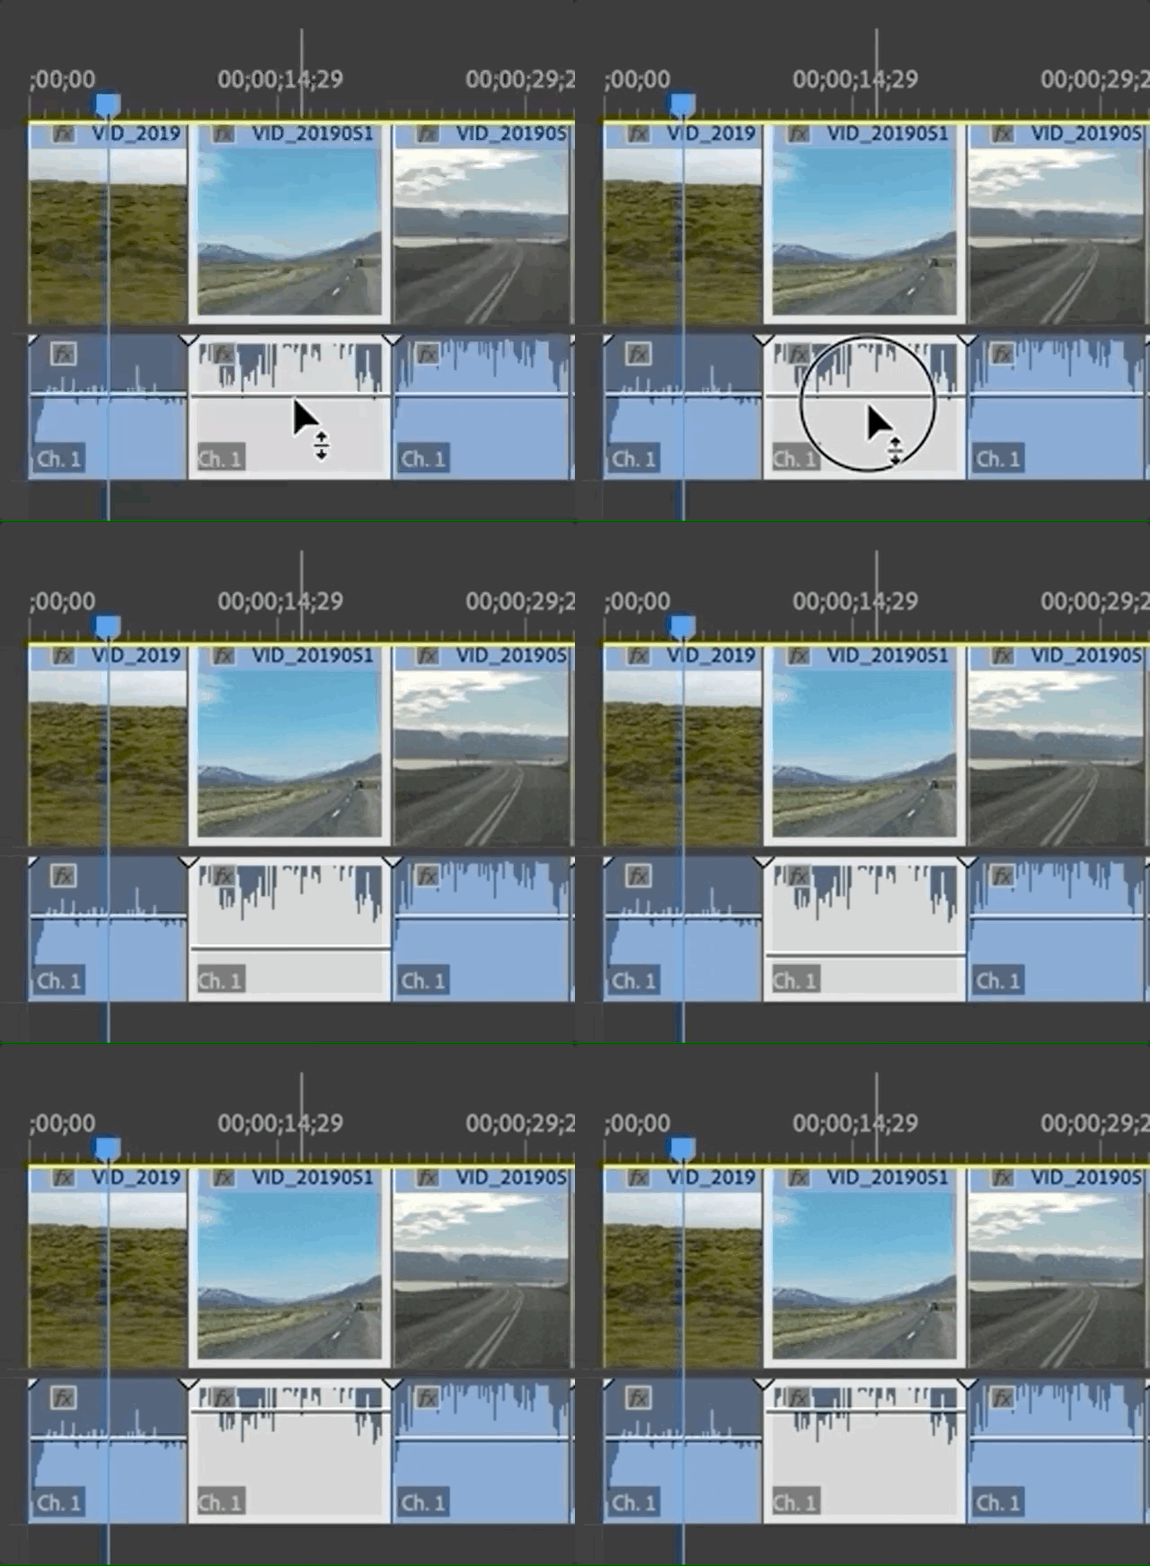
- Within the Audio Track, expand the track height-wise by tugging on either end of the side grey bar until you see a white line in the middle of the audio clip.
- Drag the middle white line up or down to increase or decrease the overall audio levels of the clip.
- While the clip is playing you can move the white line up and down to make the best audio levels decisions.
For a Part of a Clip
Though this is rarely needed for basic projects, in the case you need to manipulate parts of an audio clip, you can do so using keyframes. Keyframes let us add breaking points within our audio so we may have different parts of a clip have different audio levels.
- Within the Audio Track, expand the track height-wise by tugging on either end of the side grey bar until you see a white line in the middle of the audio clip.
- Ensure your audio clip is selected
- Move your Blue Marker to where you would like to you first keyframe to be
- Click on the white diamond button found within the Audio Track
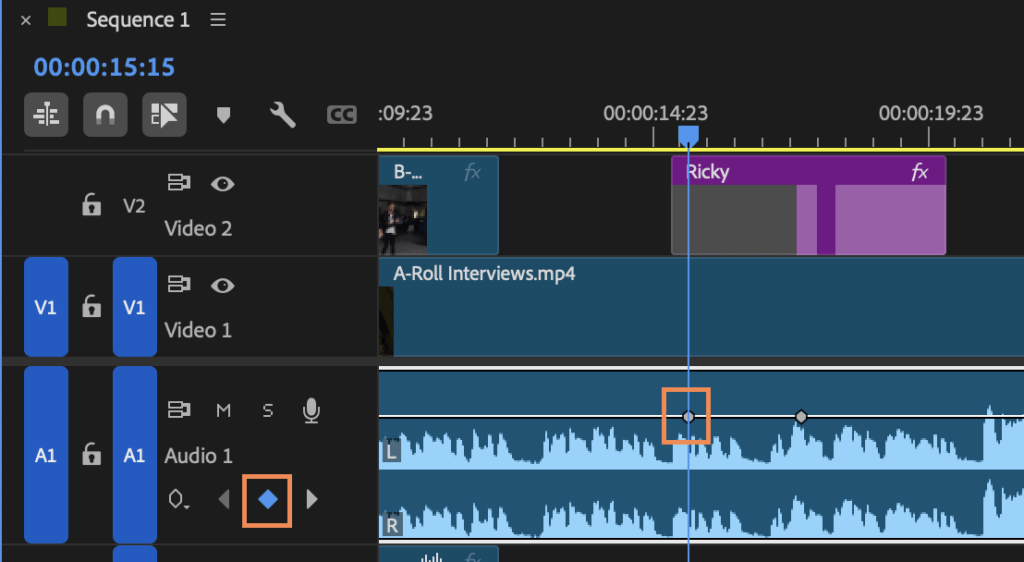
- Add at least two keyframes – as many as you’d like following the previous two steps
- Move the keyframes to your liking to increase or decrease volume.
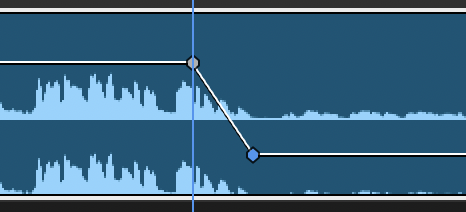
- To delete a keyframe, first select it and click Delete or Backspace
Fading Audio In and Out

- From the Timeline, hover over the audio clip you want to fade in or out until you see two grey squares appear on both corners of the clip.
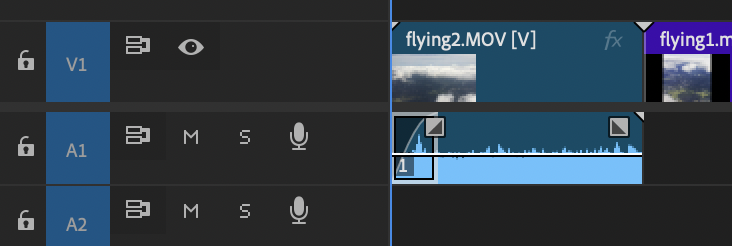
- Click and drag on one of the grey squares
- Play your project and adjust as needed
Adding and Editing Titles
Type Tool
The Type Tool allows you to quickly create different still titles within your project.

Adding Titles with the Type Tool
Throughout the filmmaking process there are times where you would like text to come up on the screen. You may want to have credits to showcase the talent in your film, or you would like an opening title. In Premiere Pro you can do all of these things with titles. Titles can be over a black screen or you can put them over video footage.
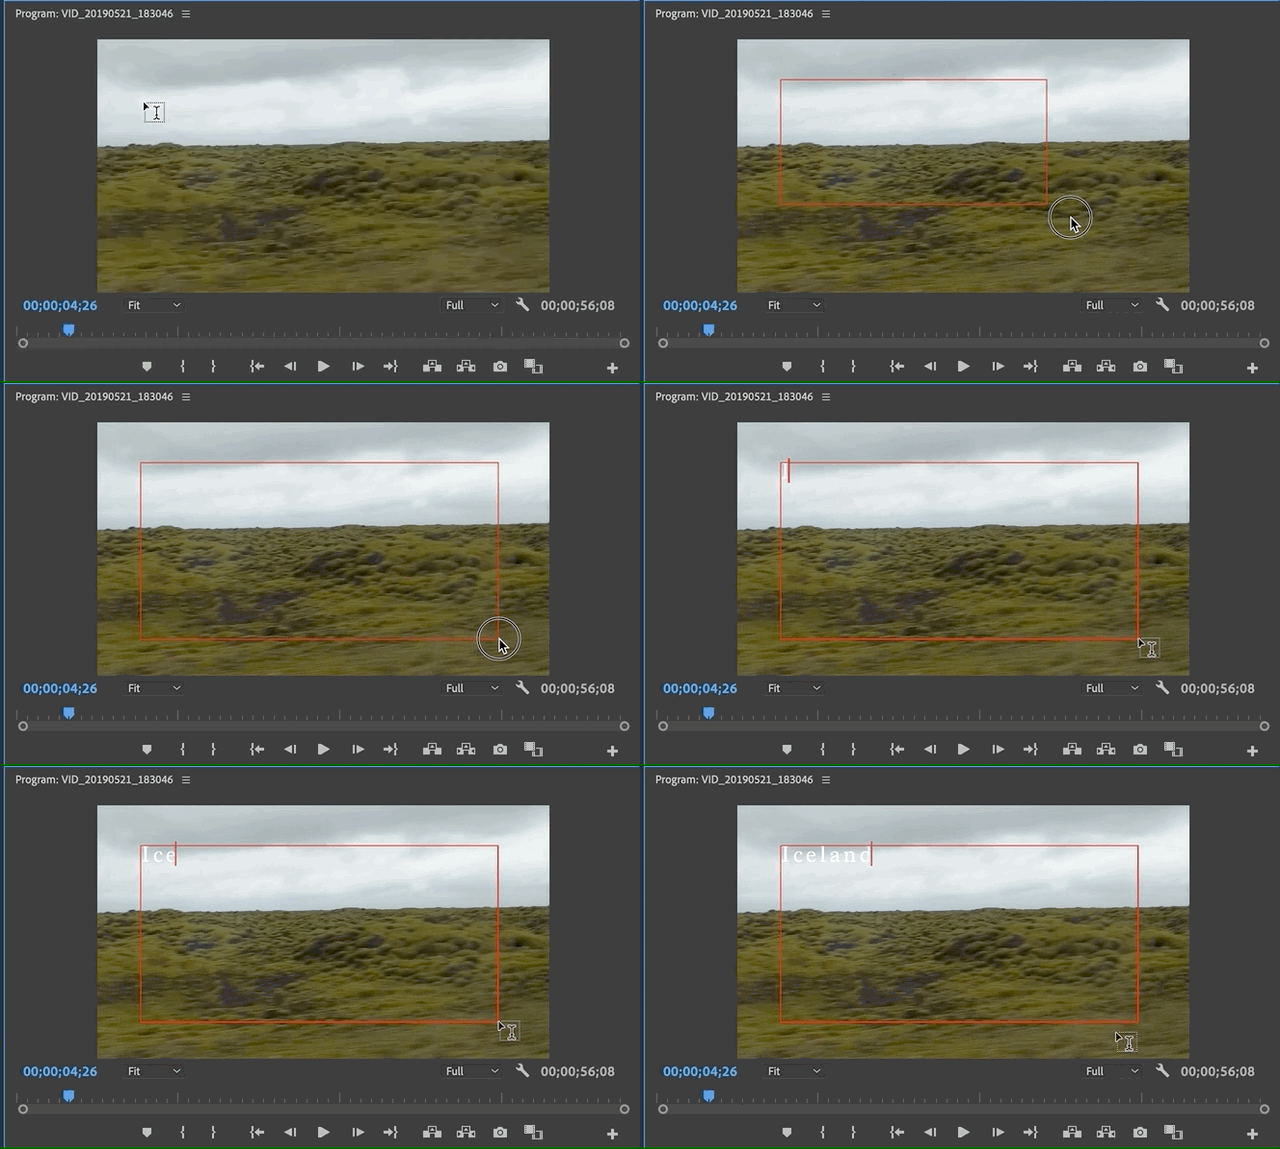
- Move the Timeline Tracker to the frame you’d like to add a title to
- Select the Type Tool from the Tool Bar
- Create a textbox on the screen within the Program Monitor
- After you’ve created your title, you will see that a new clip has been created within the Timeline in the Track above your video clip. With the Selection Tool you can shorten or extend the length of this title clip and move it to other parts of your project if needed.
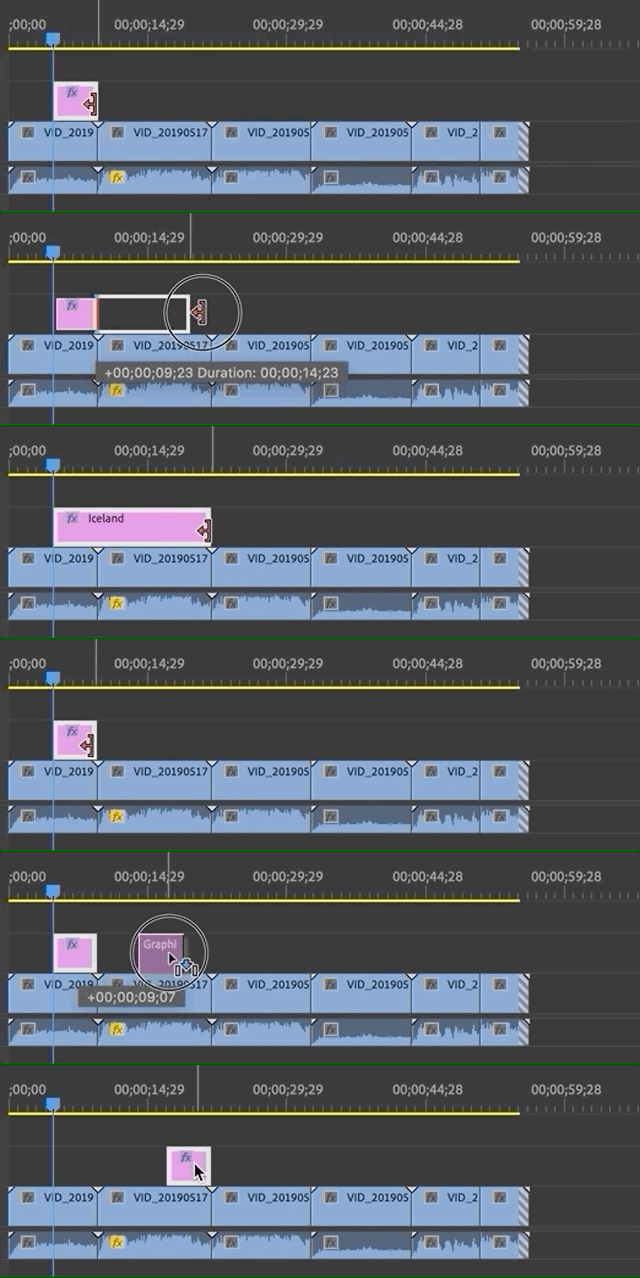
- To move your title within the frame of your video, make sure to use the Selection Tool. If you try to move the title within the screen with the Type Tool, you’ll just keep making more titles.
- You are able to make copies of your titles and edit the copies later to keep a consistent look throughout your project! Just select your title from the Timeline, hit Command C (Mac) or Control C (Windows) on your keyboard, move your Blue Marker to where you’d like to paste your copy, and hit Command V or Control V.
Adding Titles with Graphics Templates
Premiere also has some Text templates that already have cool effects applied to them. Using these may help make your project feel a bit more professional. To locate these:
- Open the Graphics Templates either from the Project Panel or by going to the top menu items and clicking on Windows > Graphics Templates
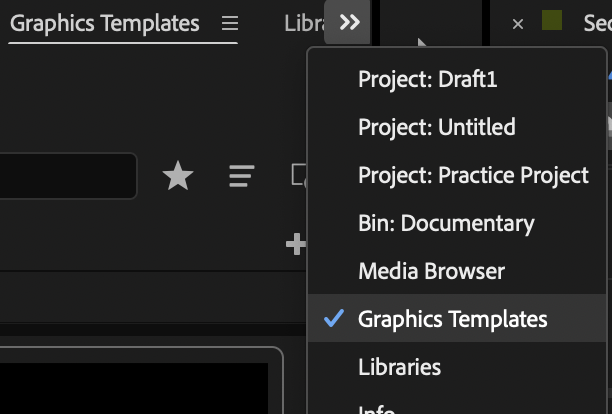
- Look through the various options and select a title of your choice
- Drag and drop the title to the Timeline
- Drag the edges of the title to lengthen or shorten the time the title is on display
- Edit the title following the steps below
Editing Titles
To change the size, font, color and alignment, you will need to use the Properties Panel.
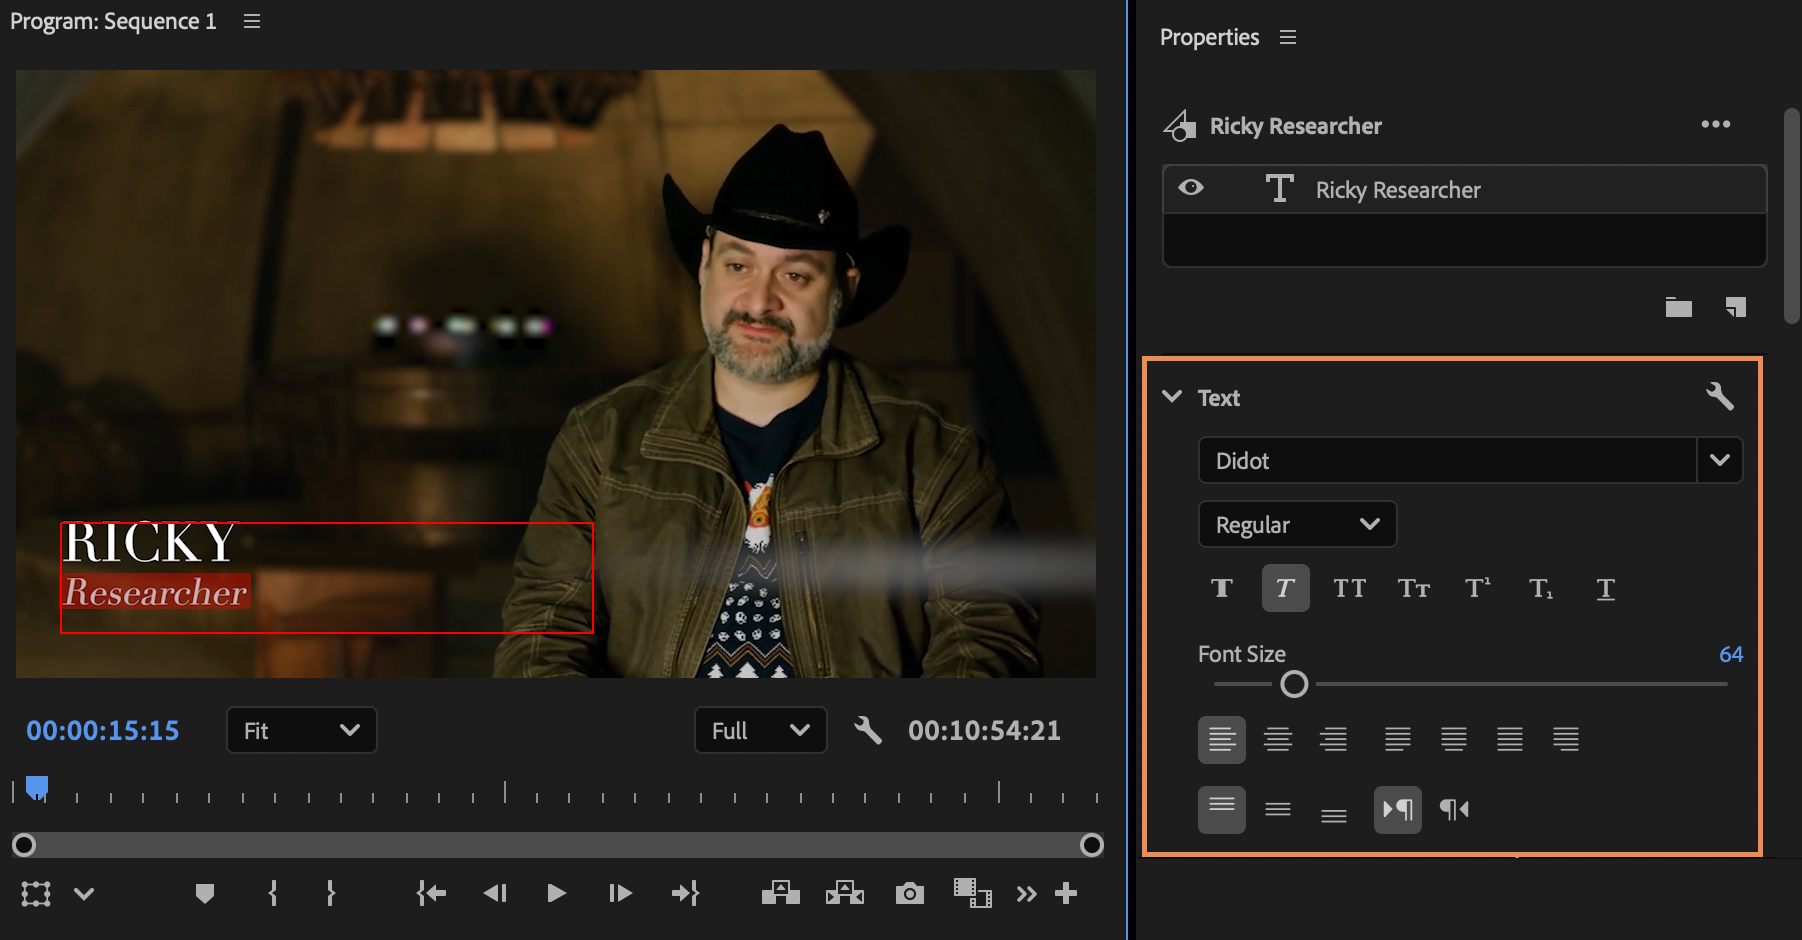
- Move your Blue Marker to be on the title you want to edit
- Select the title (using the Selection Tool) you want to edit within the Program Monitor
- Open the Properties Panel. You can go to Window > Properties to open it if you don’t already have it available in your workspace.
- Change any settings as you find necessary. To get a better idea as to what each option edits, simply hover over any of the buttons to reveal their names.
- There are many ways you can edit your title, but the most popular can be found under the Align and Transform, Text and Appearance sections. Many of these options should look familiar if you’ve worked with other Adobe products, Google docs, or Microsoft Word.
I Can’t Edit My Title!
If you notice that even though you are making changes within the Essential Graphics panel, but aren’t seeing the changes being applied to your title, you may not be on the correct tool.
Make sure you are on the Selection Tool before making any edits. If you are on the Type Tool and accidentally double-clicked on the Title to edit the text, you will need to highlight the entire text before any changes can be made.
Adding Video Transitions
Adding a Video Transition at the beginning or end of your project, or between clips in the middle of your project can make it feel more dynamic and professional.
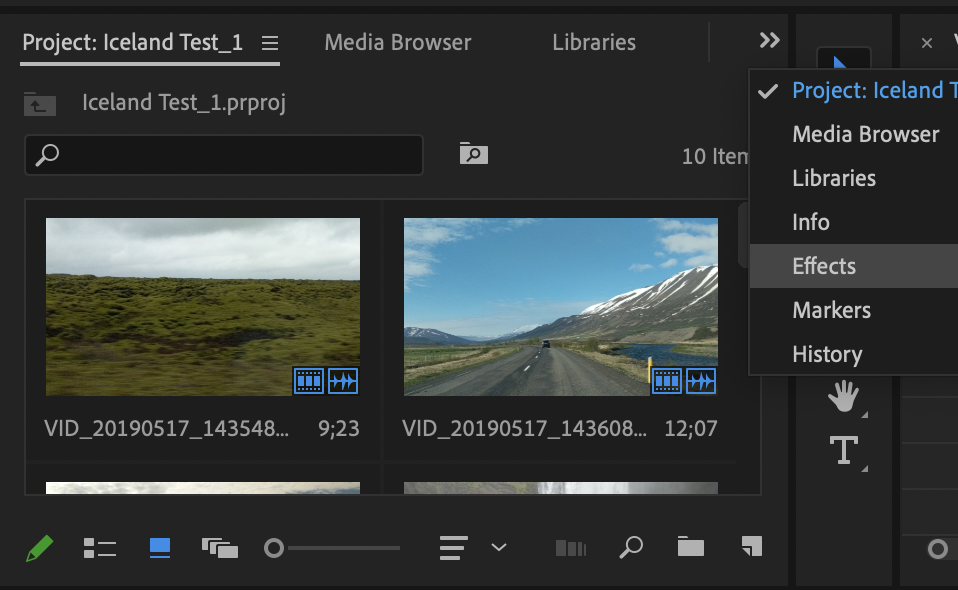
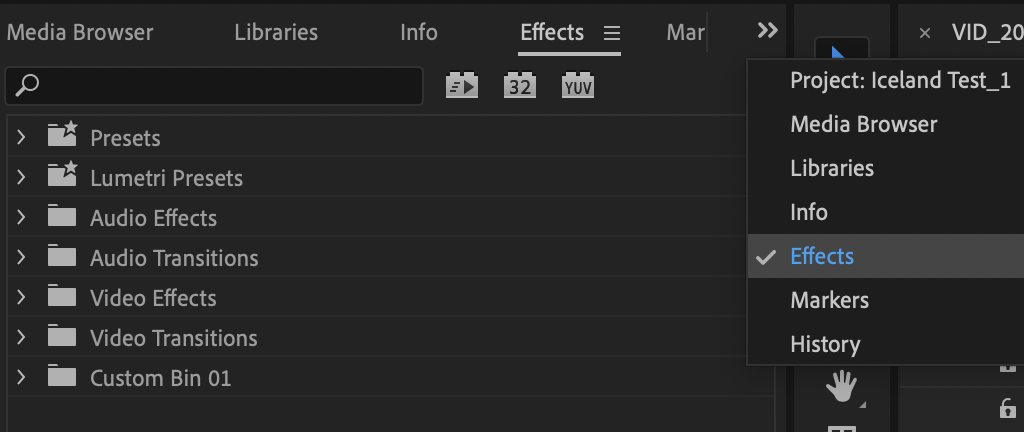
- Click on the Effects tab within the Project Panel. If you can’t see it, click on the double arrow from the top of the panel to reveal more options, and click Effects. If you still can’t find it, open Effects from the Windows menu.
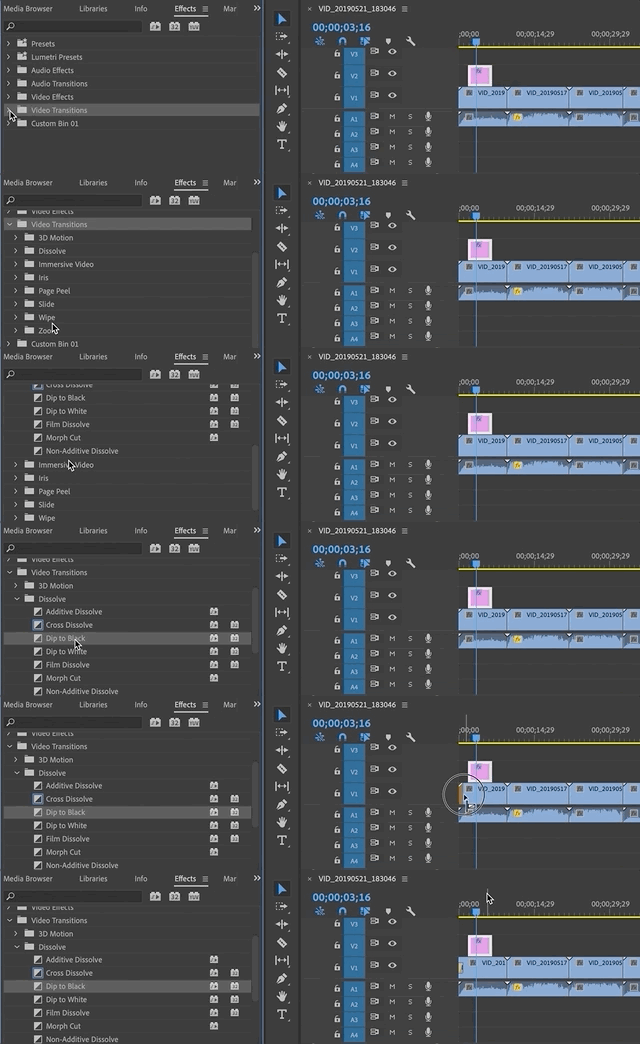
- Navigate to the Video Transitions folder and click on the arrow on the left to expand it.
- You should now see more subfolders for each general Transition. Expand one that interests you. Subtle Transitions Are Usually Best! While Premiere offers many different options for transitions, it’s always best to keep Transitions simple. Unless you are looking to resemble an early 90s aesthetic or add some comedy to your project, stick to Transitions found within the Dissolve subfolder.
- Click and drag a Transition of your choice to the either the beginning or end of any clip, or between two clips on your Timeline. You may need to zoom into your clip if it doesn’t allow you to add the Transition.
- Once zoomed into your applied Transition, you can increase or decrease its length of time within the clip by dragging an edge of the box it created.
Saving, Exporting, and Packaging
Saving as a Premiere Project
It is extremely important that you save your work as you are working on your Premiere project! In case your computer crashes or runs out of battery, saving will let you be able to reopen your project later to continue working on it. To save, simply hit Command S or Control S on your keyboard. Otherwise, you can also go to the menu at the top and select File > Save.
It’s important to note that saving your project will only allow you to reopen within Premiere on your current computer and it will have the file extension of .prproj. This file should not be used to share with others, especially if they do not have access to Premiere or the original media files used.
To create a shareable file that can be accessed by others or uploaded to the internet, see below in the Exporting section.
Planning to Switch Computers After Saving?
If you know you will be editing your project from multiple computers, it’s best to store all of your media and Premiere project within one folder, and to move that entire folder (via an external hard drive or a cloud storage service) to your new computer so that the media can be located. If any original media cannot be located, you will see “Offline Media” messages within your Timeline, which will require you to manually link the missing files. To ensure you have all your media files in one folder before you switch computers, see the “Packaging” section below.
Rendering & Exporting (Creating a Shareable File)
Rendering
In essence, rendering in Premiere Pro is the process of preparing your video project for smooth playback and ensuring that all effects and transitions are properly applied before exporting the final video. Depending on your project length and number of effects, the rendering process may take a while! DO NOT wait until the very last minute to render and export your project. It is always a great idea to render your project prior to exporting to ensure the best quality video!
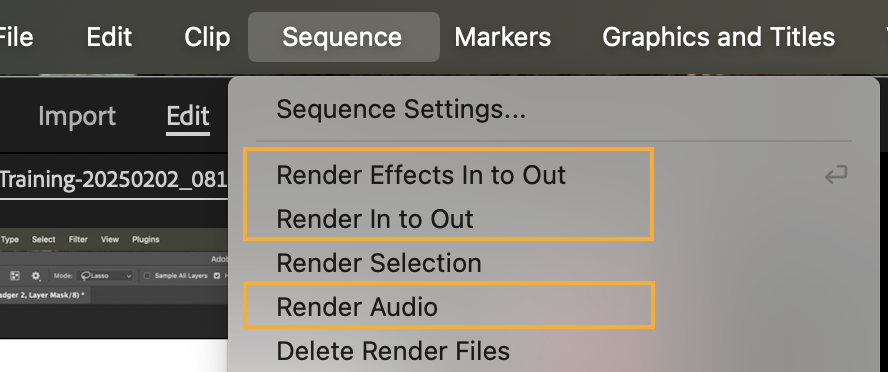
- Click once on the Timeline.
- Go to Sequence > Render In to Out
- Then Sequence > Render Effects
- Finally, Sequence > Render Audio
Exporting
Exporting our project will allow us to share our project with others! The final file can be used to upload to Canvas, to a cloud service such as Google Drive, or to a social media application or YouTube.
1. Navigate to the top-left corner of your workspace and click on Export. If you are having trouble locating this, you can also go to File > Export > Media…

2. Change the File Name if necessary
3. Make sure the Location is a folder you will be able to find afterwards. To change the Location, click on the blue link.
4. For the Format section, change it to whatever your project instructions tells you. If no specific guidance is provided, H.264 or Quicktime are always great options for a high quality video that isn’t too large of a file size. H.264 creates a .mp4 file, while Quicktime creates a .mov file.
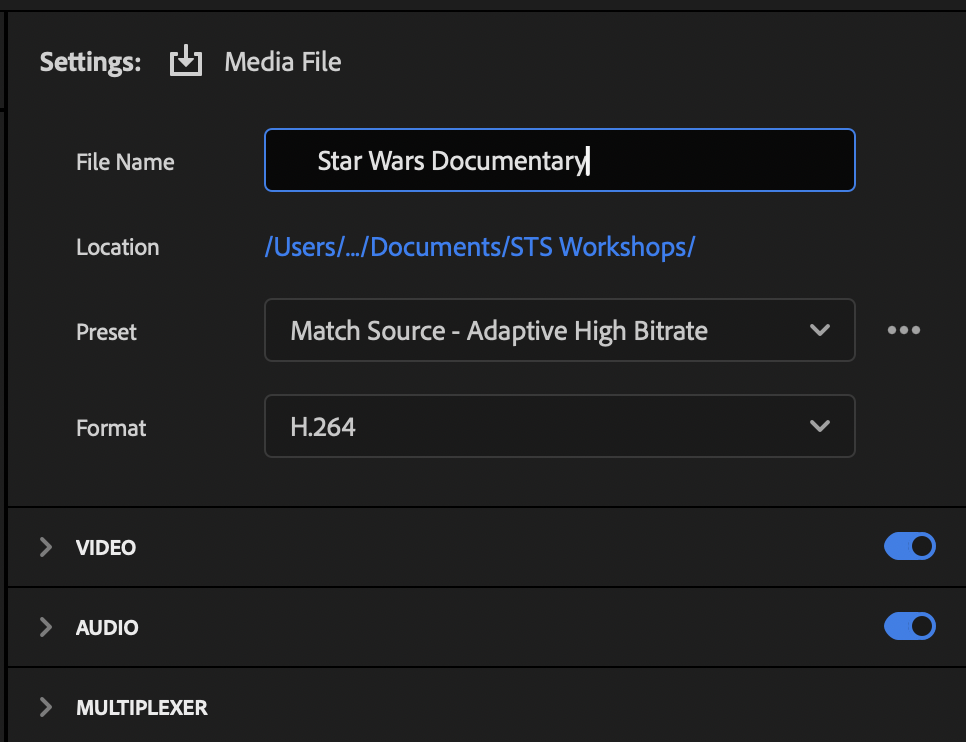
- Unless your project guidelines state otherwise, you should keep the rest of the settings as they are for a basic project. But always confirm with your instructor if there are other settings you should change.
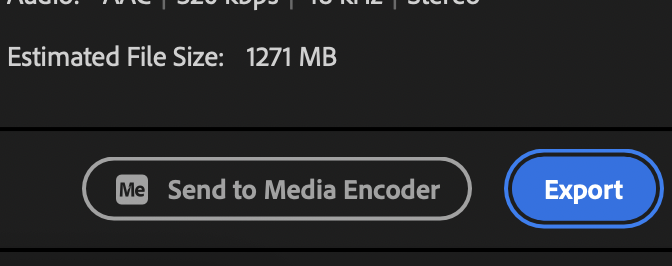
- Click Export. Congratulations! You now have a completed Premiere Pro movie project.
Packaging (Creating a Shareable Folder)
It’s a fair assumption to believe that access to just a Premiere file (.prproj) will let you edit your project on any computer with no issue. Unfortunately, this is wrong! All Premiere projects reference video and audio files that exist on your computer to create a project. If you take the Premiere file to a new computer without all of the media it references, you will get a bunch of “Missing Files” when you try to edit the file on a new computer. Packaging helps with this! If you plan to work on your Premiere project from more than one computer and you don’t have an External Hard Drive, it will be a good idea to create one folder with your premiere project file and all of the video and audio files so you can upload it to Google Drive or another cloud-based service. You will then be able to download this folder to your new work station and continue with your project with no worries of missing files. Luckily, Premiere let’s you do this relatively simply:
- If you haven’t already, go to File > Save As… to save your project
- After you’ve saved, go to File > Project Manager…. A dialog box will appear, giving you some options for packaging your project.
- Under Resulting Project, select “Collect Files and Copy to New Location”.
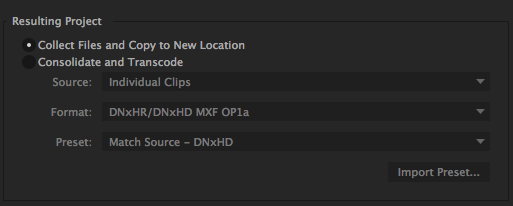
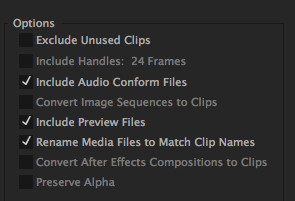
- Under Options uncheck “Exclude Unused Clips” as we want all our footage to transfer to this location. Keep “Include Audio Conform Files”, “Include Preview Files”, and “Rename Media Files to Match Clip Names” selected.
- Under Destination Path, click Browse… and choose a location that makes sense to you and can locate later.
- When you have changed these settings, click OK.
- Navigate to the location on your computer you selected and you will see a folder titled after your project. Here you will see your project, along with all the footage. This folder can now be transferred or copied to another location.
Troubleshooting
My Media Disappeared! What Do I Do??
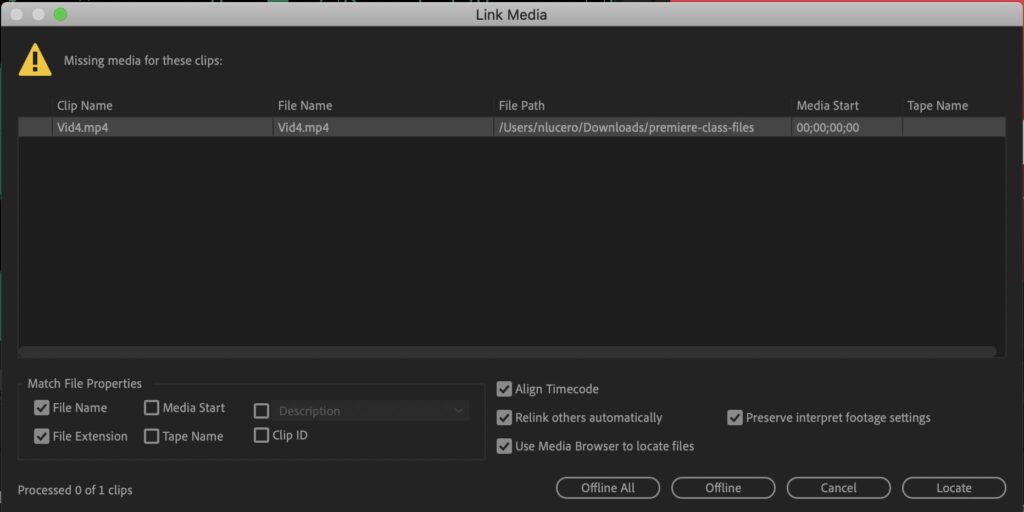
As mentioned before, your media needs to stay in the same location in order for Premiere Pro to be able to find and work with it after importing. If you open your project and are greeted by the message below, your current computer needs help locating the media files you used in your original project. Once you can locate that media, your project should be the same as the last time you saved it.
Reconnecting Offline Media
- Create or find a folder and place your Premiere Project and all of your media files (video and audio). Make sure this folder is named or renamed to something related to your project.
- In Premiere Pro, within the “Link Media” message showcased above, select one media clip. If you closed out of this pop-up, select all of your media from your Timeline, right-click, and select “Link Media”.
- Make sure that “Align Timecode”, “Relink others automatically”, “Use Media Browser to locate files” and “Preserve interpret footage settings” are all selected.
- Click Locate and find the clip from the folder you saved it in earlier and select OK.
Because “Relink others automatically” was checked, Premiere Pro will automatically reconnect all of the clips that were within the Link Media pop-up.
Additional Tools (Not Taught In Workshop)
In this section, we will go over a few more advanced editing techniques.
Effect Controls
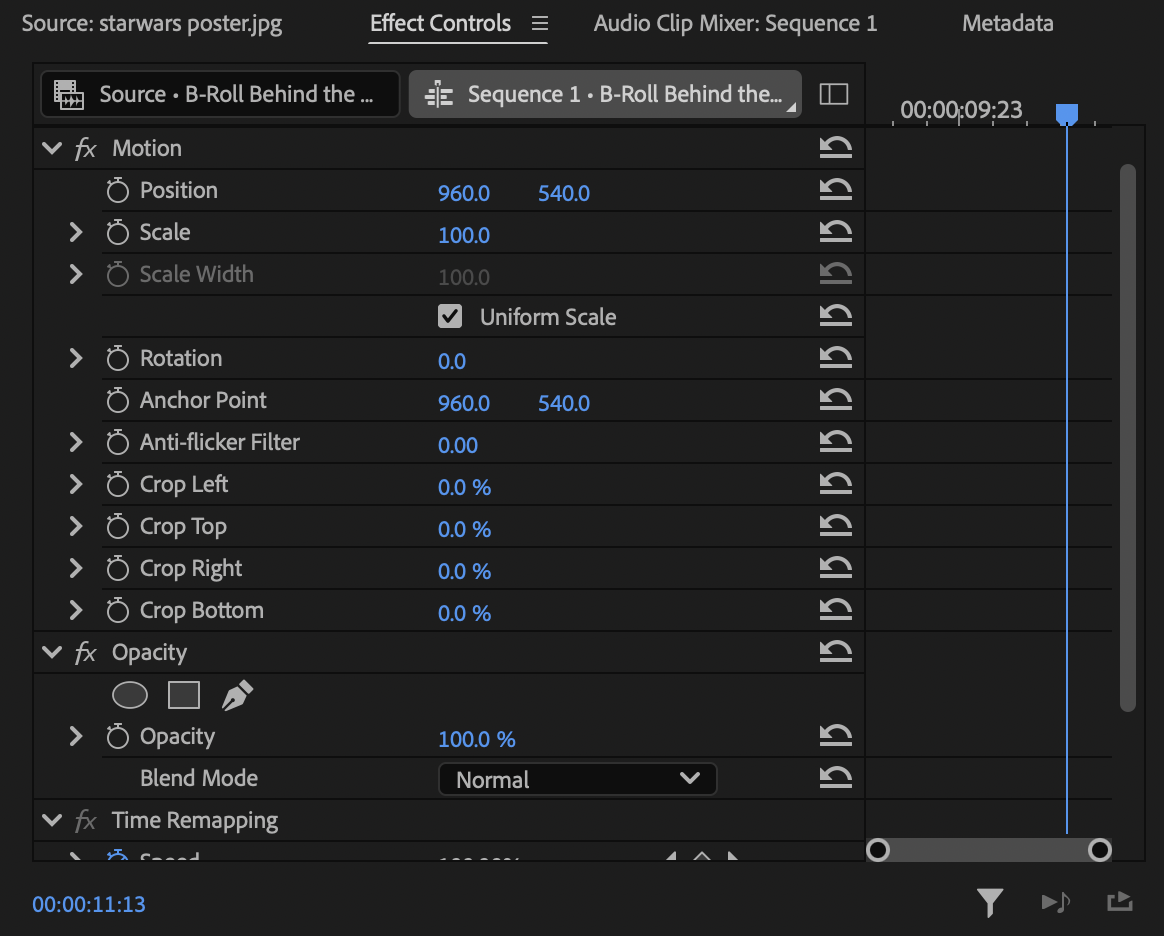
The Effect Controls panel displays all effect properties, keyframes, and interpolation methods at once. Effect Controls used to be where we would alter much of the settings the Properties Panel now houses.
- Within the Timeline, move the Blue Marker so it is on the video clip you want to resize. This will let you preview the clip on the Program Monitor as you rescale.
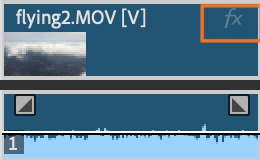
- Click on light-colored “fx” located on the top-right corner of the video clip you want to resize. If you don’t see this option, from the top menu go to Windows > Effect Controls
From the Effect Controls panel, you will a bunch of settings, including any effects you added to a clip (you’ll probably have to scroll down to see all of the fx settings). Alter any of its settings by hovering your cursor over the blue text and using your trackpad or mouse scroll to scroll up or down to increase or decrease the number.
Using Keyframes in Effect Controls
Underlying the basic animation and effect functionalities of Premiere are keyframes. A keyframe marks the point in time where you specify a property, such as position, opacity, or audio volume. To create a change in a property over time, you set at least two keyframes—one keyframe for the value at the beginning of the change, and another keyframe for the value at the end of the change. Premiere then reads these marks and changes the clip’s properties over the time period that you have marked.
- Within the Timeline, move the Blue Marker so it is on the video clip you want to resize. This will let you preview the clip on the Program Monitor as you add keyframes.
- Click on light-colored “fx” located on the top-right corner of the video clip you want to add keyframes to. If you don’t see this option, from the top menu go to Windows > Effect Controls
- From the Effect Controls Panel (NOT the Timeline), move the Blue Marker to where you want the first keyframe to be.
- Change the numbers next to the property to whatever settings you’d like your first keyframe to hold.
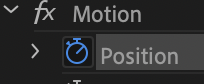
- Click on the stopwatch icon next to the property you’d like to add keyframes to (i.e. Position, Scale, Opacity, any effects you added, etc.)
6. From the Effect Controls Panel (NOT the Timeline), move the Blue Marker to where you want the next keyframe to be.
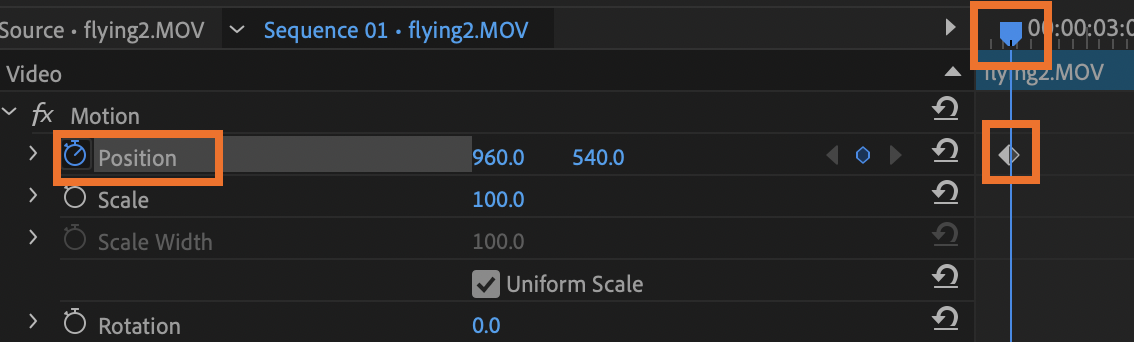
7. Change the numbers next to the property to whatever settings you’d like your next keyframe to hold. The moment you change the numbers, a new keyframe will be applied.
8. Playback your clip to see how the keyframes interact with one another.
Adding Effects
Premiere offers effects to improve the look of some clips. Below are the steps you would take to apply and edit any effect you apply to your media clips, using Brightness and Contrast as an example.
- Select the Effects tab in your Project Panel. You can also go to Windows > Effects. You will see many different options for Effects. You can click on any of the arrows to the left of the effect headings and see many more options.
- Click on the dropdown arrow in the Video Effects heading.
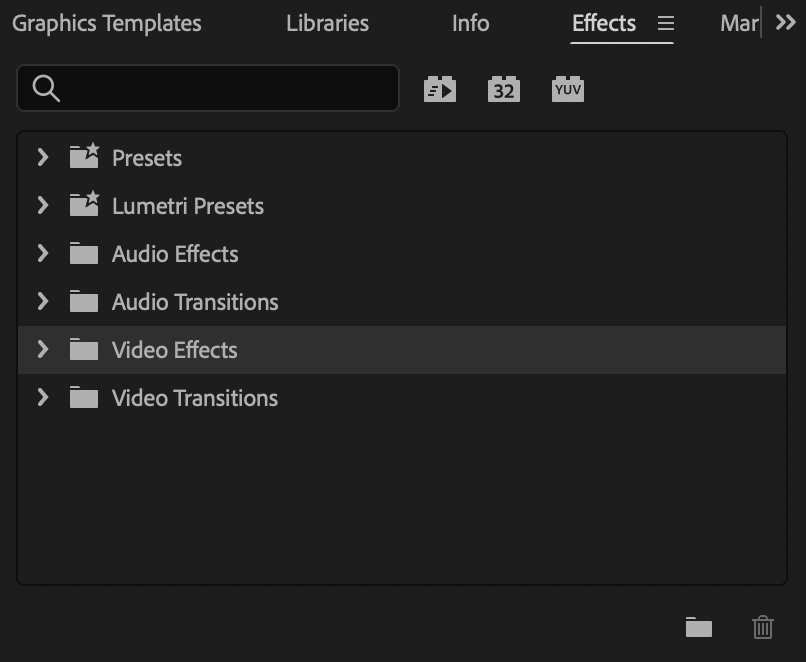
3. Expand the Color Correction subfolder and drag and drop the Brightness and Contrast effect onto the clip you want it to apply to.
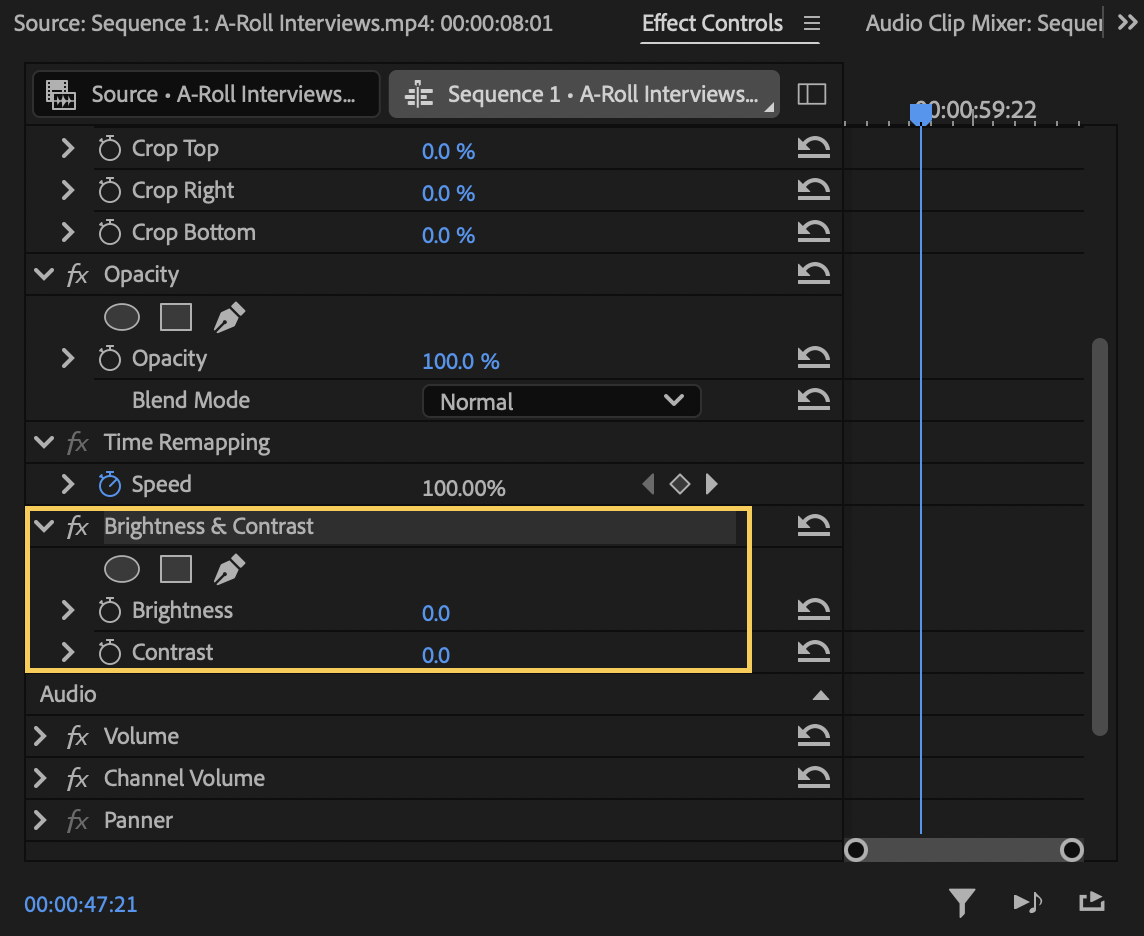
4. Open the Effect Controls Panel next to the Source Monitor. If you can’t locate it, go to Windows > Effect Controls
5. Select the clip you want to edit in the Timeline and make sure that the Blue Marker is over that clip so you can preview the changes in real time.
6. From the Effect Controls panel, locate the Brightness and Contrast effect and change the settings as you see fit!
Applying Effects to Sequences
If you’d like to add the same effect to all the clips within a sequence, it might just be worth applying the effect to the entire sequence! To do this once you are done editing together your project, you will have to create a New Sequence, and drag and drop the original Sequence to the Timeline of this New Sequence.
Adjusting Premiere Preferences
Preferences allow you to change specific settings in Premiere. Usually, the default settings will be sufficient, but it is good to know what they are.
To access Prefrerences:
Windows Users: Edit > Preferences
Mac Users: Premiere Pro > Settings > General
Project Versions
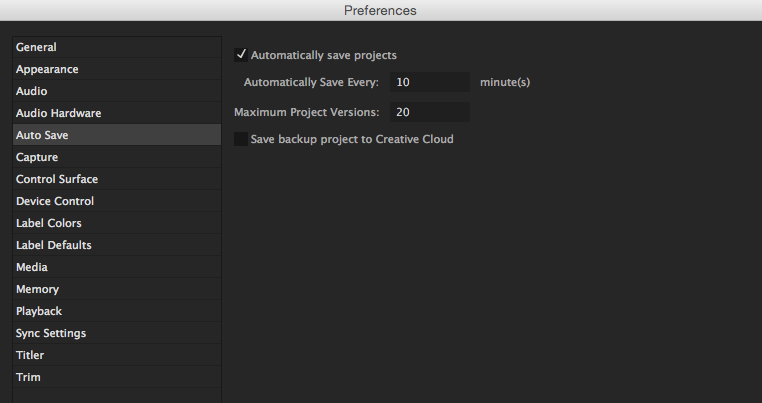
Premiere saves your recent project versions automatically. The default number it will save is twenty, if you want less or more, you will have to modify it in this panel.
- Select the Premiere menu.
Premiere Pro > Preferences > General…
A Preferences window will appear with the general settings. - Select Auto Save in the left side of the Preferences Window. You can set the automatic save to whatever duration you would like. This can be very helpful if you are someone who forgets to save often.
- The default setting is every 15 minutes. You can change this setting a different amount of time, just make sure Automatically Save Projects is checked.
- Click OK to close the Preferences Window and save your changes.
Creating More Sequences
Creating additional Sequences for a project can be helpful for larger projects that need more organization. For example, if you are creating a documentary, it might be helpful to create a Sequence for each day’s footage and bring in those sequences to organize your final draft rather than have one file with hundreds of clips that may make organizing a bit more complex.
- Navigate to File > New > Sequence. A box should appear.
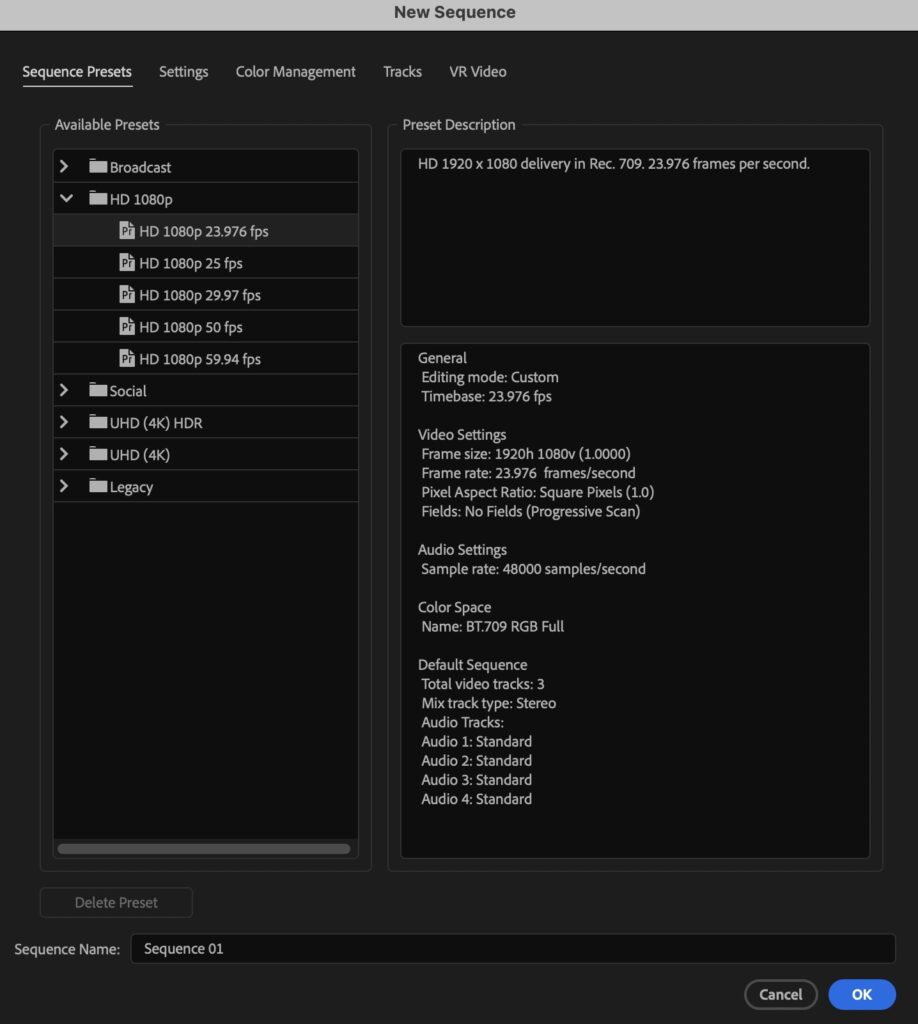
2. Choose the Sequence settings according to your project’s specifications. You can choose from the Sequence Presents or go into the Settings option to be more specific. If your project doesn’t request specific sequence settings, typically HD 1920 x 1080 23.976 fps (frames per second) is a common high quality option that projects well onto most screens.
3. Name your new sequence something that makes sense to you and your project. If you know you have specific settings for your video, you can select them here. However, Premiere Pro is smart enough to automatically tailor its Sequence settings to the settings of your video clips and photos.

4. Accept the choices and click OK.
Making Notes on the Timeline
We can create notes within our project’s Timeline called markers. In Premiere we can create these markers at a set timecode. This is helpful for organization and for when you are cutting together footage. This can be a marker for the sequence or a specific clip. To make it a clip marker remember to select the clip before pressing “m”.
- Navigate to a point in the clip you would like to create a comment marker.
- Select the clip.
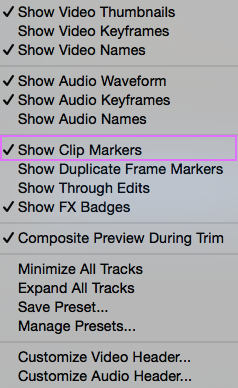
- Click the Source Monitor Setttings icon (looks like a wrench) in the upper left hand toolbar and make sure that Show Clip Markers is checked.

4. Press M on your keyboard.
5. In the dialog box called Comments you can add notes to yourself about this part of the project. Notice how the time of the marker is noted.
More Editing Tools
Insert Edits
Adding clips into the middle of Timeline video sequence can get tedious if you can only click and drag the clips to move them, so data isn’t lost. This is another way to move material from the Source Monitor to the Timeline. This type of insertion is non-destructive; it will just move all the clips over from where the clip is inserted.
- Choose a clip to bring into Source Monitor.
- Mark an inpoint and outpoint.
- Make sure the Blue Marker is at the point in the sequence where you want to insert the clip.
- Click the Insert Clip button in the Source Panel.

Ripple Edits
Let’s say that you have two clips with a big gap between them where there is no action, about 5 seconds or so. You could shorten the clips and then move all the footage over, or you could perform a ripple edit. This editing tool moves an edit point, causing the rest of the timeline to move the same amount to compensate. That way there are no gaps, and all your footage is moved over with the edit.

- Navigate in your Timeline to a smaller clip that you know has more footage than is being shown in the Timeline.
- Click the Ripple Edit tool in the toolbar, the icon third down.
- Hover over the end of a clip and notice how the arrow is now yellow instead of red.
- Move a clip’s endpoint out so it is longer; notice how the timeline adjusts to the edit.
Rolling Edits
A roll edit can be used to lengthen one clip and shorten another so that they don’t add or take away length to a video project, or to be about the same or exactly the same amount of time.
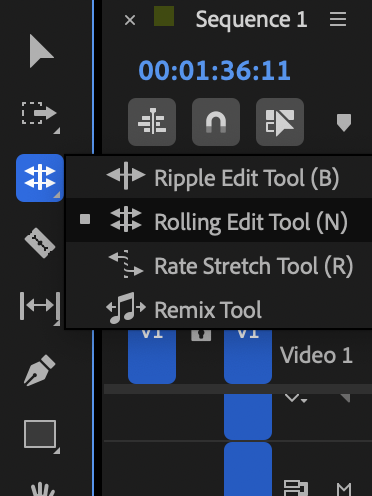
- From the Timeline, choose two clips that are right next to each other to apply the Rolling Edit to
- Click onto the Rolling Edit tool (you will have to hold down the Ripple Edit Tool to reveal it)
- Make the second clip long and the first clip shorter by pulling left with the roll edit, or pull right to do the opposite.
Using the Slip Tool
Sometimes during video editing, the timing is right, but the in and outpoints of a clip are wrong. In this situation the slip tool is the best edit to use. This keeps the exact timing that you have in the Timeline, but plays with the in and outpoints of the video.

- Select the clip you want to change the in and out points of
- Click onto the Slip Tool in the toolbar, the 5th icon down from the top
- Click on the part you have selected and move the tool right and left. See the in and outpoints changing? Once you feel like you have a good clip, let go of the mouse.
Free Media Resources
- Free video footage to practice editing: https://cinestudy.org/tag/free-raw-footage/
- Royalty Free Music: