DS120: In-Class Help Session
Photoshop vs. Illustrator
Layout Design for Posters
Every poster should consider following basic layout design principals to ensure a much more visually pleasing project. Review the resources below to help you best prepare for your DS120 Project 2 >> Part II (Sketching and Summary Board Development). These resources will be especially helpful for Step 4: Develop a Layout: Using Adobe Illustrator or Photoshop continue to develop the board layout (11” x 17”)
Informational Videos:
Important: Even though the video above demonstrates the golden rules using Adobe Illustrator, the same layout principals apply in Photoshops
Tutorials (Using Photoshop):
Practice!
- Explore case studies and media samples on websites such as Pinterest , Behance, Dribbble , Designspiration, and Archive of Graphic Design Posters (AGI Open). Then, select the layout, color scheme, and font type you want to replicate. Be sure to prepare all images and text content in advance before starting your project.
- Use the rulers, Grid Lines, and Rectangle Tool to find the hypothetical grids of your work to order the information
Typography and Simple Text Effects
Want to know which fonts work best for different types of content? Curious about why typography matters in design? Check out the resources below to explore font choices, readability, and the role of typography in creating impactful visuals.
Informational Videos:
Font Resources
Choosing the right font can transform your design, whether it’s for titles, bold text, or clean body copy. Below you’ll find curated links to both free and commercial fonts, along with trusted websites to explore and download high-quality typefaces.
Free Front Websites
- Google Fonts →https://fonts.google.com/
- DaFont –> https://dafont.com/
- Velvetyne → http://velvetyne.fr/
- Fontshare → https://www.fontshare.com/
- TypeType → https://typetype.org/freefonts/
- Open Foundry → https://open-foundry.com/fonts
- Use & Modify → https://usemodify.com/
- Behance (some are free) → https://www.behance.net/search/projects?search=free+font
Free Fonts Suitable for Titles and Bold Text :
- Ronzino → https://www.collletttivo.it/typefaces/ronzino
- SK Modernist → https://seankanedesign.gumroad.com/l/sk-modernist
- Geist → https://fonts.google.com/specimen/Geist
- Ortica → https://www.collletttivo.it/typefaces/ortica
- Project Blackbird → https://pixelsurplus.com/products/project-blackbird-free-font
- Akony → https://unblast.com/akony-display-font/
- Gyst → https://fonts.adobe.com/fonts/gyst-variable
Paid Commercial Fonts
- Syne → https://fonts.google.com/specimen/Syne
- DM Sans → https://fonts.google.com/specimen/DM+Sans
- Cormorant → https://fonts.google.com/specimen/Cormorant
- Sora → https://fonts.google.com/specimen/Sora
- Vollkorn → https://fonts.google.com/specimen/Vollkorn
- Rubik → https://fonts.google.com/specimen/Rubik
- Archivo → https://fonts.google.com/specimen/Archivo
Simple Text Effect Tutorials
- How to Auto align text into square in Photoshop : https://www.youtube.com/watch?v=zwBMe9Lxeoc&list=LL&index=1
- How to Create customized text box in Photoshop : https://www.youtube.com/watch?v=NL0Z-AQconQ
- How to add a gradient to text boxes in Photoshop : https://www.youtube.com/watch?v=YcNpqs_jvwQ
- How to make a glowing text effect in Photoshop : https://www.youtube.com/watch?v=t1vkTgEI2FY
Poster Backgrounds
Backgrounds play a key role in setting the mood and visual style of your poster. A well-designed background can enhance readability, highlight important elements, and make your overall design more engaging.
Informational Videos
Tutorials (using Photoshop)
- Abstract gradient background : https://www.youtube.com/shorts/V28KzThMyjc
- Gritty texture background in Photoshop: https://www.youtube.com/watch?v=08zKmKnhoBg
- Blurry Abstract Background in Photoshop : https://www.youtube.com/watch?v=J5atks1P9-k
Generative AI for Text
There are two recommended ways to generate fonts for different purposes in your DS-120 projects using Adobe Creative Cloud:
- Adobe Express → Free AI Text Effect Generator
If you want to quickly customize your font with texture overlays, Adobe Express allows you to easily swap the text to create new styles with textured effects. - Adobe Firefly
Want more complex or custom textured fonts?
Use your own fonts or stylize existing ones with creative patterns and material layers.
Generative AI for Images
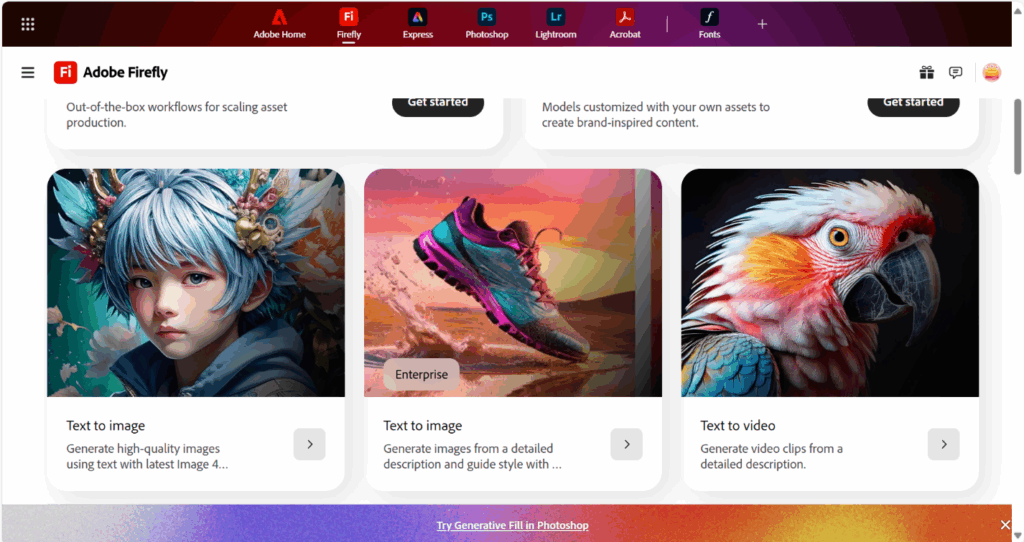
Image generation tools like Adobe Firefly open up endless creative possibilities for your projects. By combining clear, detailed prompts with the right settings, you can produce high-quality, tailored visuals that perfectly match your design goals.
Explore the guide below to learn how to craft effective prompts, adjust key settings, and use Generative Fill to refine your images. Follow the steps and examples to create unique, professional visuals for your own projects.
Prompts and General Settings
Two important components are the prompt and general settings.
Prompt: Write a clear and detailed description specifying the desired properties of the image. Consider including these elements in your prompt for optimal results:
- Environment
- Object Size
- Position
- Lighting
- Color
- Texture
- Other distinguishing details
Tip: For best outcomes, describe your desired result in great detail. To fine-tune visual aesthetics, use the Visual Intensity slider.
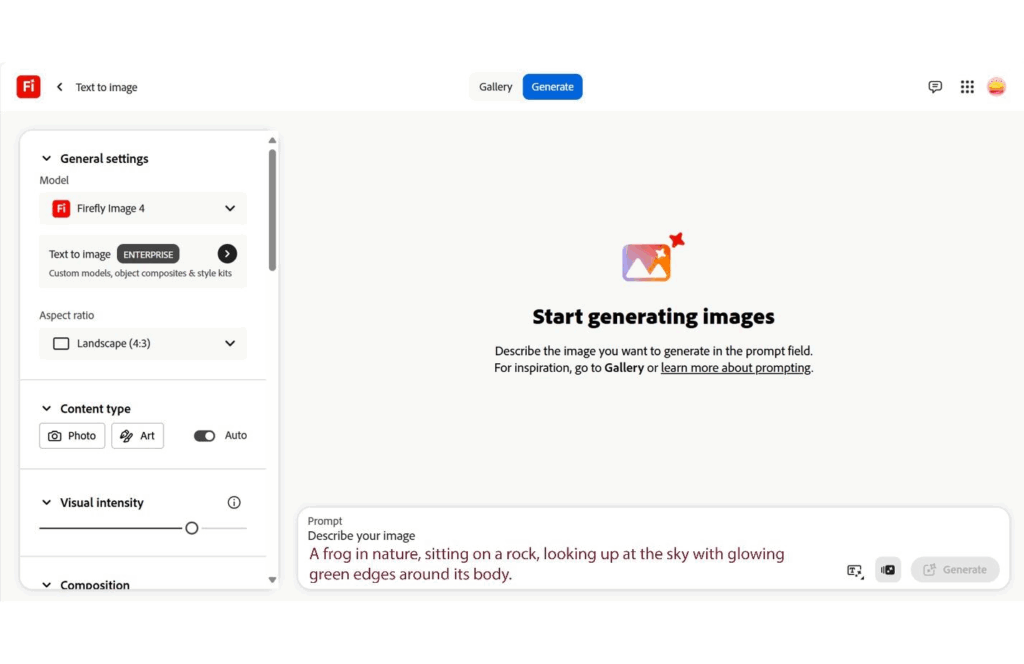
General Settings:
- Model:
- Firefly Image 4: Best for generating high-quality images.
- Firefly Image 3: Ideal for creating creative fonts or text effects.
- Content Type:
- Photo: For more realistic results.
- Art: For more animated or artistic style output.
- Composition: Refers to the structure and the main character of the image.
(In the example, the frog is the key subject of the composition.) - Style: Defines the visual effects and rendering style or mood of the image.
(Using both composition and style references can significantly improve the specificity and quality of results.)
Generating the Images Tutorials
After considering the prompt and general settings above, you are ready to generate your image!
- Click on the Generate button
- If the generated image isn’t exactly what you want, you can:
- Generate similar images from four variations offered each time
- Select one of them
- Click on “Edit” menu from the top-left corner
- Select Generative Fill to modify the image further
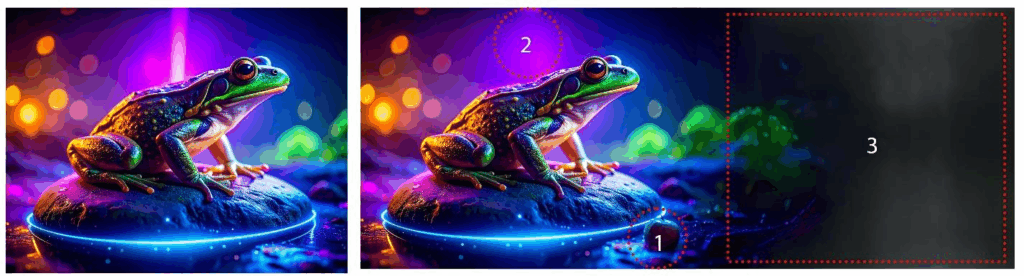
Generative Fill tool allows you to:
- Insert new elements
- Remove existing elements
- Expand the canvas
In the tutorial example using a frog image in Adobe Firefly:
- Inserted: One green apple.
- Removed: Purple lighting behind the main subject.
- Expanded: The image canvas to better fit the layout or reveal more details.